How To Craft The Perfect Professional Biography

How To Craft The Perfect Professional Biography

As a real estate agent, you do a lot of marketing. You market your listings, you market your business, and most importantly, you market yourself.

One of the best ways to do that is by creating a bio that represents who you are and how you want potential customers to see you.

But if you don’t consider yourself a great writer — or if you simply don’t know what to say — you can get a serious case of writer’s block when it comes time to actually write one.

In this training article, I want to talk to you about the different types of bios, walk you through a simple writing process to get your creative juices flowing, and provide you with easy-to-edit templates you can use for your own business.

But first, let’s talk about why bios are so important in real estate.

Why do I need a bio?

Your bio is one of the first things potential clients see online when they’re searching for an agent, alongside your client reviews and listing stats. Make a great first impression, and you could easily land listing appointments. Fail to impress, and people will keep on scrolling.

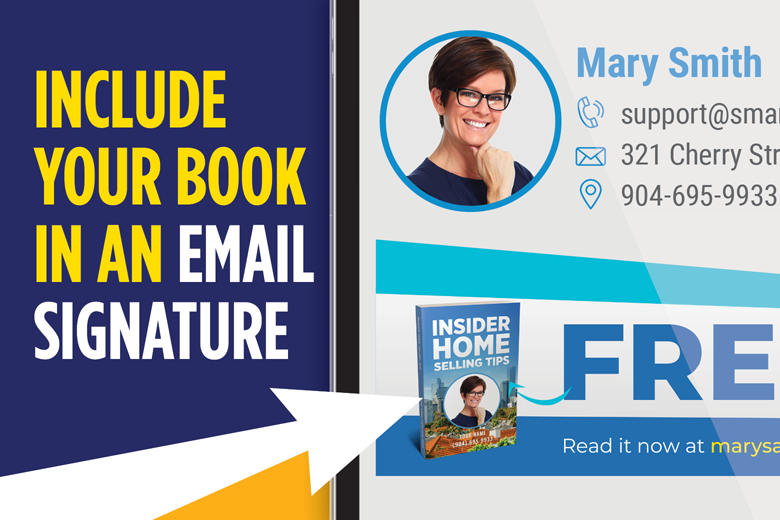
Your bio can appear in a number of places, both online and in print:

  • On your website
  • On your broker’s website
  • On Zillow and other home search websites
  • On your social media accounts
  • On promotional materials you send out to potential clients
  • Inside your book

As important as your bio is, you have to make sure you’re saying what you want to say, exactly how you want to say it.

What do you want to say?

There are different types of bios that work for different platforms and different types of businesses.

In fact, you may need different bios to appeal to different audiences.

Establish how you want to be seen, and you’ll be able to decide what type of bio works best for your business or will reach each type of client you’re trying to reach.

Standard/Professional Bio

This is probably the most frequently used type of bio. It discusses your career accomplishments, talks about your strengths, and gives readers a little taste of your life outside the office, without getting into too much detail.

This is probably the type of bio you’ll want to to appear on your broker’s website and maybe on sites like Zillow and Realtor.com. It’s straight to the point and builds a strong impression of what you can do as an agent.

You can use this template to write a simple, professional bio. Simply fill in your information anywhere that’s highlighted in yellow, and expand on it anyway you’d like. You can find this template and the others in this article inside the Book Builder App and customize them to include in your book.

List of Accomplishments

This type of bio is pretty similar to the standard/professional bio, but it puts your accomplishments at the forefront.

Showing off your accomplishments in a bulleted list, rather than discussing them in detail, is ideal for social media platforms and third-party real estate websites, where people quickly browse and don’t want to read long paragraphs. 

Use this template, and fill in your own accomplishments. If you’re new to real estate and haven’t built up a solid list of credentials, you can use this kind of bio to list your strengths and talk about what you can do for your clients.

Informal Bio

Straying from the last two formats, this bio is meant to show off your personality and give potential clients an idea of the type of person you are. You want to show them that working with you will be a stress-free experience and that you’ll be able to relate to them on a human level. 

These bios can be a little bit more challenging to write because you have more creative license to go in any direction you want. We’ve provided a template to give you just one example of how to write an informal bio. 

Talk about your childhood goals and aspirations — and how you still apply those same ideals in your business — or share a little bit about your hobbies or family life that tie into your career. 

You still want to include information about your professional qualifications and accomplishments, but you don’t want to shove them down the reader’s throat. There should be a natural transition between the less formal and more formal parts of this bio. 

This type of bio, as well as the next bio on this list, are perfect for your personal website, social media platforms and to include inside your book. 

Storytelling Bio

Like the informal bio, the point of this bio is to help potential clients relate to you on a personal level. But in order to do that, you start out with a personal or professional story that does one or all of the following:
  • Shows off your personality
  • Shows off your abilities and skills
  • Shows how you deal with/solve problems
  • Leaves an impression about the type of person you are

We’ve included a template for this bio, too, but you’ll need to really personalize it to make it work for you.

How do I get started?

If you don’t want to use one of these templates and would prefer to “start from scratch,” I’m here to help you get past your writer’s block. 

Sometimes, the best way to start writing is to interview yourself. 

That might sound silly, but answering questions is a great way to form the basis of your bio. 

Here are some questions to answer (feel free to come up with more of your own):

  • How long have you been in business?
  • What is your market area?
  • Why did you get into real estate?
  • What area of the market is your focus?
  • Do you specialize in a specific niche?
  • What are your major real estate accomplishments?
  • Do you have any success stories to share? Maybe a lesson you learned along the way?
  • What are some problems that you’ve helped clients overcome?
  • What do you hope to achieve for your clients in the future?
  • What do you enjoy doing outside of the office?
  • Do you have any family members or pets you’d like to talk about?

Enhancing Your Book

Including a bio inside your book is just one more way to really make it yours. Yes, your name and face appear on the front, but including more information about yourself and your career can help readers gain a more solid connection with you as an agent.

A Few Loose Ends

Including a bio inside your book is just one more way to really make it yours. Yes, your name and face appear on the front, but including more information about yourself and your career can help readers gain a more solid connection with you as an agent.

1. Once you finish writing, walk away for a day or two.

It’s easy to gloss over mistakes or get stuck in a rut when you’ve been staring at the same words for hours on end. Sometimes, the best thing to do is to take a break to refresh your mind

  • How long have you been in business?
  • What is your market area?
  • Why did you get into real estate?
  • What area of the market is your focus?
  • Do you specialize in a specific niche?
  • What are your major real estate accomplishments?
  • Do you have any success stories to share? Maybe a lesson you learned along the way?
  • What are some problems that you’ve helped clients overcome?
  • What do you hope to achieve for your clients in the future?
  • What do you enjoy doing outside of the office?
  • Do you have any family members or pets you’d like to talk about?

When you come back to your work, you’ll be able to look at it with a fresh set of eyes and make changes to improve what you wrote before.

2. Cross your t’s and dot your i’s.

Every bio should make you look your best. That’s a given. But does yours accomplish that?

Susan Greene, a professional copywriter, gives tips on how to evaluate your work. 

Consider these questions. Does your bio…

  • Use facts, not hype?
  • Seek to inspire trust?
  • Tell visitors what they want to know?
  • Offer specifics, rather than bold claims?
  • Give readers a peek behind the curtains?
  • Forge a connection?
  • Express your values?
  • List credentials, certifications and awards?
  • Hold the interest of the reader?

If you’ve answered yes to all of these questions, chances are, your bio is just about ready to go. If not, you may need to go back and expand on certain areas or change sections that may not be giving off the impression you’d hoped.

3. Have it proofread.

A sloppy bio, with grammar and spelling mistakes, reflects poorly upon you and your business. If you know a teacher, writer, or editor, ask him or her to read through your bio and flag any issues. 

If you don’t have access to a friend or family member with proofreading skills, you can easily find a freelance proofreader on websites like Upwork and Fiverr. Simply post your project description, and wait for freelance editors to respond. 

You can set your desired price and describe the scope of the project, then hire a freelancer based on the ratings and profiles of the editors who respond.

4. Test it out.

If you have a solid group of former clients you still keep in touch with, ask them to review your work and give any feedback. 

The biggest question they should answer is this: If they saw your bio online, would they want to hire you?

Try to find people who are willing to be honest and not just tell you what you want to hear. 

If you have trouble finding clients to review your work, you can offer incentives like a gift card giveaway or tickets to a local sporting event.

Want our team to write a bio for you?

Let one of our writers craft a custom bio for you. We’ll put you in touch with a writer who will ask targeted questions to find out who you are and what makes you different. Your writer will put together a bio draft for review. You’ll then be able to review what was written and make any edits. Finally, add your bio to your book in the Book Builder App, or we’ll do it for you.

Other Marketing

Let's go in-depth to make sure you are building processes that will continue to bring in listings.

How To Get Online Reviews And Position Yourself As The Trusted Expert

Read More

How To Get Your Book On Community Library Shelves

How To Get Your Book On Community Library Shelves

I know what you’re thinking. “How am I supposed to get my book on library shelves?” But what if I told you it was as simple as opening the door and setting your book on a shelf?

Well, it is that simple, but we aren’t talking about your local municipal library.

We’re talking about the “Little Free Libraries” popping up all over the country. These are fantastic places to leave your personally branded real estate book. 

Think about it. Who are the people using these little libraries?

Yes, everyday residents of the actual community in which you are working.

These libraries come in all shapes and sizes, and just in our local community of Atlantic Beach, FL, we were able to locate nearly a dozen.

That is a dozen opportunities to passively get your book into the hands of hot leads.

How To Find “Little Free Libraries” In Your Community

By nature, these little libraries can be difficult to find. Not only are they small and hidden, but in most cases, they are only advertised by word-of-mouth.

In some cases, the “Little Free Libraries” are registered and can be found using the interactive map on https://littlefreelibrary.org/.

To locate the interactive map tool, you will first need to navigate to the Map drop down menu. 

Next, click the Little Free Library Map option.

You can also locate the map page by going to https://littlefreelibrary.org/ourmap/.

Once on the map page, scroll down, and you will see several options for searching the map. 

The most useful for your purposes would be Zip Code and City. 

You can also use Near Me, but you’ll need to make sure you have given your web browser permission to access your location.

For our demonstration, we will be using the Zip Code option.

Simply type in the zip code of your choice and click Search.

The map below will be populated with all of the registered Little Free Libraries.

Once the map has been populated, you can click on the individual markers and see the exact address of the Little Library.

In some cases, pictures are also attached.

What about the Little Libraries that haven’t been registered?

Like we said earlier, in our home community of Atlantic Beach, we were able to locate about a dozen Little Libraries. That means the majority of them were not registered. So how did we locate them? By simply noting their locations as we traveled in our daily lives.

We all have smartphones with GPS capabilities these days, and Google Maps has a great feature that allows you to create shareable lists of locations. As you travel around your community, write down the addresses of any Little Library you come across.

To get started, you need to open the Google Maps App on your phone.

On the bottom of your screen, you will see the Saved button. Click that.

From there, you will be taken to your saved locations screen.

In the top right corner, you will see the option to Add A New List.

From the New List Setup Page, enter the name you would like to give your new list. There is an option to describe the list, but that can be left blank.

Next, select the List Type. You can certainly keep it private, but if you have an assistant or team member, you can select Shared. This will allow anyone you give permission to view and edit the list. 

From there, click the Save button in the top right of the screen.

Now that you have your list created, it is time to start adding new locations to it. This is something you can do either the moment you locate a Little Library or after the fact.

From the main map view, drop a pin on the location you would like to save. To drop the pin, simply press and hold on the location you would like to mark. 

Once you have placed your pin on the map, click the Save button at the bottom of the screen.

Select your Little Libraries list, and save the location.

We highly recommend Adding a Note to your location, especially if you will be sharing this list with someone else.

Like we said earlier, these Little Libraries are sometimes hard to see from the road, and providing extra details can  help you relocate them in the future.

To add a note, click in the designated space below your list. You’ll then be taken to a window where you can enter the information. 

Once you finish, click the Done button in the top right corner.

From this point, you can add as many locations to this list as you would like.


Now that you have added locations to your list, you can easily view them in your Saved tab.

To share the list, you can click the Share button and send it to anyone you would like.

This is a great thing to share with an assistant so they can add new locations and even set out your books for you.

Leaving Your Book In The Little Library

When you drop off your book in the library, make sure it is placed in a way that can be easily spotted. 

The idea behind leaving your book in a location like this is for it to be “stumbled-upon.”

Again, this is a passive method for getting your book in the hands of hot leads.

The idea behind “Little Free Libraries” is that community members are recommending books they have read to their neighbors.

So with that in mind, make your book look as though it has been in the hands of a previous client. 

Highlight or underline sections where you’d like to draw special attention.

While your book will include your contact information, adding a business card inside the cover is a nice touch.

Like any other form of passive marketing, you may not get tons of calls and listings from putting your books in these libraries. It is simply a way to take advantage of an opportunity. As time goes on, periodically stop by the locations where you have dropped off a copy of your book to see if you need to add a new one.

Other Marketing

Let's go in-depth to make sure you are building processes that will continue to bring in listings.

Rank At The Top Of Google With A Business Profile

Read More

Boosting Your Social Media Book Promotion To A Wider Audience

Boosting Your Social Media Book Promotion To A Wider Audience

When it comes to social media, high engagement is what you are looking for. In this quick video we walk you through the steps for boosting your post promoting your listing-getting book to a wider audience on both Facebook and Instagram.

“Boosting” a Facebook or Instagram post is much like running an ad but without having to create a whole new campaign. You can simply take a post you have already created and distribute it to a larger, more targeted audience. Authorify member Robert spent just $30 to boost a post promoting his buyer book and received three extremely hot leads.

Boosting Your Post On Facebook

From your Facebook page, find the post you would like to distribute to a wider audience.

Below the post you will see a blue Boost Post button, click that.

You will be brought to the page to begin filling in the parameters for your boost.

At the top of the page you will see Goal. This is where you can pick the desired outcome of your boost.

By default, it is set to automatic but by clicking on the Change button you can select from several options. 

Since the idea of this book promo post is to get people to request copies of your book, select either Get More Website Visitors or Get More Engagement.

Next, we can add a CTA button on our post.

Click on the drop down menu and select Learn More. You will then be able to enter the website URL that you would like people to be taken to when they click on your post.

With the intended goal of people requesting copies of your book, your lead capture website is a great option for this CTA.

Very Important Step

Next you will see the Special Ad Category Option.

It is very important for you to turn this on and select Housing.

Failure to do so can result in your ad not running or your ability to run Facebook ads to be suspended.

Now it is time to select the audience for your post to be distributed to.

Click the pencil icon to the right of Audience Details.

You will then be taken to a window where you can set up the audience parameters. You will see that some options are not available due to running a Special Category Ad. But no worries, we are only concerned with the location.

To target a specific location, enter in the zip code or city name into the location box.

Using the slider below the map, you can determine how wide of a radius you would like to target. The minimum is 15 miles.

Once you are happy with your audience click the Save Audience button.

Next you will select the duration and budget for your boost. The minimum amount you can spend is $1 per day.

Now it is time to choose your boost Placement

Since Facebook owns Instagram, if your accounts are connected you can choose to have your boosted post appear on both platforms.

Now that you have set your boost details simply enter in your payment details and click the Boost Post Now button.

Boosting A Post Directly From Instagram

Want to boost an Instagram post right from your phone?

Simply find the post you would like to boost and click the blue Promote Button. 

You will then follow the same series of steps from above.

Other Marketing

Let's go in-depth to make sure you are building processes that will continue to bring in listings.

How To Generate Listings With Flyers

How To Generate Listings With Flyers

Flyers are a cornerstone of marketing, and chances are, you've used them before as a real estate agent. Whether you are publishing a flyer that says you’ve just listed a home or a flyer that says you just sold a home (Congrats!), these simple advertisements can help neighbors and members of your sphere and local market keep up with your achievements as an agent.

So what key elements should you include on a flyer to get the attention of interested buyers and sellers? There are a few things to keep in mind.

For a flyer about a recent listing, you might want to include the following de

  • High-quality photography that shows key features of the home, as well as its curb appeal
  • Statistics of the home, including the number of beds and baths, square footage and other points of interest such as a two-car garage or in-ground pool
  • The current listing price.
  • Amenities for the community, if applicable

Meanwhile, a flyer about a recent sale might include the following details:

  • Number of days the home spent on the market
  • Price the home sold for
  • A photo of the new buyers, looking happy and satisfied in front of their new home

In both versions — the listing flyer and the recent sale flyer — make sure to include all of your contact information, including information about your Authorify book.

We suggest using the backside of your flyer to promote both your buyer and seller books. Make sure to include a brief description of what prospects will be able to find in your book and where to request a copy.

Simple — you can be more conservative with the number of printed books you give out. If you are hesitant to go through your book reserves in one mailing, an eye-catching flyer can tell people about your book and entice them to contact you instead. That way, your printed book only goes to the most qualified leads and your digital book gets in front of more people.

Create Your Flyer:

You can find more than two dozen, fully customizable listing flyer templates using the Canva.com software by clicking here!

Be sure to review the tutorial video and check out all of the available options.

To Summarize:

  • Remember to include information about your Authorify book on all of your marketing flyers, whether you’ve just listed a home or just sold a home.
  • In addition to book information, flyers should include relevant and appealing photos and details about your recently listed or sold home.
  • A short summary of the book and invitation to reach out to you for a FREE print copy will entice anyone who sees the flyer to get in touch.

Take Action:

The key is to remember that any printed marketing material can only be enhanced with information about your book. Your Authorify books are a valuable resource of information to anyone who might be looking to buy or sell and is seeking the advice of someone knowledgeable — you!

Other Marketing

Let's go in-depth to make sure you are building processes that will continue to bring in listings.

How To Send Emails Directly From The Digital Marketing Platform

Read More

How To View Landing Page And Digital Book Analytics

Read More

How To Get The Perfect Headshot For Your Marketing Materials

How To Get The Perfect Headshot For Your Marketing Materials

The saying is, “You only get seven seconds to make a great first impression.” In this day and age, many times, that first impression is made without ever meeting in person.

Whether you are running Facebook ads or mailing your book, you need to use the best possible image of yourself to get the positive attention you’re seeking. A great way to do that is by having a professional headshot taken.

If you currently spend an extra two or three hundred dollars marketing your listings with professional photography, why would you not do the same to market yourself?

In the modules below, we will give you tips for not only finding the right photographer but also ensuring you are happy with your appearance in the photographs.

To help us out, we spoke with Jacksonville photographer Deanne Dunlop, and here is her take on why it is so important to have a professional headshot:

“It's attention to detail.” she says. “Your headshot is one of those pieces that says a lot about your attention to detail.”

When asked how often you should update your photo, Deanne said, “I would say every year, but I say that because I really feel that people's looks change every year. So I think it's nice for your headshot to be just a good reflection of you. And so one year, two, maybe at the max three.”

Module 1: Find The Right Photographer

If you’ve never had a professional headshot taken, it can be a little overwhelming choosing the right photographer. Luckily, no matter where you are located, you’ll find several to choose from.

To begin your search, you can do a simple Google search. 

Enter in your location and the term “headshots” or “headshot photography.”

At the top of the search results, you will see a map of your area and a list of businesses that match your search.

At the bottom of the list, click where it says “More Businesses” to see the full list of photography studios in your area.

Now that you have a list of area photographers, it’s time to decide who to use. Dunlop say’s the most important thing to look for is an online gallery. “I would say an online portfolio is going to be invaluable for you to be able to look and say, ‘Is the lighting professional? Does it look good? Is their website professional looking?’”

As you can see on Deanne’s online portfolio, she displays a wide variety of headshot examples.

The main thing to look for is quality lighting.

Once you find a few options, Deanne recommends you call the studio and ask the following questions:

  • Do I have access to the photos digitally?
  • Am I going to be able to reproduce them?
  • Do I have print rights?

While prices vary depending on your market, we found most headshot sessions cost between $150-$300, which is comparable to having your listings photographed.

In addition to searching Google, you can use sites like Thumbtack or Snappr Photography to find local photographers.

Don’t forget personal referrals. Ask around your brokerage for recommendations. “Personal referrals are a great place to go,” Deanne says, “as long as you can back that up with a gallery or something that you're looking at on a website.”

Module 2: Deciding What To Wear For Your Headshot

When it comes to first impressions, your choice in clothing can say a lot about you. For your professional headshot, what you’re wearing should not be the focal point. Over the course of her more than 20 years as a professional photographer, Dunlop has taken thousands of headshots.

“What you really want is for the focus to be on the person. The eyes, the smile and then the clothes.”

“You definitely don't want to put something on that everybody's eyes keep going down to the shirt and they're like, ‘Wow, that was quite a choice.’”

So how do you make sure you are making the right choice? Dunlop says bring plenty of options to your photo session.

“Don't worry about looking like you're over the top. It doesn't matter. When you leave, you get a good headshot. That was the purpose.”

In this module, we will discuss color and prints and whether you should wear a jacket or accessories.

Color:

“The thing that's really important about colors is that number one, it's a color you feel good in. That's an important element because when you feel good, obviously you look good and you smile.”

That was Dunlop’s number one piece of advice when it comes to choosing which color to wear in your headshot.

However, some colors work better than others.

It is a good idea to avoid pale shades. 

According to Deanne, these colors can be difficult to light, leading to hot/bright spots in your photo or a photo with an overall washed-out look.

There may be times when your headshot will need to be printed in black and white.

As you can see in our example here, when the photo is converted into black and white, there is very little contrast between the model’s skin tone and clothing.

Jewel tones are preferred over light colors because jewel tones are darker, without being too dark. They also add a nice pop of color without distracting away from your eyes and smile. When converted to black and white, they also allow for good contrast between your skin tone and clothing, keeping the focus on your eyes.

Now, what about specific colors? Again, it comes down to what you feel most comfortable in. However, there have been countless studies done on how certain colors are perceived, and here are some takeaways.

Black: can invoke the feeling of power or sophistication. A drawback of black formal wear is that it can be associated with mourning. It is best not to wear other dark colors with black because the combination gives little contrast and can look unprofessional.

White: is known as a color of purity, clarity, cleanliness and openness but can also represent simplicity and sterility. White should be worn with caution on fair-skinned people, as it provides little contrast. If you choose white, it’s best to layer it under a darker color.

Blue: represents trustworthiness, dependability and professionalism. Lighter blue represents friendliness and calm.

Brown: has several meanings including wholesomeness, reliability, stability, experience and comfort. If you’re wearing brown, be sure it doesn’t blend in too much with your skin tone and leave you with a no-contrast look.

Beige or Tan: represent piety and conservatism. They can also be perceived as dull. When worn as an outer layer, beige and tan will take on the meaning of the color they are worn with. Again, be careful with these colors as they can blend in too much with your skin tone, leaving little contrast.

Red: is viewed as exciting, powerful and passionate. Red is best worn in small amounts so as not to overpower the headshot. 

Orange: less overwhelming than red, but also viewed as vibrant and energetic. Orange is best worn in small amounts, similar to red.

Green: has a calming, balancing, and rejuvenating effect. Green also represents stability, growth and happiness and is considered inspiring.

Yellow: is seen as energizing and warm. It represents happiness and can be considered stimulating and expansive. Yellow can be a very difficult color to pull off though for certain skin tones.

Pink: viewed a softer, happy color.  Pink should be worn with caution so as not to blend in with skin tones and lose the details of the face.

Purple: represents nobility, creativity and imagination. Darker shades of purple can be associated with wealth and luxury.

Prints:

When it comes to prints, it is best to avoid anything that may be distracting. Big, bold prints are a great way to show off your personality, but they tend to not photograph well.

Remember, you do not want your clothing to be the first thing people see in your headshot. It is also best to steer clear of prints to not date your photo. If you plan on using this headshot for a few years, you want to make sure you aren’t wearing something that could fall out of trend.

Stripes can also be a tricky pattern when it comes to headshots.

The great thing about having a professional take your photo is their ability to touch up minor flaws with editing.

However, wrinkles in stripes can be extremely difficult to remove and will make your photo less professional looking.

Jackets:

To wear a jacket or not? While it may seem like the “professional” thing to do, the point of your headshot is to portray your unique brand. Do you wear a jacket to every listing appointment? If you answered yes, then it is a good idea to wear one in your headshot.

Darker color jackets are great for layering on top of lighter colors. So,if you are dead-set on wearing a lighter shade, take a jacket with you to wear for a few shots.

Accessories:

Like jackets, accessories such as glasses and jewelry should be worn if they are part of your everyday look. Again, the key is for accessories not to be a distraction.

If you wear glasses, you know how much they become a part of who you are. You definitely want to have them on in your photo if that is how potential clients will be meeting you in person.

Remember, you want to avoid distractions, so try sticking with a more subtle pair.

Glasses can be tricky to photograph due to light reflection, but your photographer will work to position you to avoid any glare.

Women’s accessories such as earrings and necklaces make for great pops of color. Here is what Dunlop had to say on the topic:

“I think accessories are a really good idea. If you can bring a couple of different kinds of earrings, you know, a lot of times a pop of color goes a long way, especially if your headshots are going to be pulled off of a background and perhaps laid on top of a different background.”

“If you don't wear a lot of jewelry, then you just need to tell the person photographing you, ‘I don't wear a lot of jewelry.’”

“It doesn't matter whether the photographer likes your choice in earrings. The important thing is that it looks like you and that you're comfortable with it.”

Module 3: Hair and Makeup Tips

Now that you’ve found your headshot photographer and chosen what to wear, it’s time to think about hair styling and makeup. While this may seem like a no brainer, you do have to think ahead when it comes to this part of your photoshoot.

Dunlop recommends giving yourself about three weeks for this project.

“Don’t just check a box and get your headshot done because you're in a hurry because you put it off and your boss needs it Tuesday. You want to make sure you think about all of those parts in advance.”

Hairstyling:

When it comes to hairstyling, it should go without saying, you want to stick with your signature look. Remember, the idea is that you will eventually be meeting in person many of the people who see your photo. You don’t want to try out a new hairstyle for your photograph just to change it a few weeks later.

Here are some more of Dunlop’s tips:

  • Don’t not get a fresh haircut the day before your photo, unless of course, you shave your head.
  • People are generally happiest with their hairstyle about 10 days after it is cut.
  • If you color your hair, pay attention to your roots.

On the day of your photoshoot, you may want to use hairspray, gel, and other products to tame frizz and make your hair look healthy. Be sure to avoid products that give a matte look. Matte finished hair will look dull and lifeless in pictures. Instead, use hair products that enhance shine.

Facial Hair:

If you regularly wear facial hair, you will want to be photographed with it. Make sure everything is trimmed up and looking clean. To add a little shine to your beard, apply some beard oil prior to your appointment.

If you like a more clean-shaven look, pay attention to your photography session time. If you have a late afternoon appointment, do yourself a favor and give yourself a fresh shave right before.

Makeup:

When it comes to business head shots, the idea is to “look like you on your best day.” Makeup styles vary widely, but there are tips to consider when getting ready for your professional headshot.

  • Go for a “Natural” not “Light” look.
  • You want to avoid uneven application.
  • Avoid uneven application by using enough product to ensure full coverage.
  • Apply more setting powder than you ordinarily would.
  • Lip color should be a notch darker than what you would normally apply.
  • Using a lip gloss can also make your lips appear fuller. Darker mascaras work best for headshots.
  • Don’t be afraid to use more powder than normal.

When all is said and done, the main thing to remember is to relax and have fun. By choosing to have a reputable professional photographer take your headshots, you can rest assured that you will have a quality photo in the end.

Other Marketing

Let's go in-depth to make sure you are building processes that will continue to bring in listings.

How To Get The Perfect Headshot For Your Marketing Materials

Read More

Generate More Sales With Your Email Signature

Read More