The Complete Guide To Building Your Authorify Book

Welcome to the Complete Guide to building your personally branded book!
In this course, you will learn everything you need to know to completely customize the cover and contents of your book. We will also walk you through the steps to generate your digital book and landing page links.
This course is broken down into 5 easy-to-follow modules covering every aspect of the Authorify Book Builder Application.
*Note*
Be sure to check out the bonus modules for additional customization features.
When customizing one of your personally branded books, we highly suggest starting with personalizing the cover. Once you complete the cover you can generate you digital book links to begin promoting it. At any point you can come back and customize the interior of a chosen book.
*NOTE *
As you make changes to your book, it’s important to save frequently.
After each edit you make, a green box will appear to alert you to the changes being automatically saved.
Additionally, you can save your work by clicking the Save button at the top right of the screen.
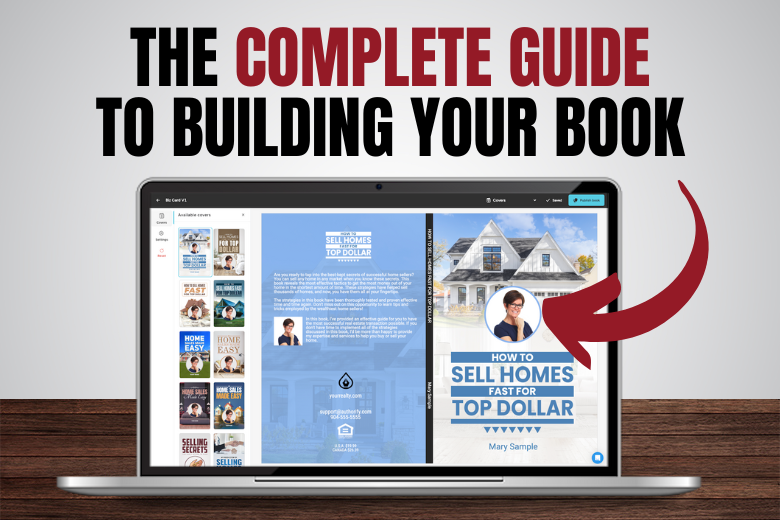
The Front Cover
The front cover is one of, if not the most important, part of your book. And while by this point you have already selected your cover design, there are two areas for you to customize: the Headshot Photo and Author Name.
Selecting Your Cover
Included with each book is a selection of cover templates. You can select a cover with a spot for your headshot or one without.
To select a new cover template, navigate to the left side of the screen and simply click on the image of your desired book cover.

Headshot
If you did not upload a headshot when you initially logged into your account, now is the time to do so. If at any point you take an updated photo or would just like to switch to a different photo, follow the instructions below.
To edit your photo, click on the headshot currently on the front cover of your book.
This will bring up a new Author Image dialog box from which you can add a new photo or select a previously uploaded one.

Author Name
The second section of the front cover you can edit at any time is the Author Name.
To make changes to the name displayed on your book, simply click on your name, and the Author Name dialog box will appear.

*Note*
One question we often get is “How do I add the REALTOR® Logo to my cover?”
Simply type out REALTOR
To add the trademark ® symbol:

The Back Cover
Book Description
Starting at the top of the back cover, the first customizable section is the Book Description.
These sections have been prewritten to reflect the content of the book, so you don’t need to do any editing. However, if you would like to add some personal touches, simply click on the section.
That will bring up the Book Description Back Cover editor. Once you are happy with your edits, click OK.

Short Author Bio
Next, you can edit the Short Author Bio. Again, we’ve provided a template for you to use without editing.
But in case you do want to edit it, click the text to open the Short Author Bio Back Cover editor.
Remember to watch your character/word count to make sure the text you add fits in the allotted space.

Back Cover Headshot
In addition to the headshot on the front cover, there is a placeholder for a photo on the back cover.
In order to update this photo, simply click on the placeholder and chose the desired file.
Note: Below you will find a Bonus Module about using QR Codes, this is a great location to add a QR Code to your book.

Logos
Next up, we have both your Broker Logo and Fair Housing logo. If you do not see these areas of customization on your book, navigate to the left of the screen and click on the setting icon. This will open the Preferences dialog box.
You will see options to activate/disable your Broker Info, Broker Logo and Fair Housing Logo.

Broker Logo
In order to add your own Broker Logo, click on the place holder and locate your logo file on your desktop.
For best results, use a Transparent PNG file.
Broker Address
The broker address is a piece of information you can enter during your initial account login.
To make changes to this bit of information, click on the address, and the Broker Address editor will appear.
In addition to your address, this is a great location to add a website.

Broker Contact
The email address and phone number on the back of your book are again populated using the information you provided upon first logging into your account.
If you need to make changes to that contact info, click the text and you will open the Broker Contact editor.

Additional Services
While each book comes with several cover options, you can further personalize your book with a custom cover.
Our team can work with you to create a one-of-a-kind cover that’s unique to your business.
To the right, you can see examples of custom covers our team created for member Jim Curry.
To find out more about this service, please reach out to our Support Team at support@authorify.com or 904-695-9933

*Final Thought*
From this point, your book is ready to start distributing digitally. To learn how to generate your Digital Book Link and Landing Page, go to Module 4.
Your book is 100% editable, and in this section, we will show you how to manage and edit the inside contents. We will show you how to Activate Sections, Edit Section Text and give you a brief overview of each section.
Getting Started
Once you’re in the book editor application, navigate to the drop-down menu at the top right of the page.
Once it is open, you will see several options.
Click Manage Sections.

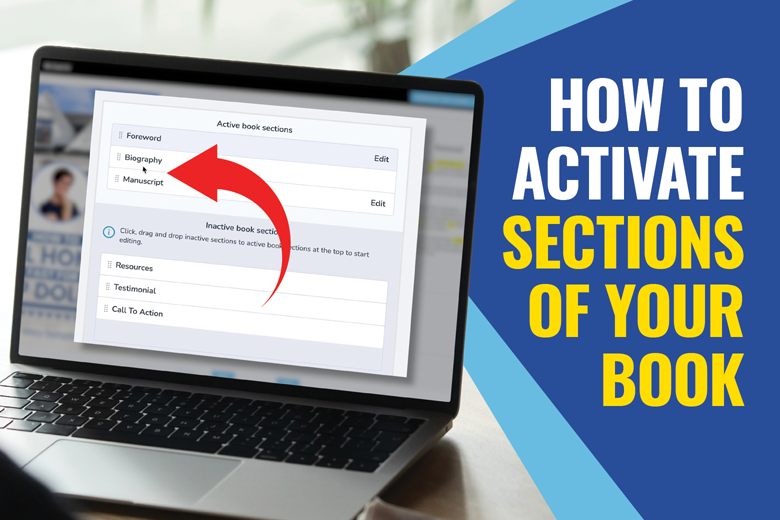
Activating Sections
To activate sections of your book, simply click and drag a section from the Inactive list to the Active list.
The order in which you place the sections in the Active List is the order they will appear in both your digital and printed book.
Feel free to arrange your sections in whatever order you choose. We typically suggest the following order: Forward, Biography, Testimonials, Manuscript, Resources and Call To Action.

Editing The Sections
To edit any section of your book, simply click on the Pencil Icon to the right of the section you would like to edit.
This will open the individual section editor.
Along the left-hand side of the window, there are several templates available for each section.

These templates serve as a great blueprint for you to follow when customizing your book.
To choose a template, simply click on it.
If you choose to use one of the provided templates, you will see sections highlighted in yellow that must be edited.
These sections are placeholders.
To make changes, edit the text as you would any word document.
In many of the sections you will also see a Blank Template.
Feel free to use this for such sections as the Forward or Biography and add your own text.
Remember to save your work often!
Before exiting a section, click the Save button or wait for the green dialog box to appear in the top right corner. This box lets you know that your work has been automatically saved.
Section Overview
Now that you know how to manage and edit the different sections of your book, let’s take a brief look at each one.
It is important to note that you can omit any section you don’t want to include (other than the manuscript).
Forward
The forward can be used as a brief introduction to your book or yourself as a trusted Realtor.
Having the forward come from someone other than yourself, such as your broker or a former client, can lend even more credibility.
There are several templates available that will fit many different needs. Be sure to check them all out.

Biography
Your biography should tell prospective clients exactly who you are.
Again, we have several templates available to be used as blueprints for you to write your own.

Testimonials
This may be one of the most important sections of your book. Potential clients will want to know you have a proven track record, and client testimonials are a great way to show that.
We have several templates available, from short case-studies to long-form client letters. Take a look at the examples and choose the style that best suits you.

Manuscript
The manuscript is the meat of your book.
Coming up in Module 3, we will dive into this section in more detail.

Resources
Do you have a list of painters, carpet cleaners or even lenders?
This is a great section to give both buyers and sellers alike the contact information for your most trusted partners.
Check out the provided templates to get ideas of the different services you can include in your resources section.

Call To Action
Last but certainly not least, the Call To Action provides the reader with incentive to contact you.
Check out our various templates, including Home Value Offers, Marketing Consultations, Photography Offers, and more.
Each template gives you space to include your contact information.

The manuscript is the meat and potatoes of your book. Our awesome team of writers have done their research and laid out these chapters into what we have found to be the most effective order.
Just like the rest of your book, the contents of your manuscript are 100% editable. With that said, we recommend doing minimal editing to get your books into the hands of potential clients quickly. You can always come back and make changes later. The books are written with a universal audience in mind, so to customize the content for your particular market, consider editing things like average home prices or specific case studies.
Editing The Manuscript
From the book preview page, click the Edit Book button above your book preview.
Doing so will open the book editor application.

Next, click on the drop-down menu in the top right corner of the window and choose Manage Sections.
You will now see all of the available sections of your book in the middle of the page.

To edit the manuscript, click the Pencil Icon inside of the Manuscript bar.
This will open a page displaying all of the chapters.
*Note*
You can remove chapters or reorder them from this page, however we do not recommend that in most cases.

To enter a specific chapter, click the Pencil Icon next to it.
The chapter contents will open on the next page.

All of the text, including the chapter titles, is editable
To edit, treat the page as you would any word document.

Remember to save often or allow the dialog box to appear stating your changes have been saved automatically.

To exit the book editor application, click the book name in the top left corner.
This will take you back to the book preview page.

Using the book preview page, flip through your book to review your changes.
As you can see, the changes we made to the title of Chapter 2 are now reflected in the table of contents.

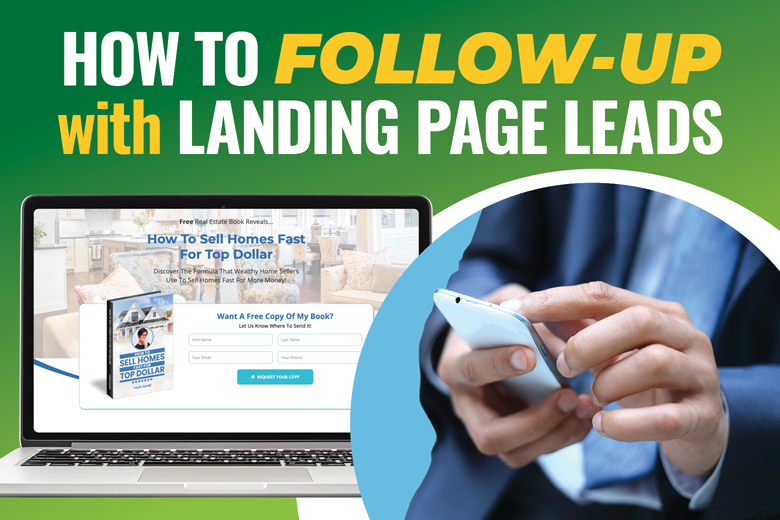
At this point, you are ready to generate your digital book and landing page links. Coming up in Module 4, we’ll show you how.
Along with every book in you Authorify library, you have access to the digital version.
View the video above or follow along with the steps below in order to generate and locate your Digital Book links.
*Note*
You must re-generate these digital links after making any edits to your book. This will allow the new edits to be present in your digital materials.
Step One:
From your Authorify Dashboard click on the book you would like to get the link for.

Step Two:
From the book preview page, if you have not already published your newly edited book, click the Publish Book button.

Step Three:
Once your digital links have been generated they will appear along the right side of the screen.

Step Four:
You will see both the landing and digital book links have been generated. You can simply copy the link from here or click the Preview button to see your digital book

Bonus:
From your digital book page, you can click the Share Icon.

From the share box, you can copy the link to your digital book as well as share links to individual pages.

Final Note:
Following any edit you make to your book, you must click the Publish Book button to ensure your edits are carried through to both your landing page and digital book.
Now that you have customized your book, you can order physical copies to start handing out to prospective clients. In the video above, we’ll walk you through the book ordering process.
Throughout our Member Training Site, you’ll find tips and advice for how best to distribute your books, including:
Also, be sure to check out the How To Build Your Instant Trust Package course to get everything you need to stand out from the competition.
Watch the video above to see the step-by-step instructions for adding your very own images to any portion of the book manuscript you desire.
Important Notes:
- Image must be a Minimum of 500x500 Pixels
- Max image dimensions: Width="3325" Height="2475", Max image file size: 2MB
- After upload, you can align and resize images as needed
- When uploading images to the book manuscript, please review your edits in the book preview screen before generating your digital book and ordering printed copies, to ensure you’re satisfied with how all images are displayed
- When ordering printed copies of the books, all images in the manuscript will be printed in Black & White
QR Codes are a great way to add additional information to your book and drive readers to webpages for more information.
There are several Free Online Tools to create QR Codes available. The one we use in the demonstration is: https://www.the-qrcode-generator.com/
Another great option is: https://qrcodecactus.com/
Watch our latest replay of our Live Member Coaching, focusing on editing the book.
Recorded June 1, 2025