How To Add A Broker Logo To Your Book

How To Add A Broker Logo To Your Book

Need to add a brokerage logo to your book? Follow along with the video above or the step-by-steps instructions below.

Note: For best result, be sure upload a Transparent PNG image file.

Step One:

After logging into your account, select the book you would like to personalize.

Step Two:

From the book preview page, click the Edit Book button above your book preview.

Step Three:

To enable the broker logo option, click the settings icon along the left side of the page. This will open a setting dialog box

Step Four:

Toggle on the Include My Brokerage Log option. A placeholder logo will appear on your back cover.

Step 5:

Click on the placeholder image. From the Upload tab, click Browse Files and find your brokerage logo file on your desktop.

Step Six: 

Your logo will now appear in the resizing tool. Position the image to your liking and click Save Changes. Your new logo will appear on the back cover of your book.

Step Seven:

Once you are happy with the appearance of your book, click the Publish Book book in the top right of the screen to publish your new updates.

Note:

In addition to the Upload tab inside the logo image dialogue box, you will find two additional tabs. The Photo Gallery hosts any logos you have previously uploaded and Logo Gallery hosts a select amount of commonly requested brokerage logos.

Other Membership

Let's go in-depth to make sure you are building processes that will continue to bring in listings.

How To Follow-Up With Your Landing Page Leads

Read More

How To Activate Book Sections

How To Activate Sections Of Your Book

Need to activate the biography or testimonial section of your book?

Follow these quick step-by-step instructions!

Step One:

From the book preview page, click the Edit Book button. This will open the Book Editor Application.

Step Two:

Navigate to the top right of the screen and click on the drop-down menu.

Step Three:

Select the Manage Sections option.

Step Four:

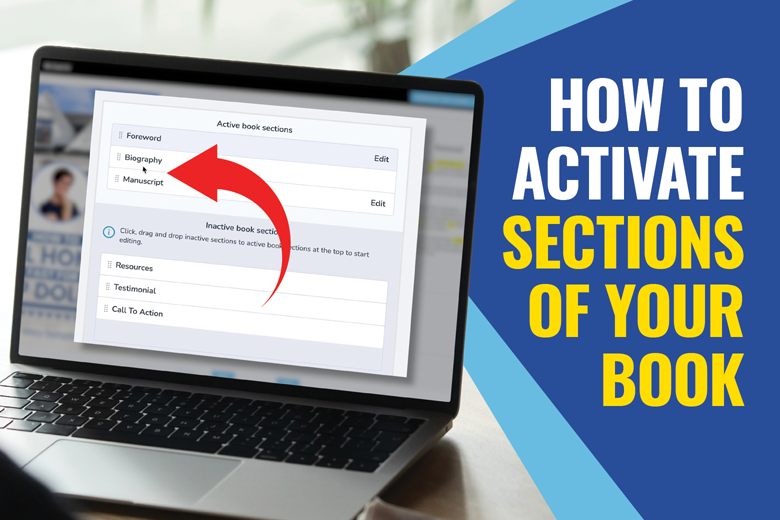
Located in the middle of the screen you will see the list of Active and Inactive book sections.

To activate a section, simply click and drag it into the active list.

The order you place the sections in the active list is the order in which they will appear in your book. 

Step Five:

Each additional section will require editing. Click on the pencil icon of the specific section you would like to customize and make your edits.

Step Six: 

Once you have finished making your edits, click on the Publish Book button. This will save your new edits and update your digital book links.

Note:

You can use the book preview flipper to review your book and make sure your book has been updated with your new edits.

Other Membership

Let's go in-depth to make sure you are building processes that will continue to bring in listings.

How To Remove Blank Pages From Your Book

How To Remove Blank Pages From Your Book

Would you like to remove the blank pages being displayed in your digital book?

Check out how you can do so with one click.

Step One:

From the book preview page, click the Edit Book button. This will open the Book Editor Application.

Step Two:

Navigate to the left side of the screen and click on the Settings Icon. This will open a dialog box.

Step Three:

At the bottom of the list, you will see the option to "Always start chapters on the right-hand page".

This setting is best activated for physically printed books.

For digital books, unchecking this setting will remove the blank pages between chapters.

Step Four:

Once you have completed making your changes, click the Publish Book button along the top of the screen. This will add your new edits to your digital book links.

Other Membership

Let's go in-depth to make sure you are building processes that will continue to bring in listings.

How To Import Leads Into The Digital Marketing Platform

Read More

How To Follow-Up With Your Landing Page Leads

Read More

How To View Landing Page And Digital Book Analytics

As a part of your Authorify membership, you have access to your Book Performance Analytics.

Included in this report you will find:

  • Landing Page Visits- The total number of times your landing pages have been visited
  • Landing Page Conversions- This number reflects the number of times your book was requested via your landing page resulting in a hot new lead.
  • Digital Book Visits- This reflects individual opens of your digital book links.

To access this information, follow the steps below.

Once you are logged your Authorify Member Dashboard navigation to the left side of the screen, click on the Book dropdown and select Book Analytics.

You will then see the Book Analytics page. From this page, you can view all of the previously mentioned stats.


In addition to the analytics report, you will see the complete list of your published books and stats associated with those individual book titles.

Other Membership

Let's go in-depth to make sure you are building processes that will continue to bring in listings.

How To Add The REALTOR® Trademark To Your Book

Read More

How To View Your Landing Page Leads

How To View The Leads Generated Through Your Landing Pages

Each time a someone requests a copy of your book via a landing page, a new lead is logged inside of your account. While you will immediately receive an email alerting you to the new lead, having one central location to store that information in vital to creating effective follow-up campaigns.

Watch the video above or view the steps below to see where to locate your leads within the Digital Marketing Platform.

Step 1:

From your Authorify Member Dashboard, navigate to the left side of the screen and click on the LEADS option.

Step 2:

From the Leads page, you will see the complete list of leads that have requested copies of your book via one of your landing pages.

The information includes First and Last NameEmail AddressPhone Number and the Date the request was made. You will also see the Segment this lead is listed under. This relates to the specific landing page the leads came to you through. For example, if a lead fills out your FSBO book landing page, they will be placed into the FSBO segment.

Step 3:

Under the Action column, you will find three options, Edit LeadLead History and Delete Lead.

Bonus:

You can export this list as a CSV file by clicking the blue Export Leads button located at the top-right of the list.

Other Membership

Let's go in-depth to make sure you are building processes that will continue to bring in listings.

How To Import Leads Into The Digital Marketing Platform

Read More