Rank At The Top Of Google With A Business Profile

Rank At The Top Of Google With A Business Profile

As an agent, you undoubtedly have a whole host of online profiles, and while each serves its purpose, one of the most underutilized platforms happens to be the largest search engine in the world. In this course, you’ll get step-by-step instructions on how to set up and optimize your very own Google Business Profile.

Why should you have a Google Business Profile?

First and foremost, the purpose of your Google Business Profile is to help you stand out from the competition. As of June 2020, there were nearly 1.4 million members of the National Association of Realtors. That is a lot of competition, no matter where you’re located.

By having a well maintained Google Business Profile, you can instantly build trust with potential clients and even leapfrog higher-ranked agent profiles.

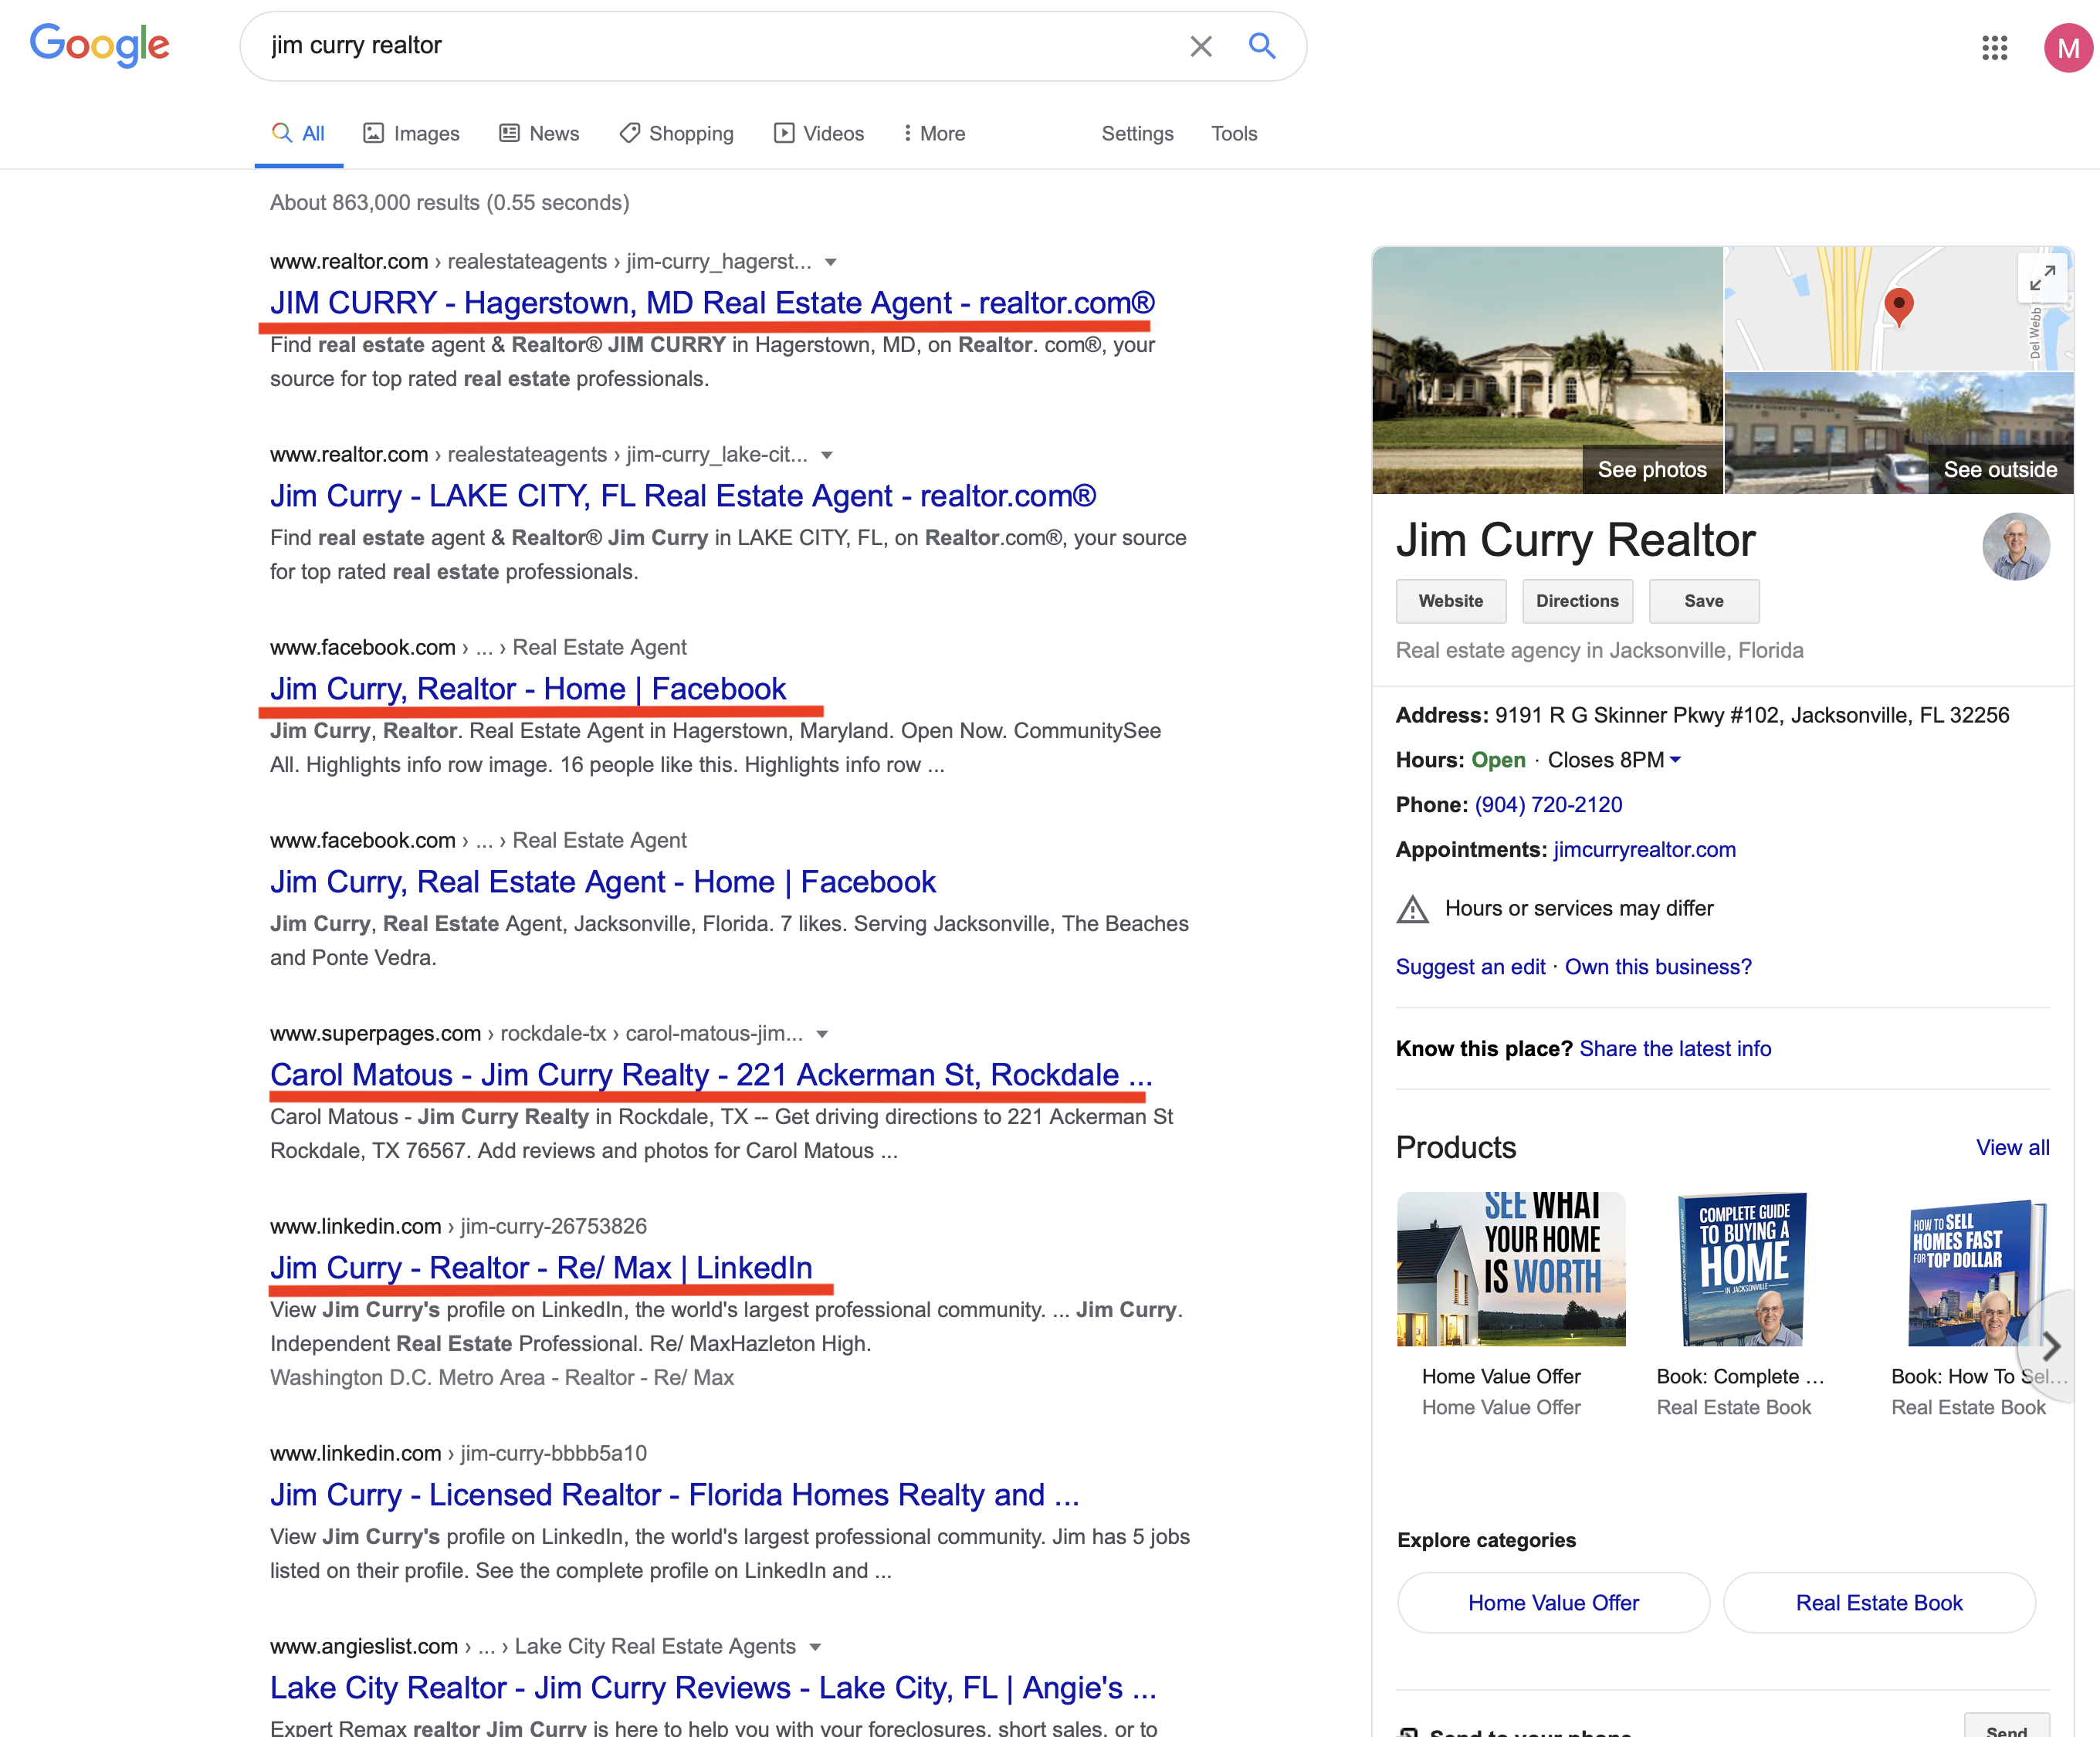
Take a look at this example:

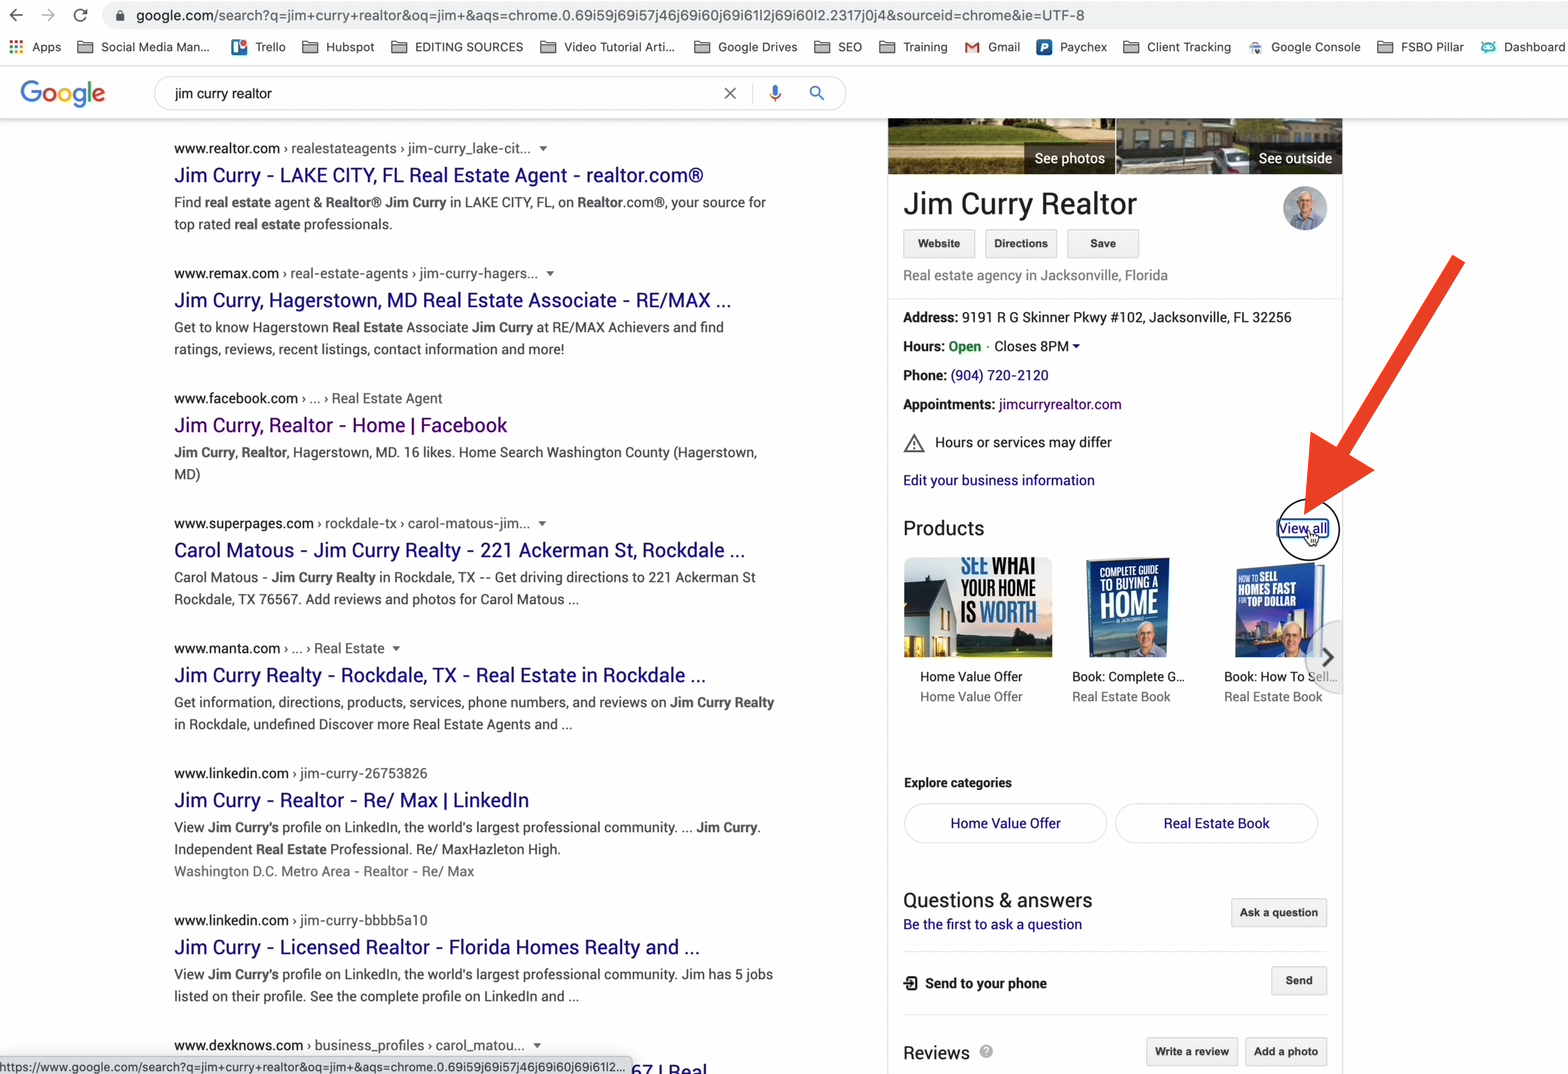
Jim Curry is an agent based in Jacksonville, FL. As you can see, when you search “Jim Curry Realtor” there is more than one Jim Curry in the country.

Of the top eight search results, five are for a different “Jim Curry.” But look at how well the Google Business Profile stands out for our Jim Curry. 

I don’t know about you, but my eyes are instantly drawn to the business listing.

The best part about Google Business Profile is that they are completely free. Over the next several steps, I am going to walk you through the process of claiming your page, adding product listings and generating requests for your books.

Step 1: How To Create and Claim Your Google Business Profile

First, you must go to Google Business Profile and make sure you are signed into the Google account that you associate with your real estate business.

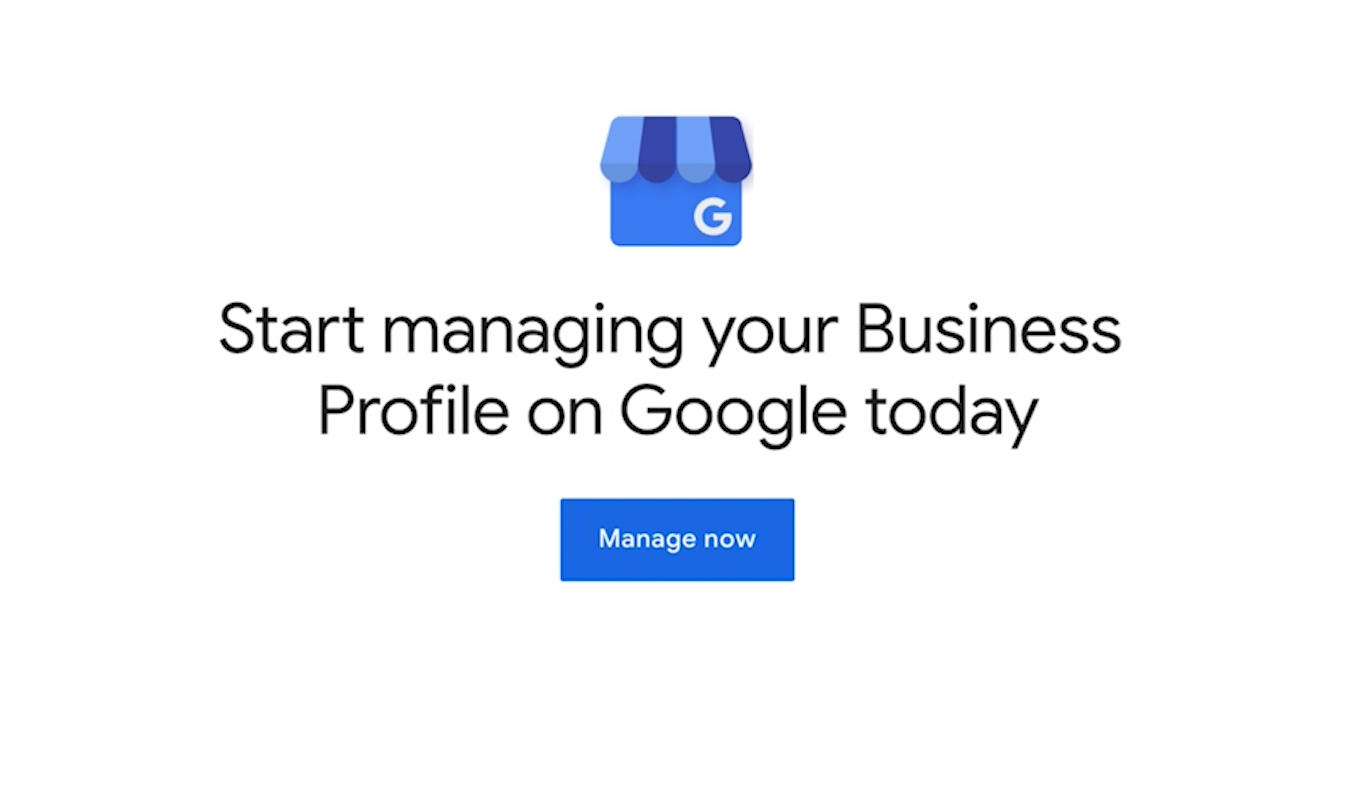
  • Scroll down the page until you find the “Manage Now” button
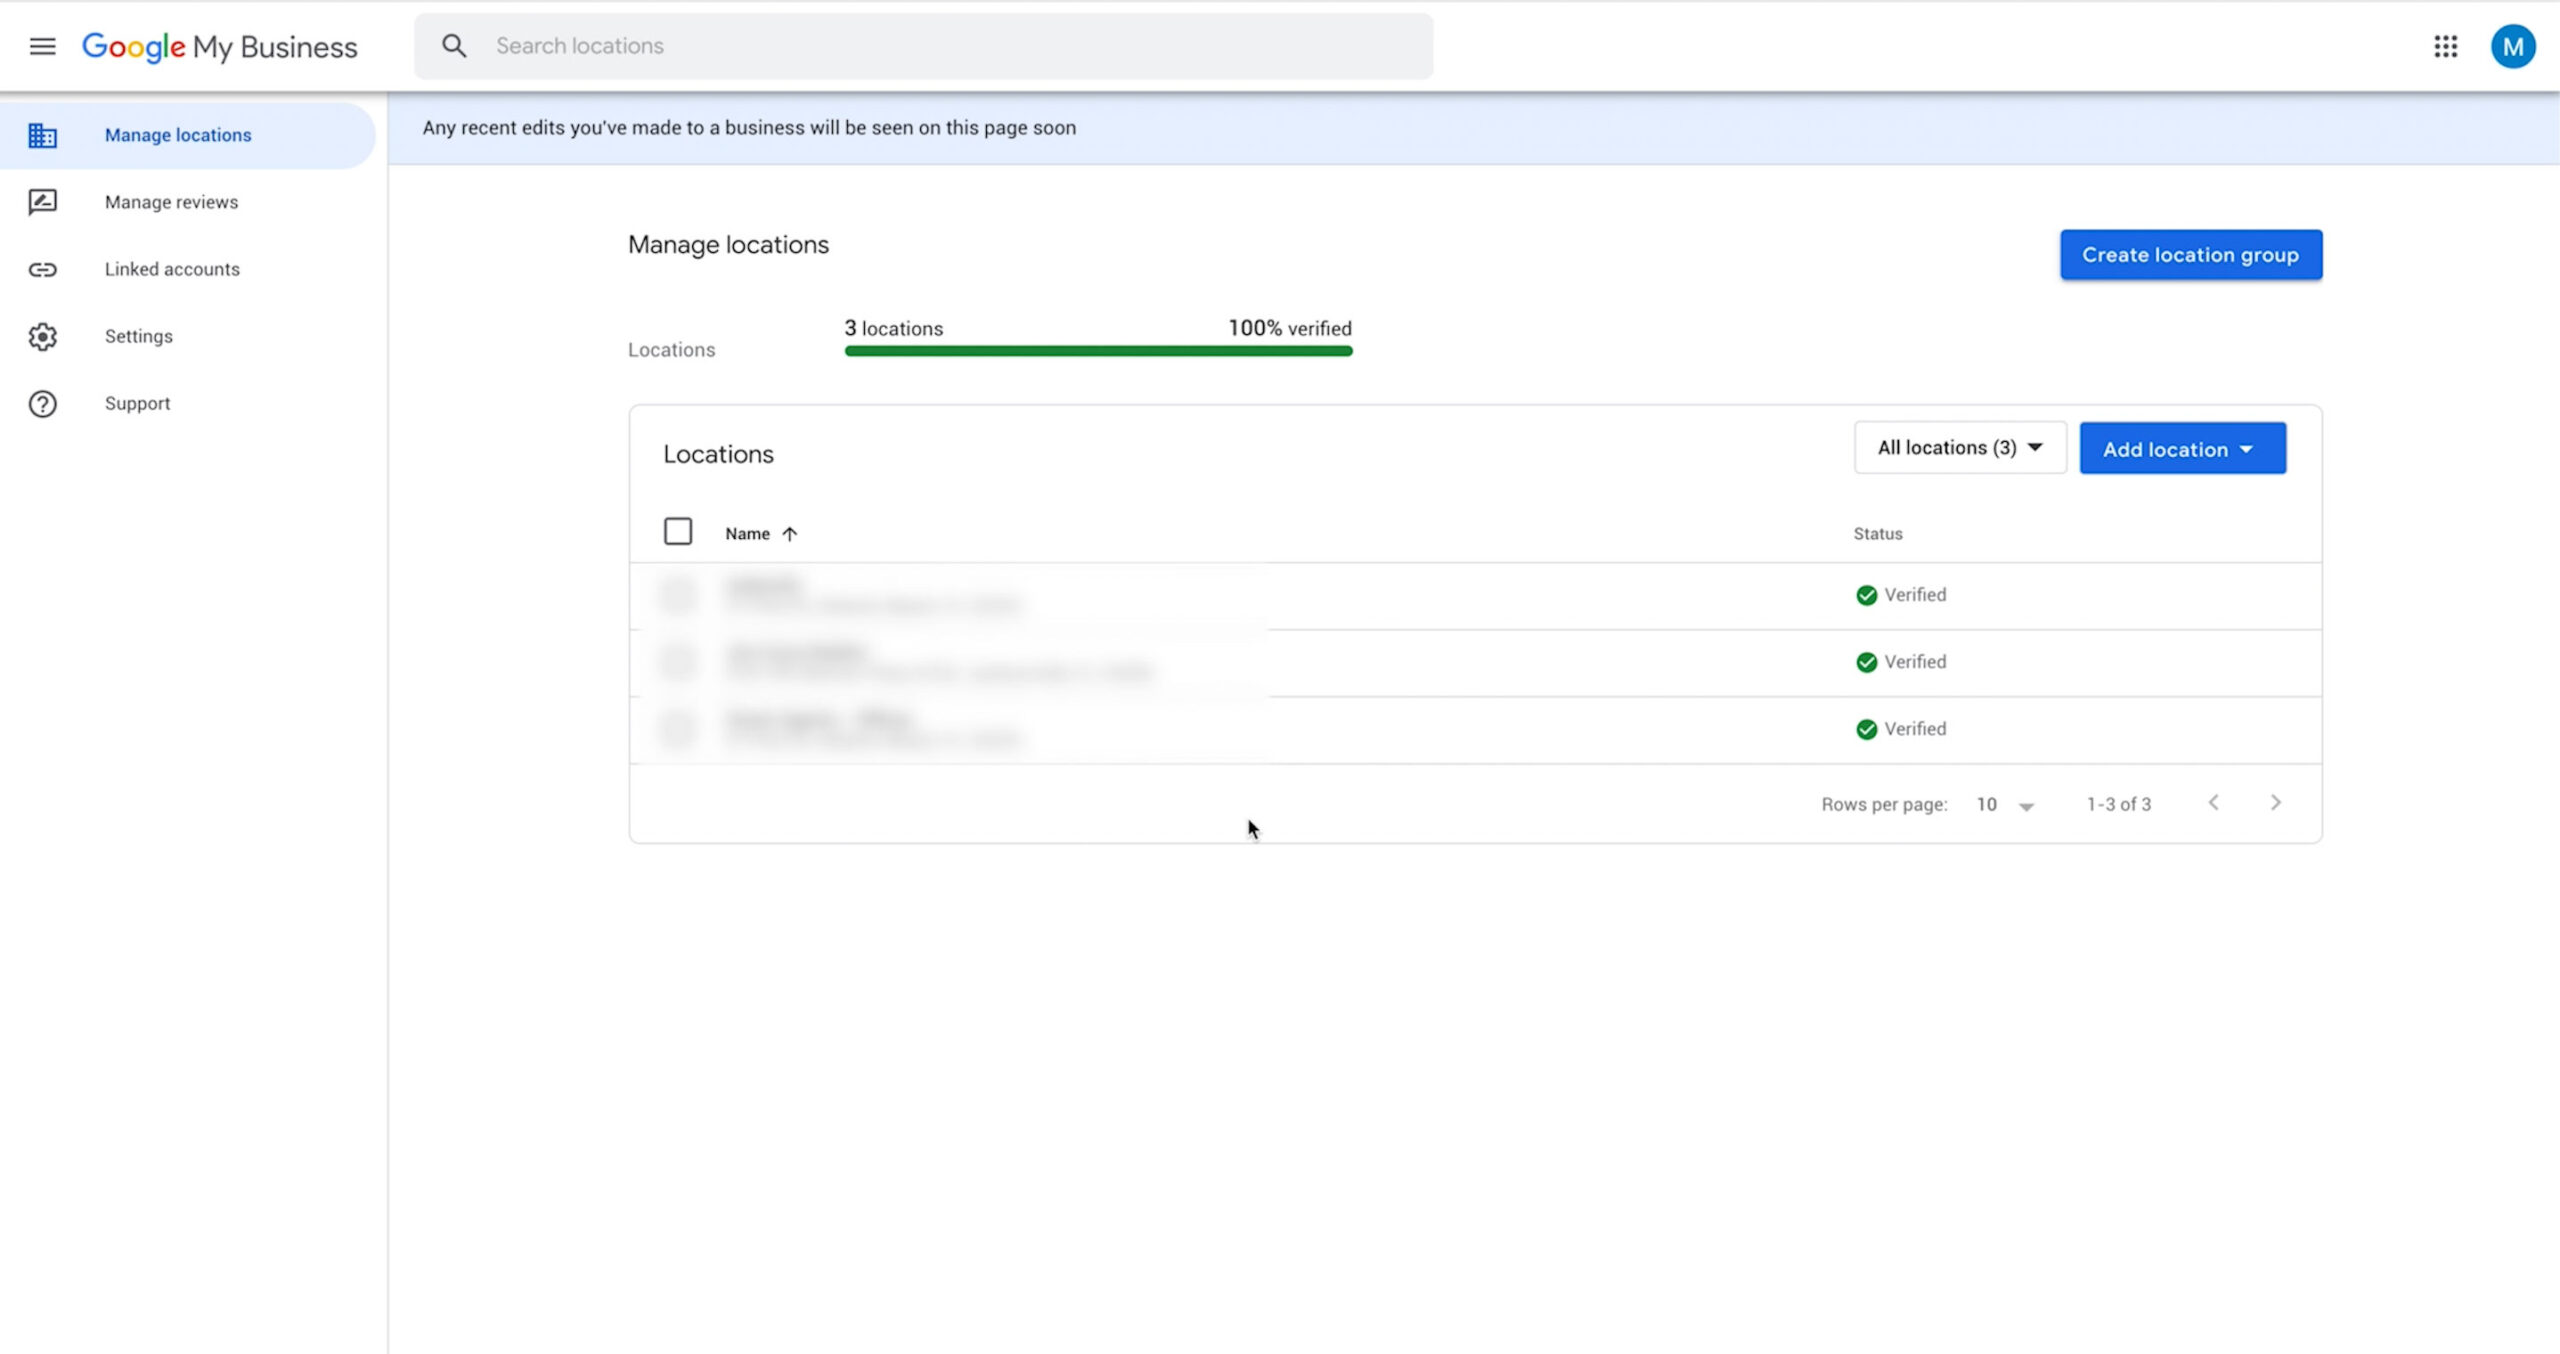
  • The window that appears next is your main dashboard for all of the pages connected to your Google login. If your account is already connected to one or more businesses, you will see them here.
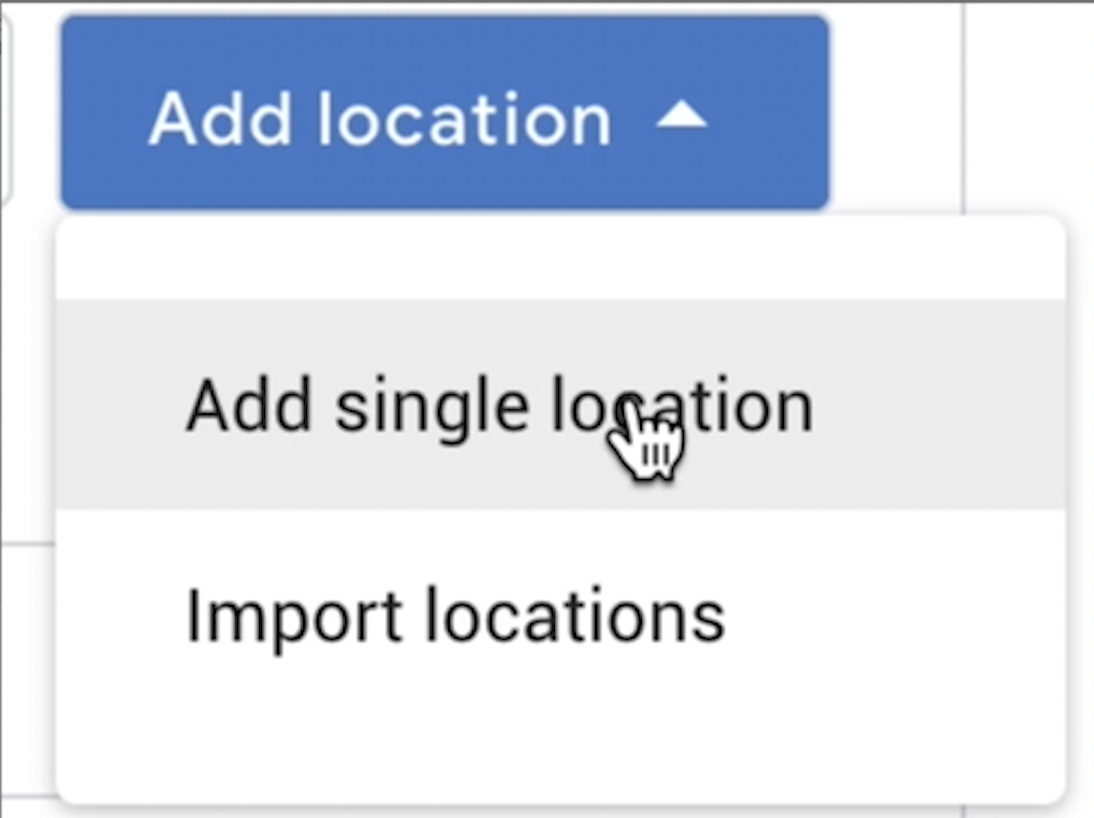
  • To add your new page to Google, click the “Add Location” button and select “Add Single Location” from the drop-down menu.
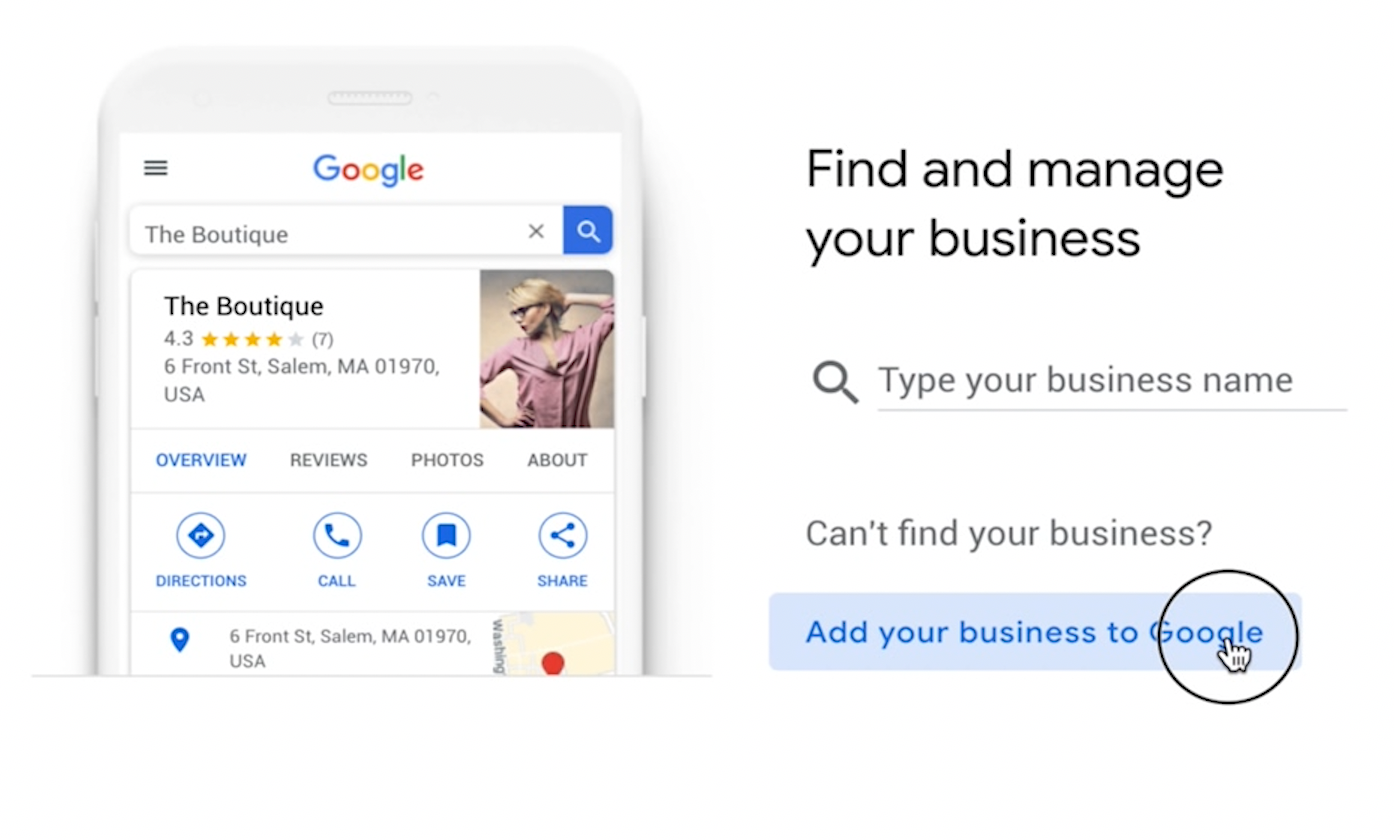
  • On the next page, click the “Add Your Business To Google” button
  • Note: If you are editing an existing business page, you can type the name in the search bar and select it from there.

Now, you are ready to add your business to Google and start entering all of the preliminary information.

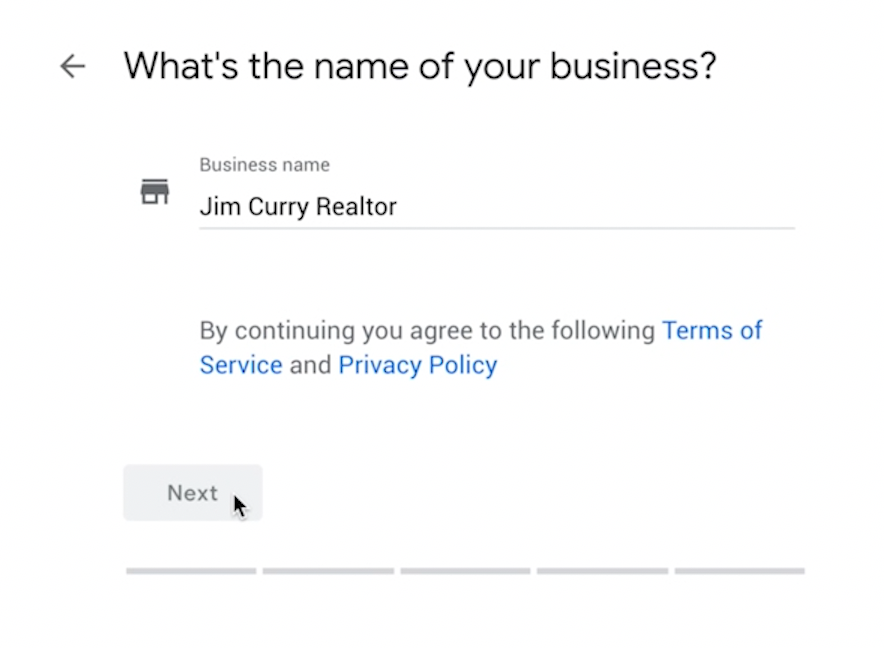
  • First up is the business name. Obviously, you will want to start with your name, but we also recommend adding the word “Realtor.” This will increase your page SEO.
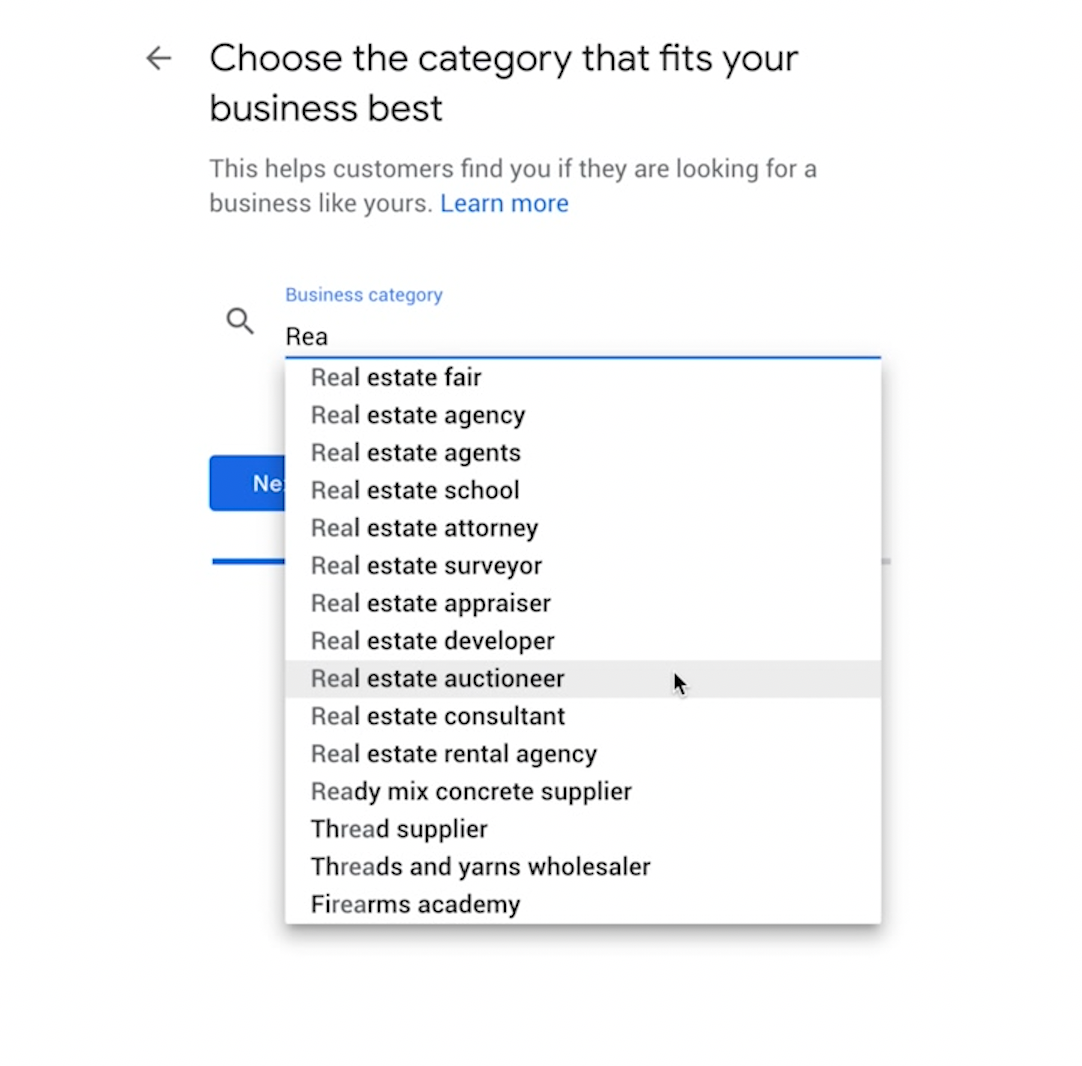
  • Next, you will choose the category that best fits your business. As you begin to type “realtor,” you will see several options populate in the drop-down menu.
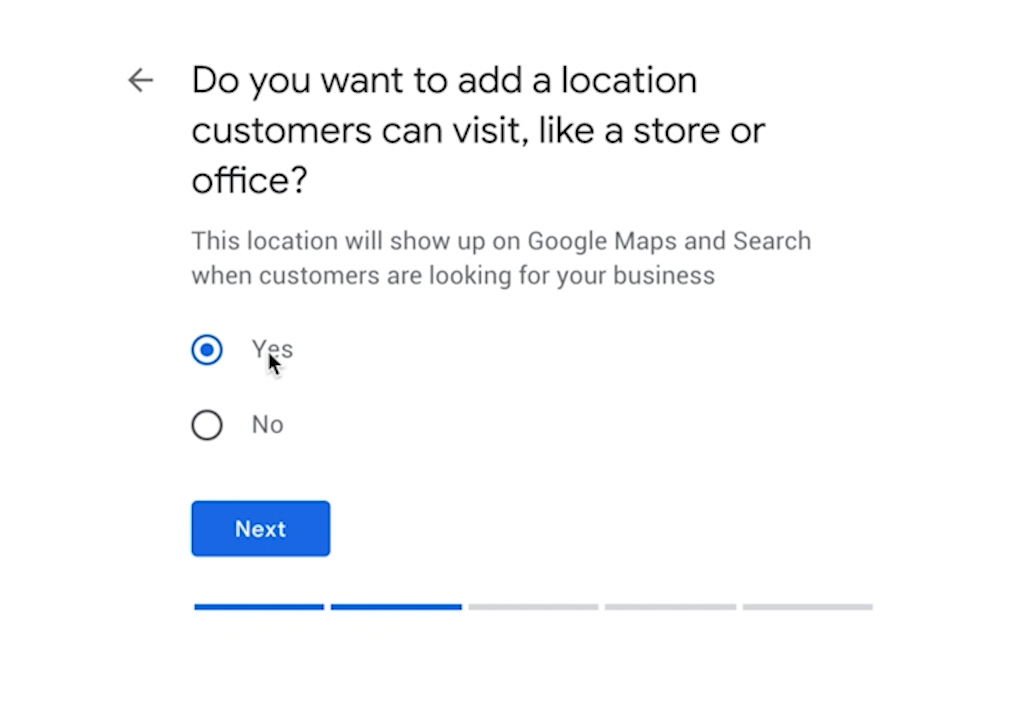
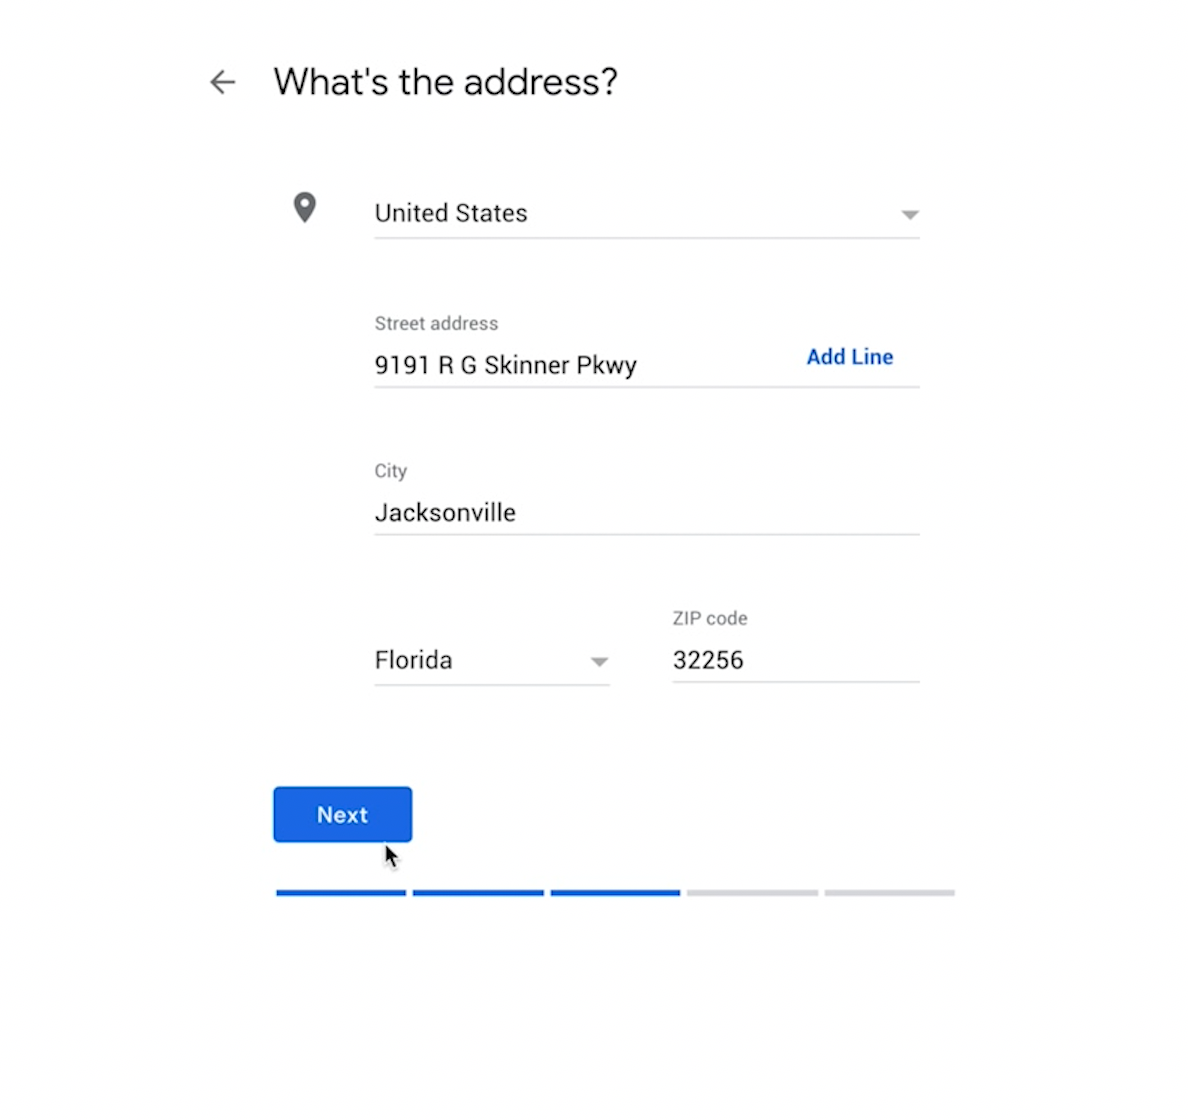
  • Adding a physical address is necessary if you want your business page to show up on Google Maps. Remember, this page is free, so take advantage of every opportunity it presents. A prospective client can easily stumble upon your page if he or she is searching your local market on Google Maps.
  • Once you click “Yes,” you will be asked to input the address. Make sure to use your brokerage address. Google automatically pulls an exterior photo of the address listed, so it’s better to have your office show up rather than your home.
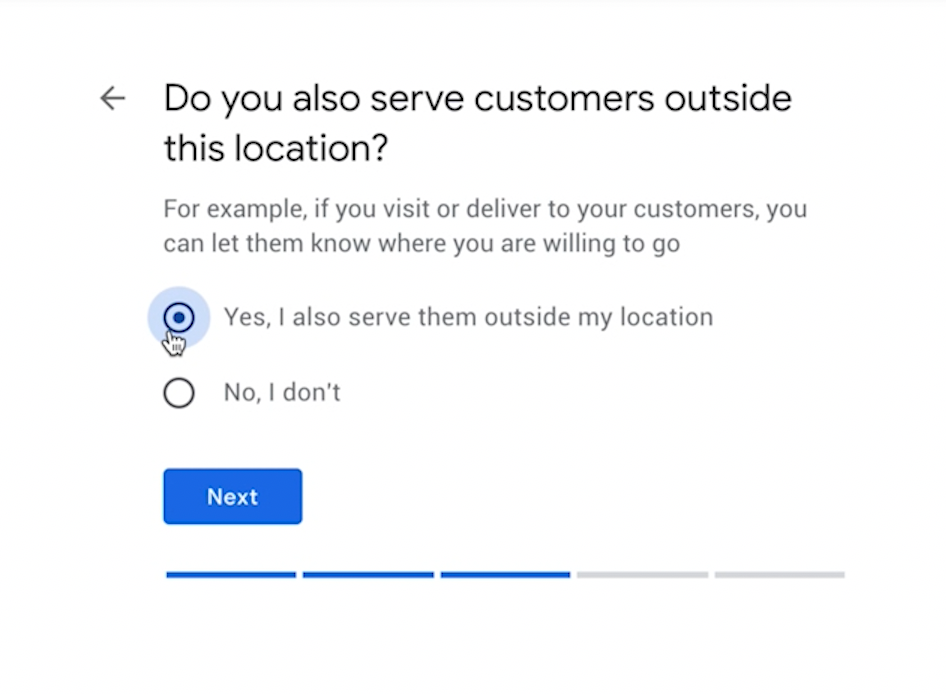
  • Next, you will be asked if you serve customers outside of the town listed in your address. It is especially important to select “Yes” as an agent to let your clients know which areas you cover.
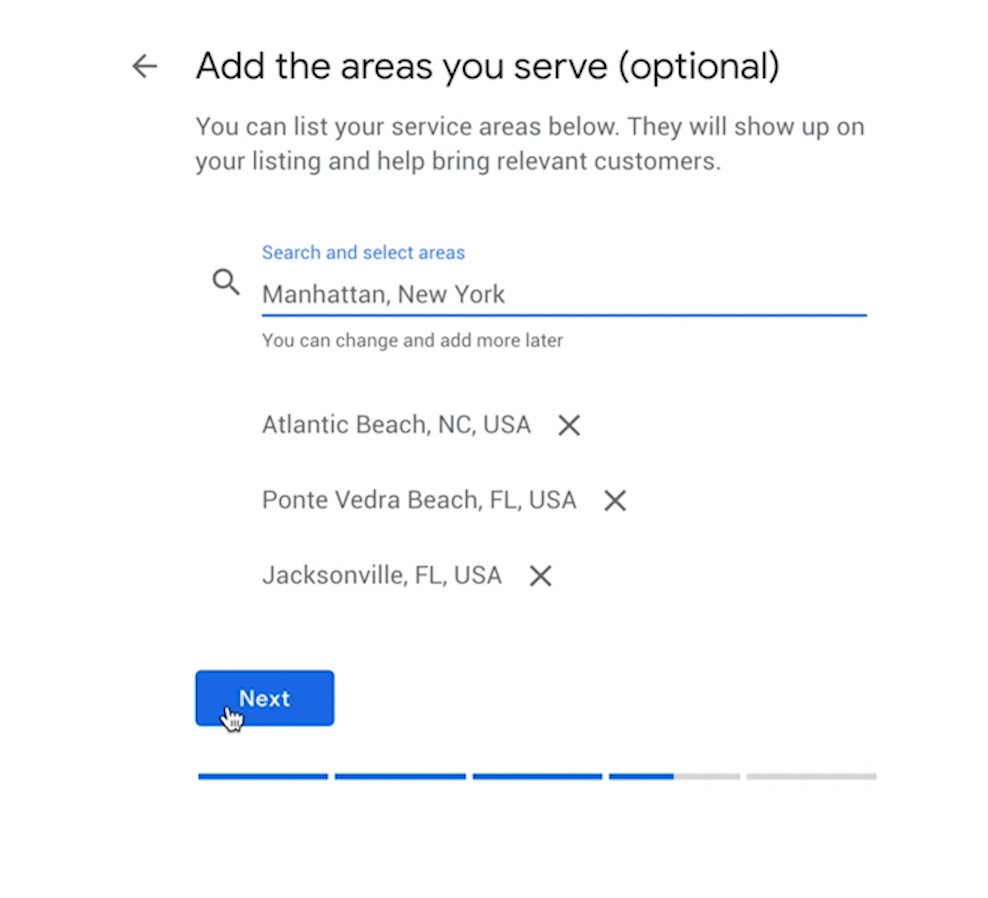
  • On the following screen, you will be able to list all of the towns and cities you serve. By adding individual locations, you increase your odds that someone looking for an agent in a particular area will see your page.
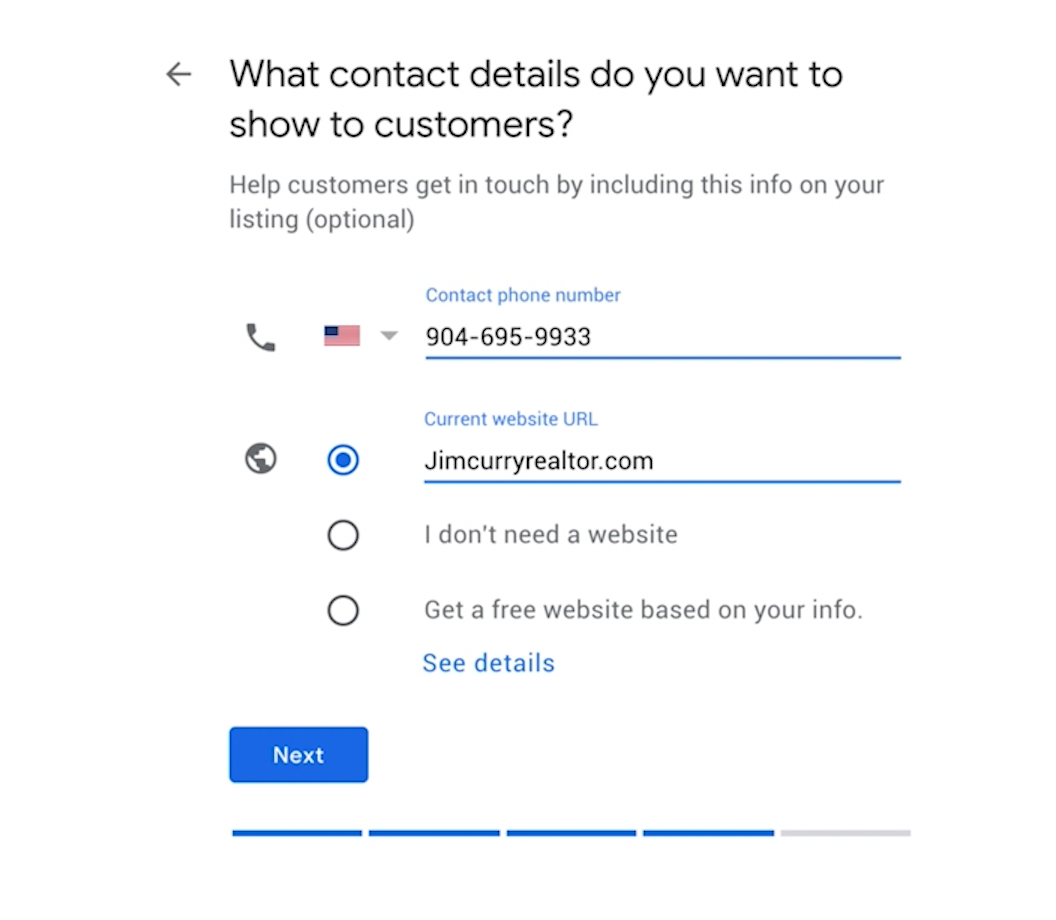
  • Next, you will enter the phone number and website address that will be displayed on your page.
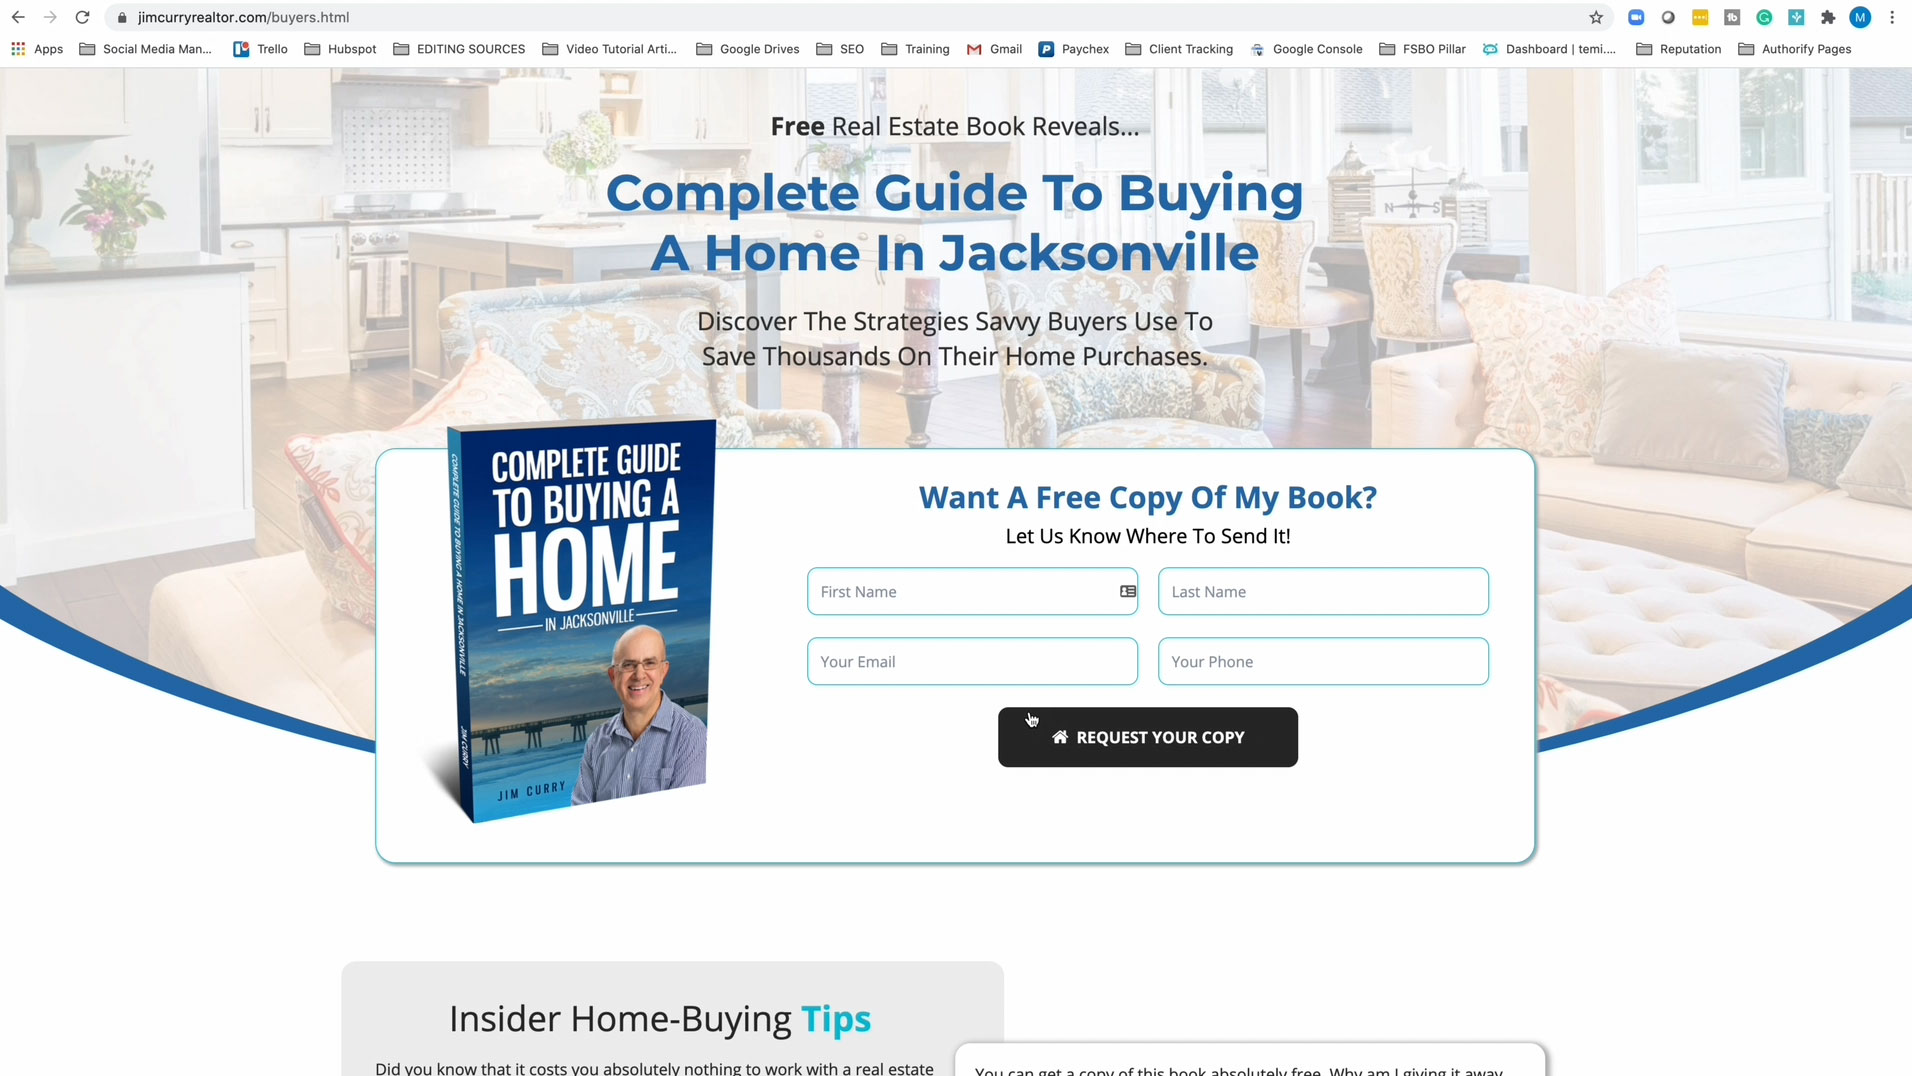
  • This is a great opportunity to start promoting your books to potential clients. If you have a website that shows off your books, I highly recommend adding it here.

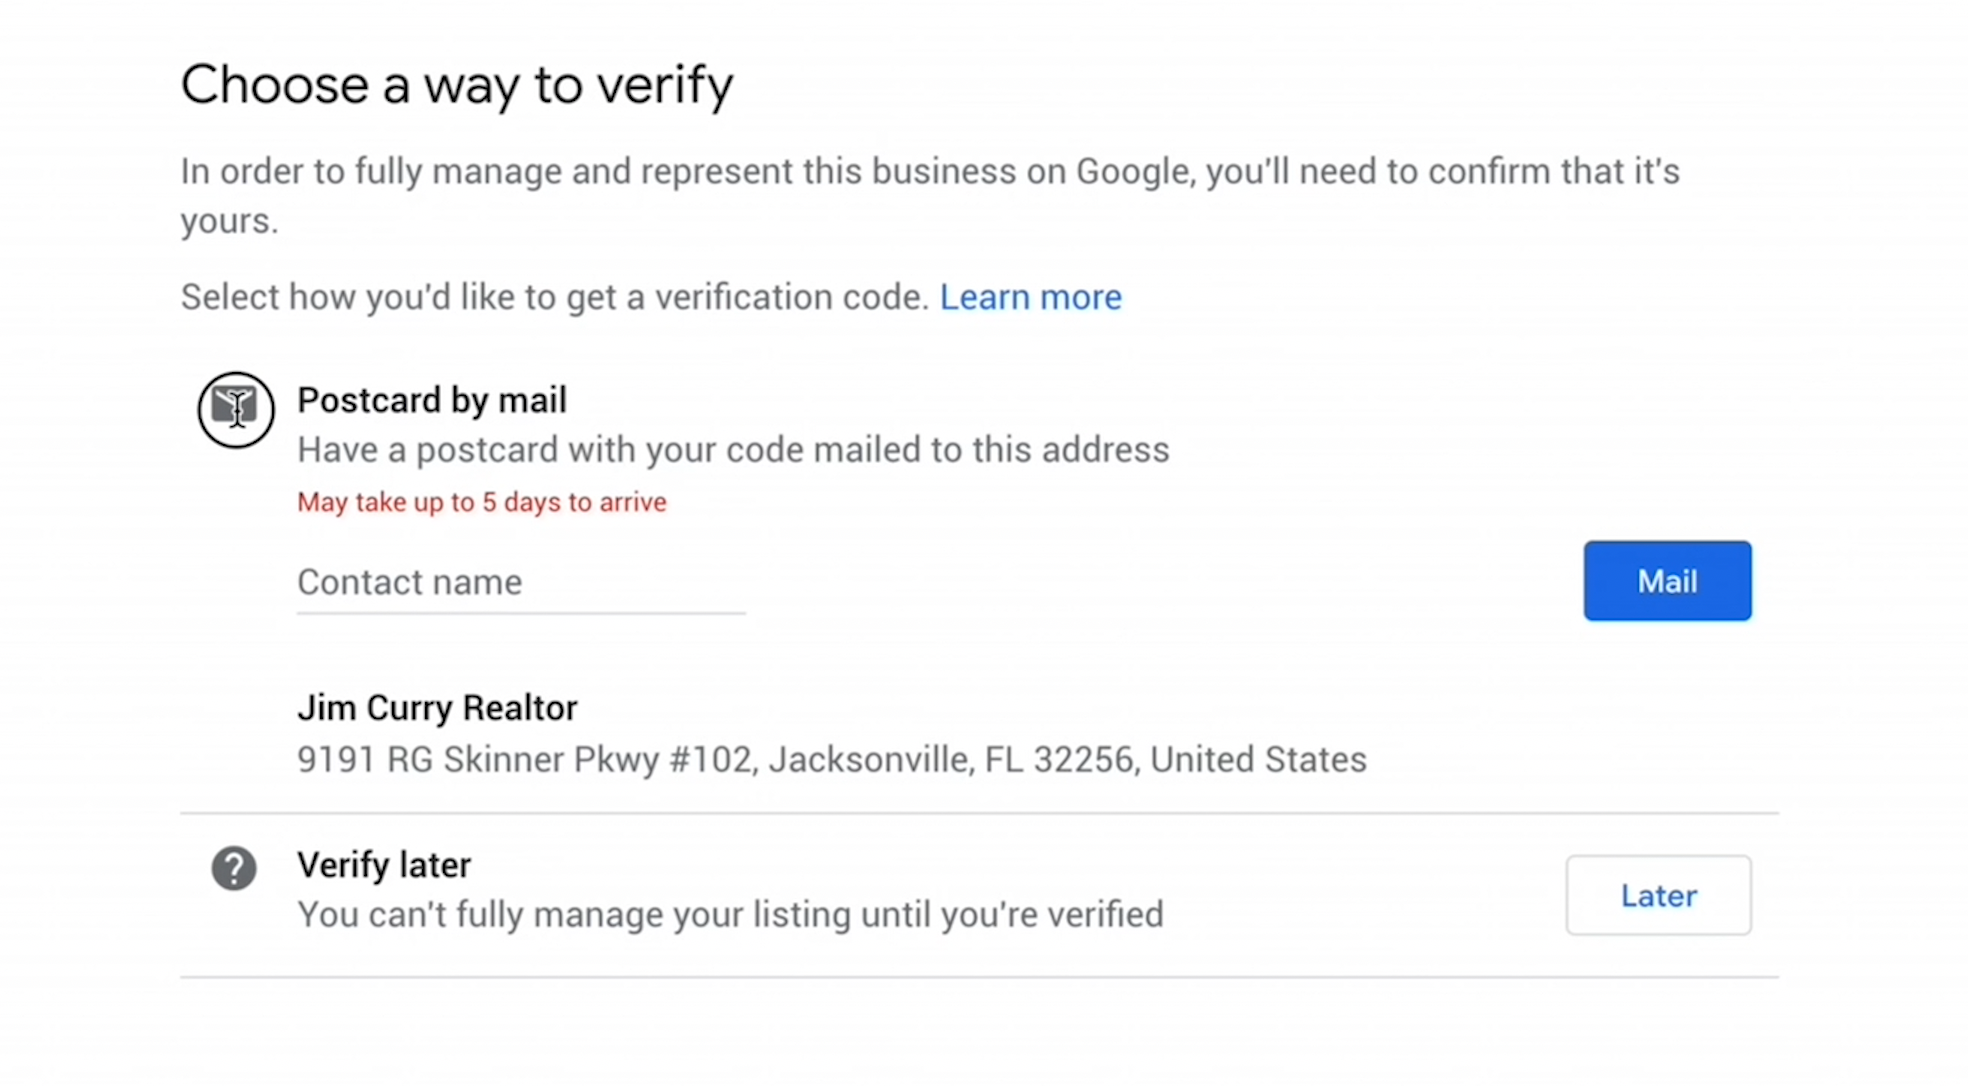
This next step is extremely important. You must verify your business with Google before your page becomes live.

  • To verify your business page, Google will send a postcard to the address associated with your business. The postcard can take anywhere from 5-10 business days to arrive.

Note, in a very small number of cases, verification by phone is offered. However, this is not the norm and almost certainly is not offered when you build your page from scratch.

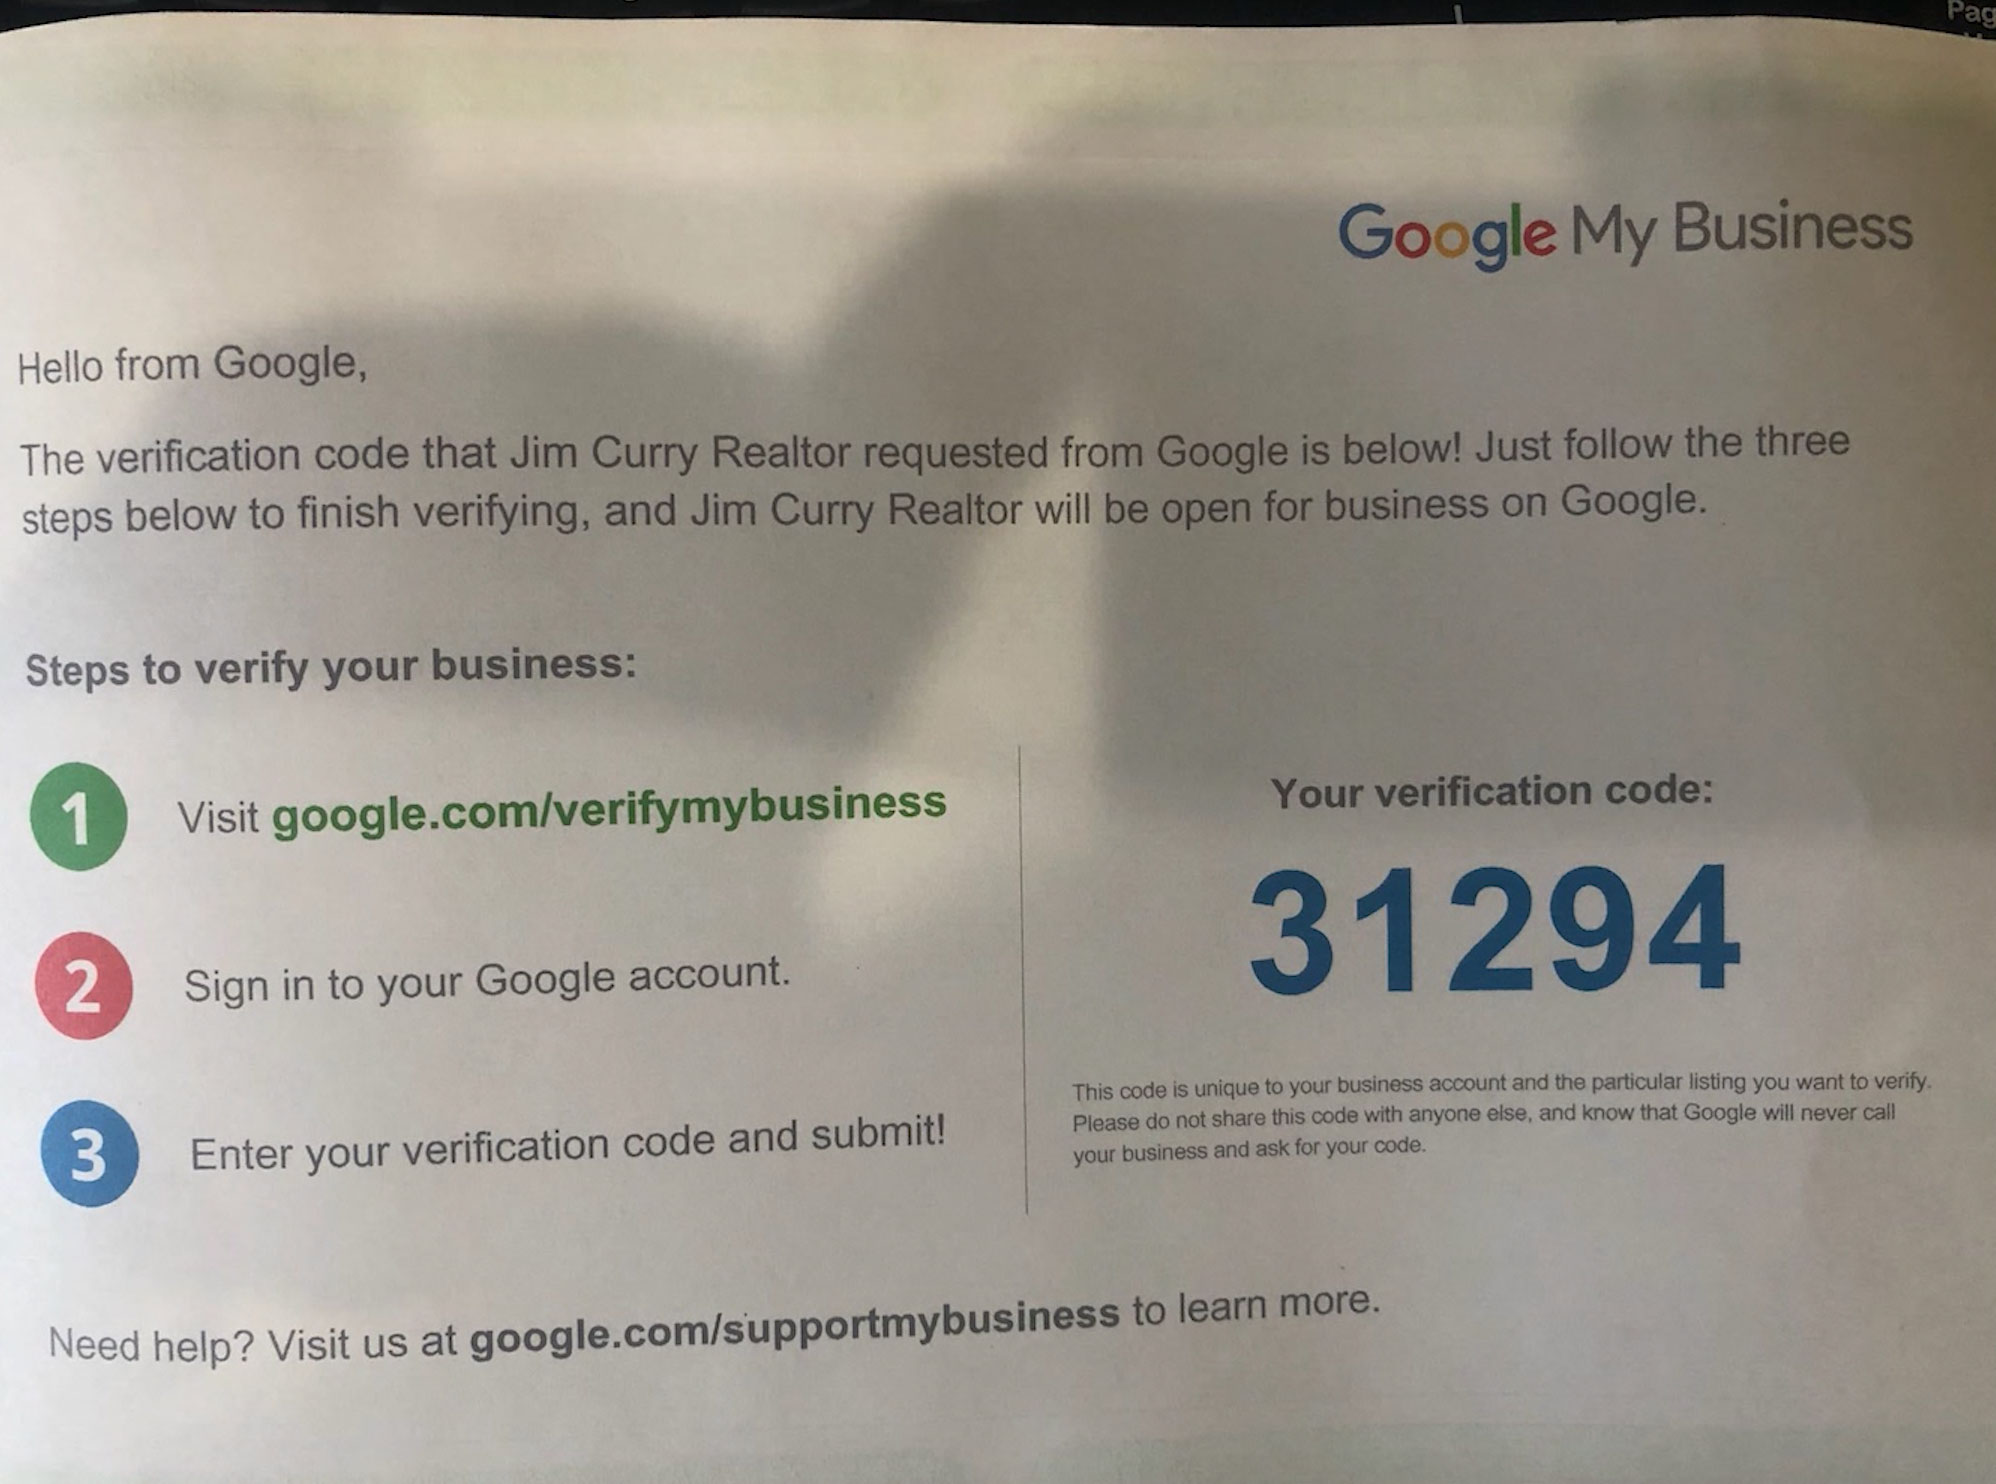
  • This is an example of what the postcard will look like. It will include the 5-digit verification code and instructions for verifying your page.

Again — I can not stress this enough — without verifying your business with Google, the page will not become live. In addition, if you are making edits to an existing page such as the address, you will be required to verify again before those edits are made public.

Step 2: How To Edit and Add Additional Information To Your Google Business Profile

Now that you’ve created your Google Business Profile, it’s time to start adding additional information. All of the information you entered in the previous step will carry over and autofill many of these spaces. However, if you are updating an existing page, you will need to edit all of the information to fit your new business location.

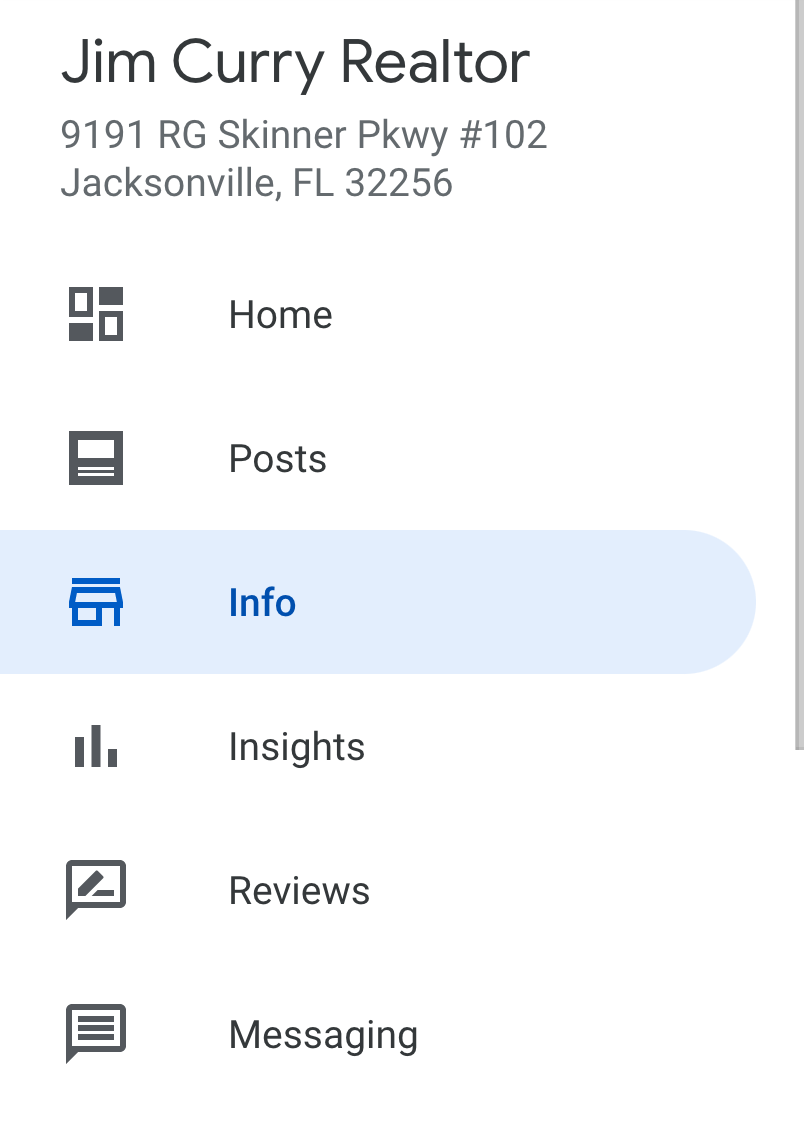
  • First, you will need to make sure you are in the “Info” tab of your page. The tab can be found on the left side of the page just below your business name and address.
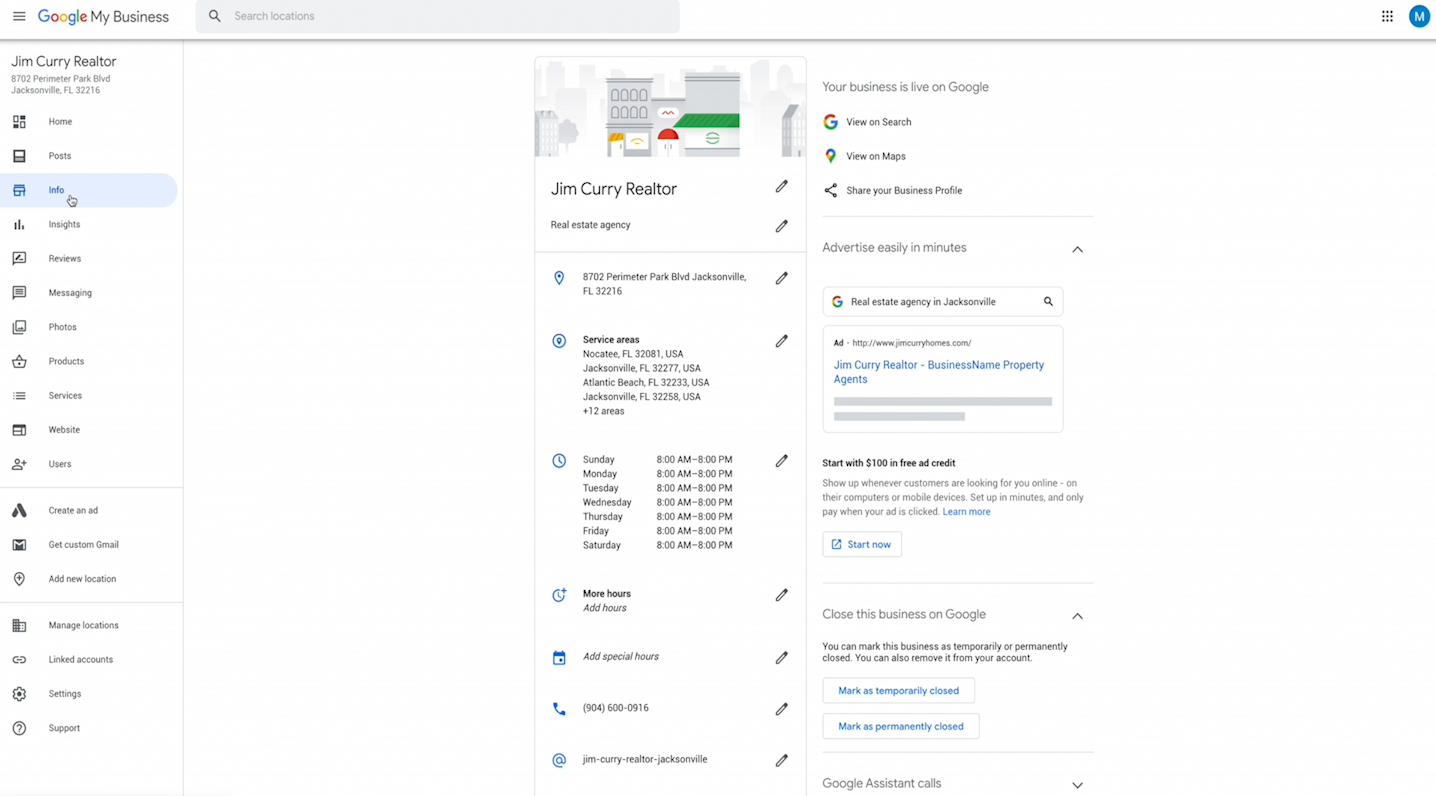
  • Once “Info” has been selected, you will be taken to your profile’s main information hub. You will see everything from service area and hours of operation to your business description.
  • To edit a piece of information, you can click the pencil icon and begin entering your info.

To edit a piece of information, you can click the pencil icon and begin entering your info.

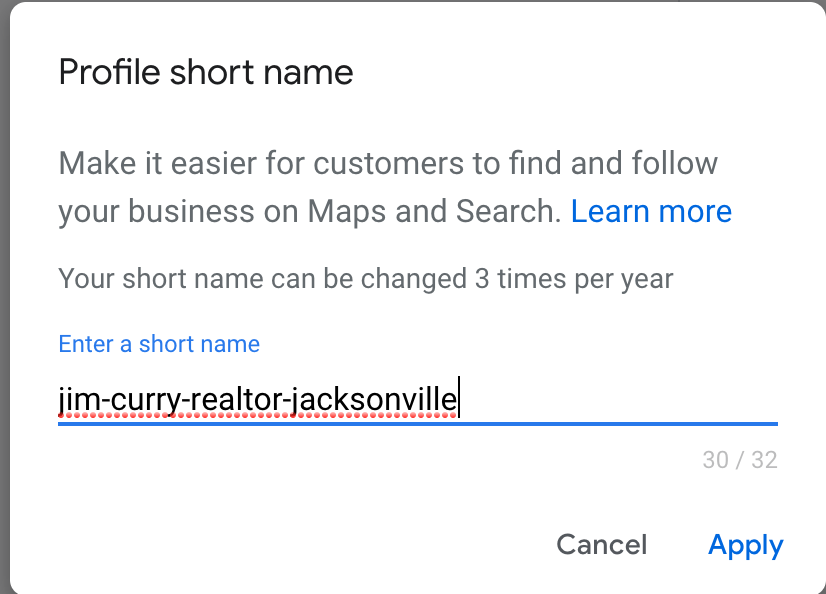
  • The first bit of new information to fill out is the “Profile Short Name.” This makes it easier for potential clients to find you both through Google Maps and Search.
  • As you can see, you are limited to 32 characters.
  • Make sure to start with your name and then follow with the word realtor. If you have space available, try to include your location. By doing so, your page becomes even more searchable.
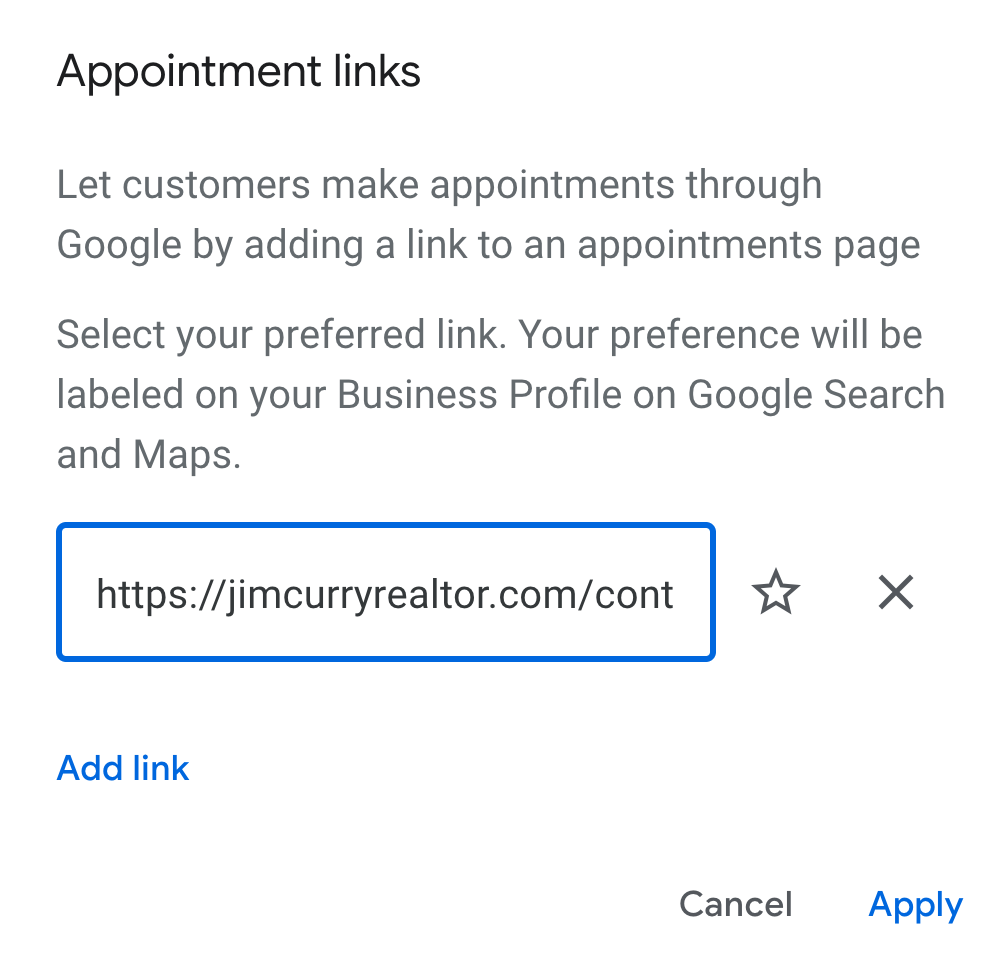
  • The next piece of information you add is a link to help prospects schedule appointments with you. If you currently have an appointment booking website, you can simply add it here.
  • If you do not have a way for customers to book appointments, you can easily set one up with a program such as Calendly.com.
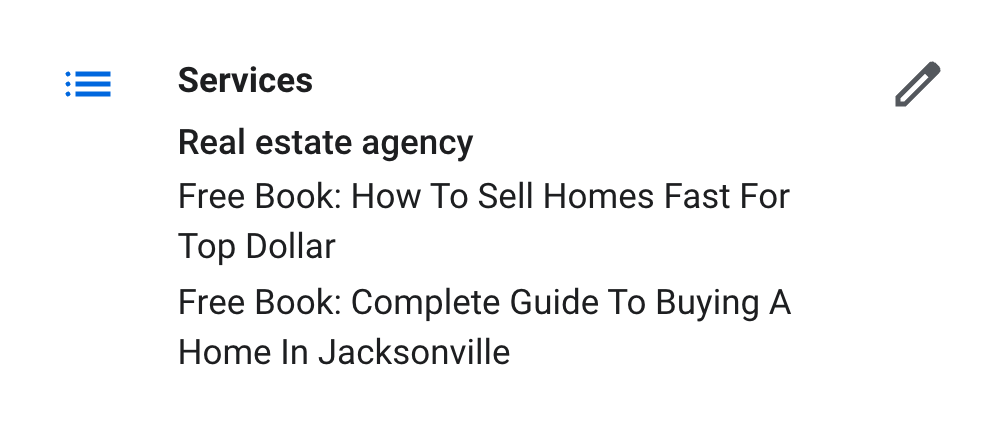
  • Next, you can add the services you provide. In our example, we used this opportunity to promote both Jim’s buyer and seller books.
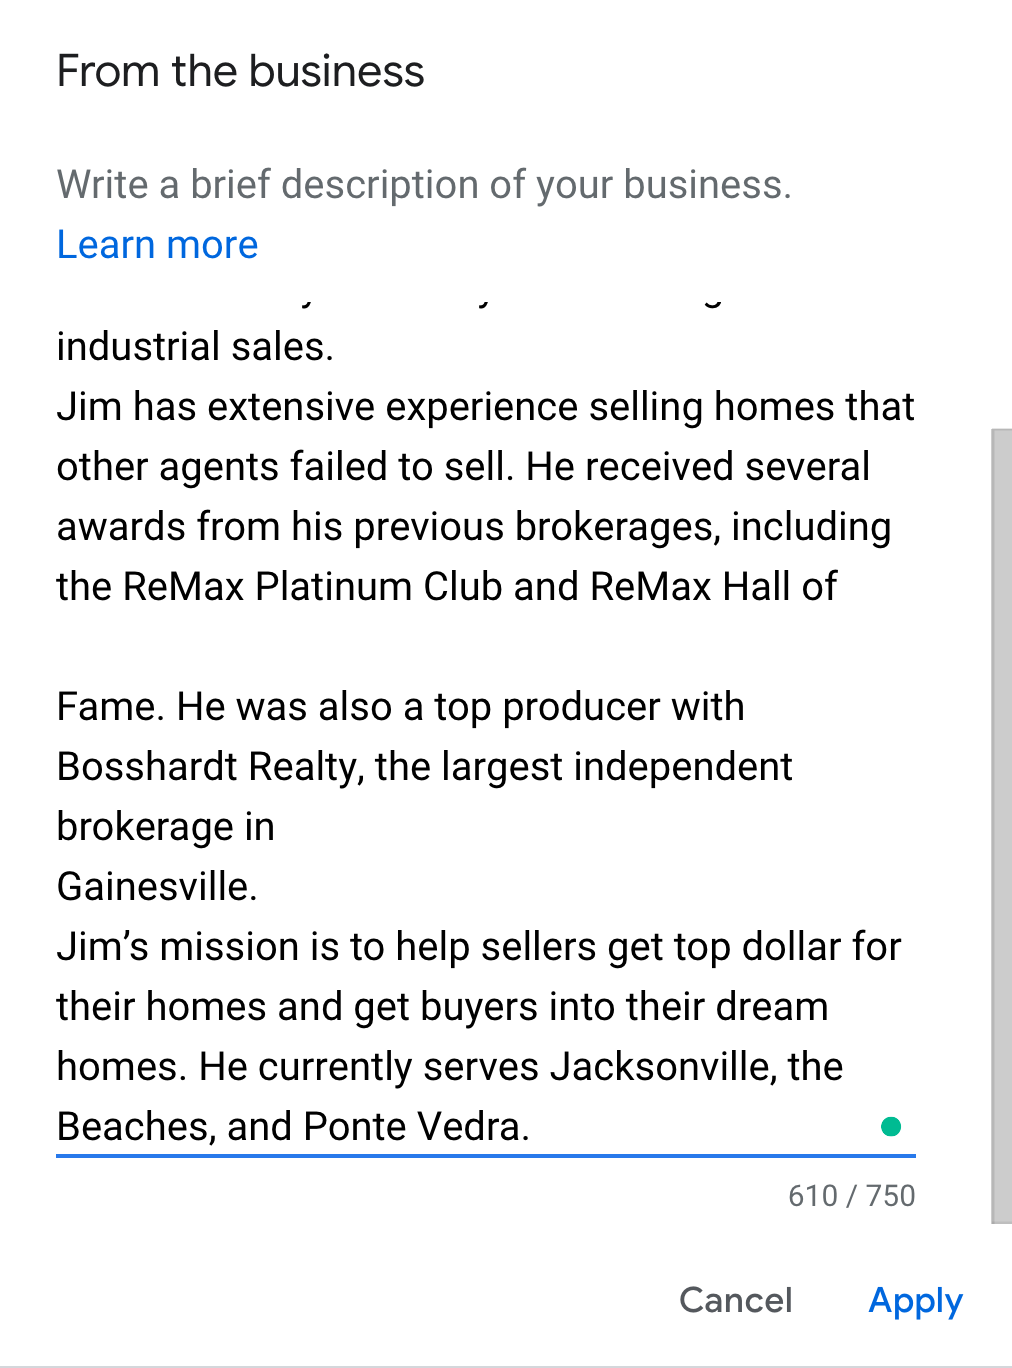
  • Following services, you will see an area to add a brief business description. The character limit is quite large at 750 characters. That is plenty of room to write a short biography.
  • Be sure to include keywords such as selling, buying, home and real estate.
  • You also want to include references to your location. This will increase your page’s local SEO score.
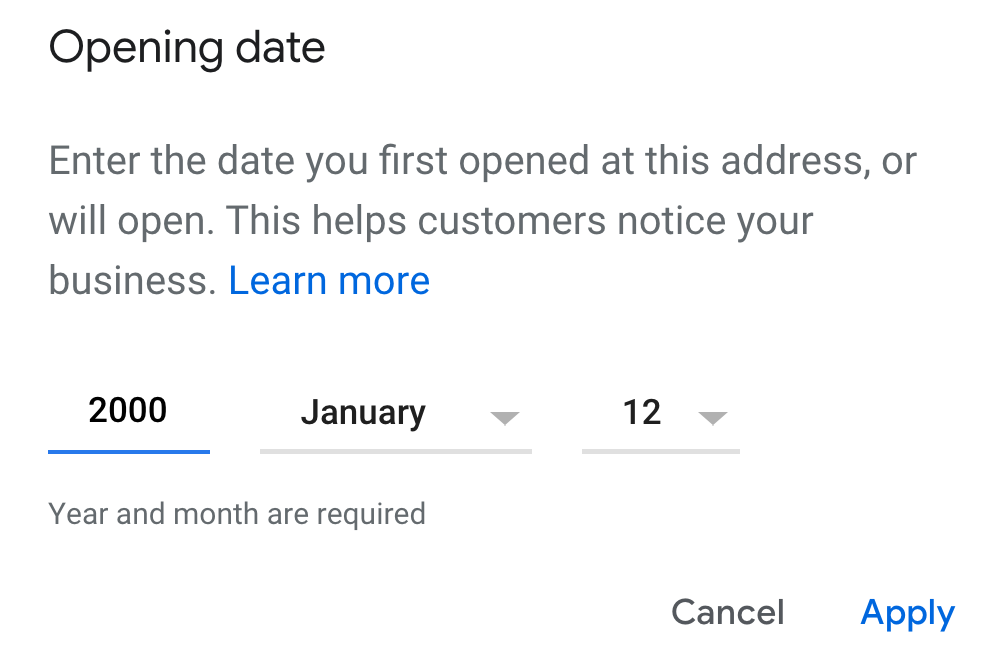
  • The final bit of information you can edit on this page is “Open Date.” Rather than entering the date you started at your current location, enter the date you became a licensed agent.
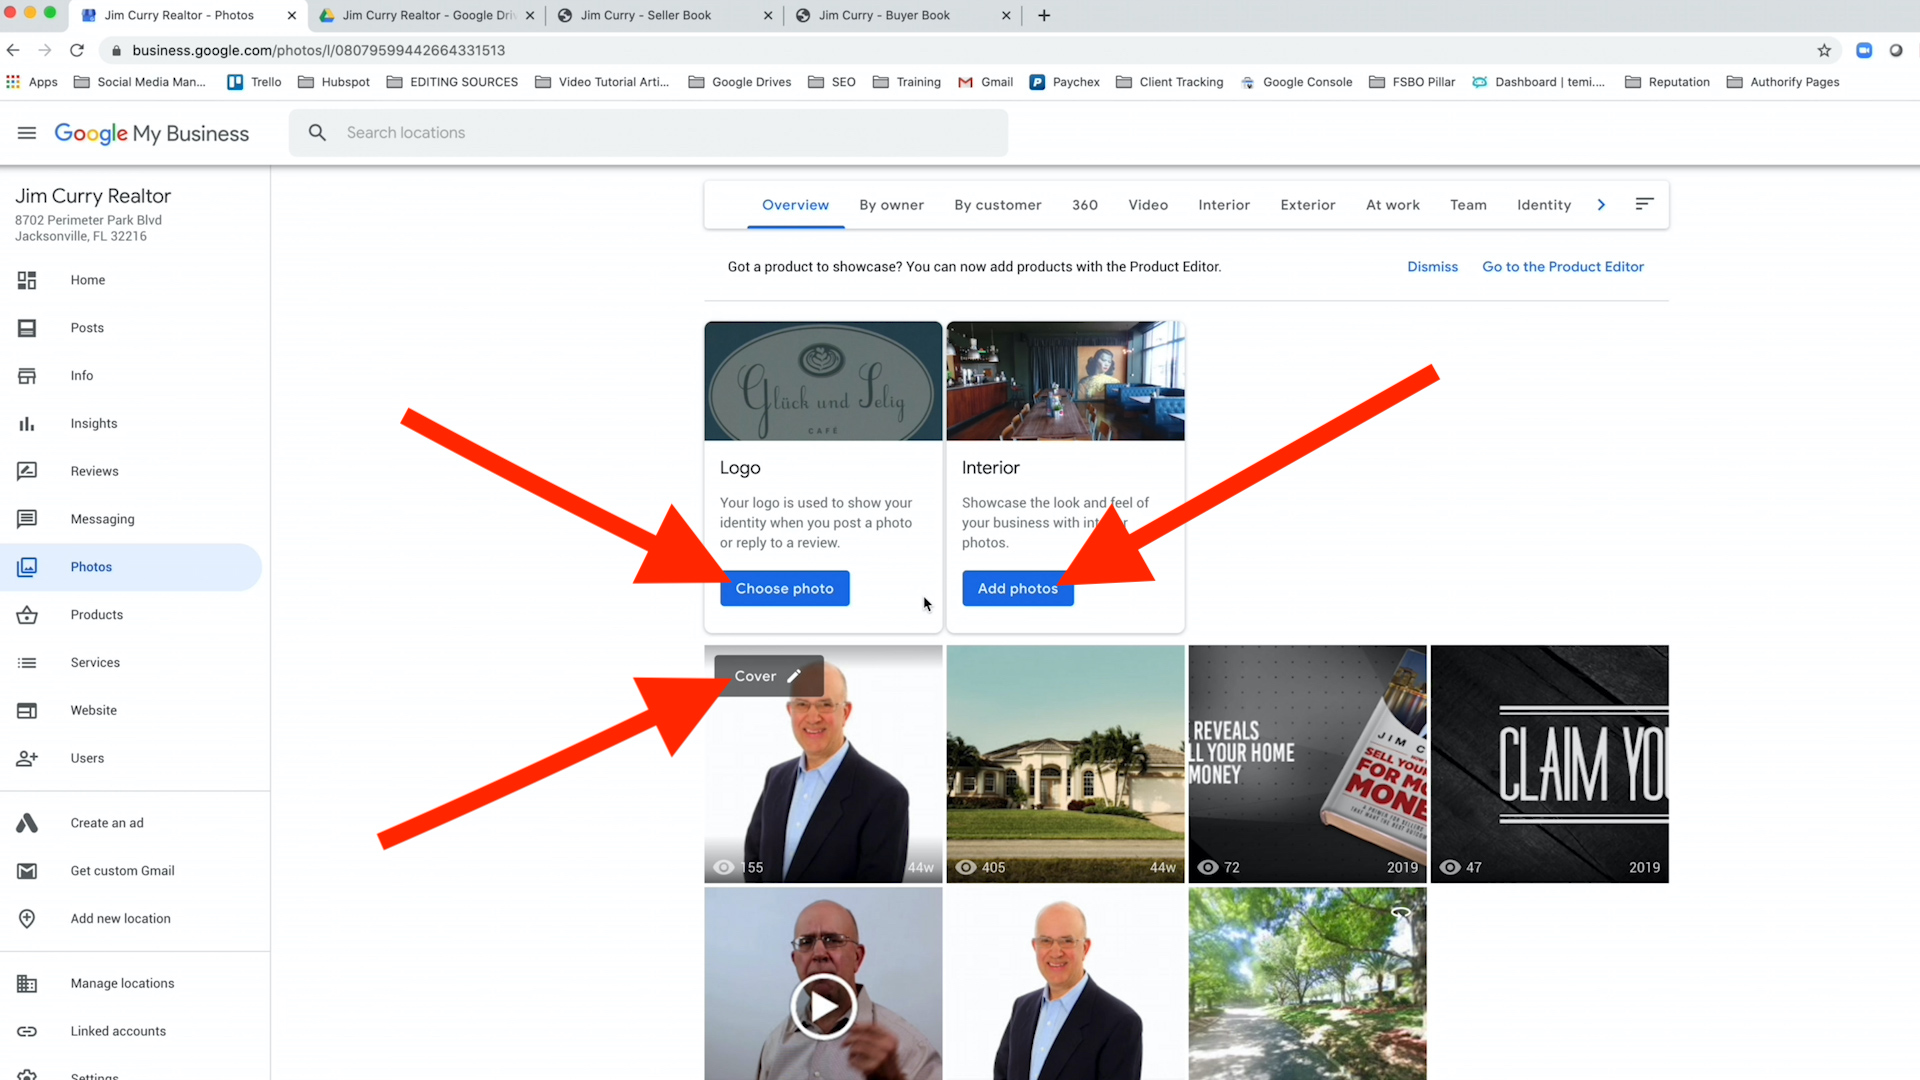
  • Now you can add photos to your page. At the very bottom of your “Info” page, you will see an icon to add photos.
  • Once you click the button, you will be brought to the main photos page. From here, you can upload as many photos as you’d like.We suggest adding photos of yourself, as well as previous listings and images of your books.
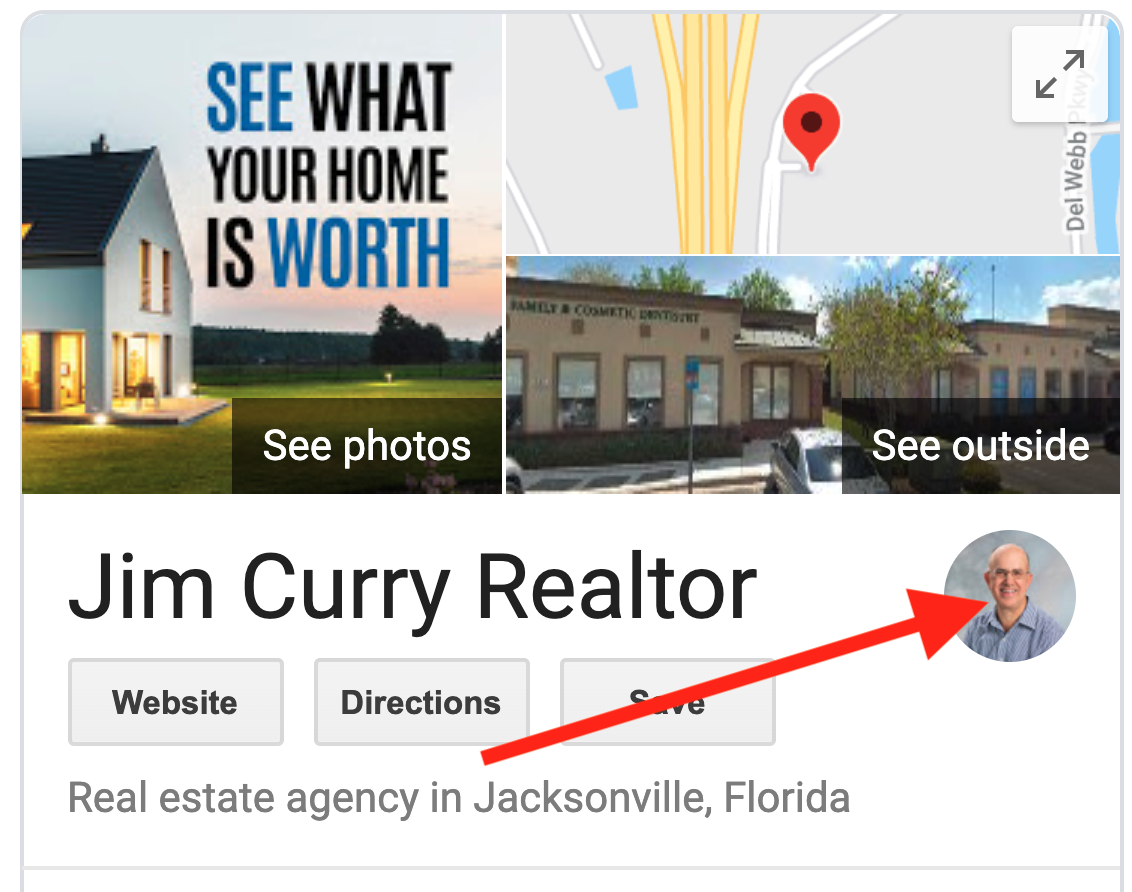
  • While adding photos, you also have the option to set a logo. This image will appear on your listing anytime your page is viewed. It will also be the default image shown when you make a post or respond to a review. We suggest using the same headshot you’ve included on your book cover. By doing so, you will build strong brand awareness and cohesion.
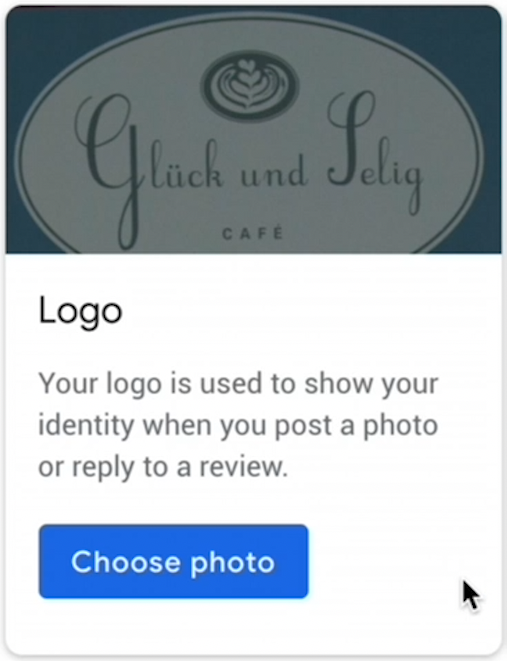
  • To set your logo, click the “Choose photo” button underneath the logo description. From here, you’ll be able to upload and size your photo of choice.
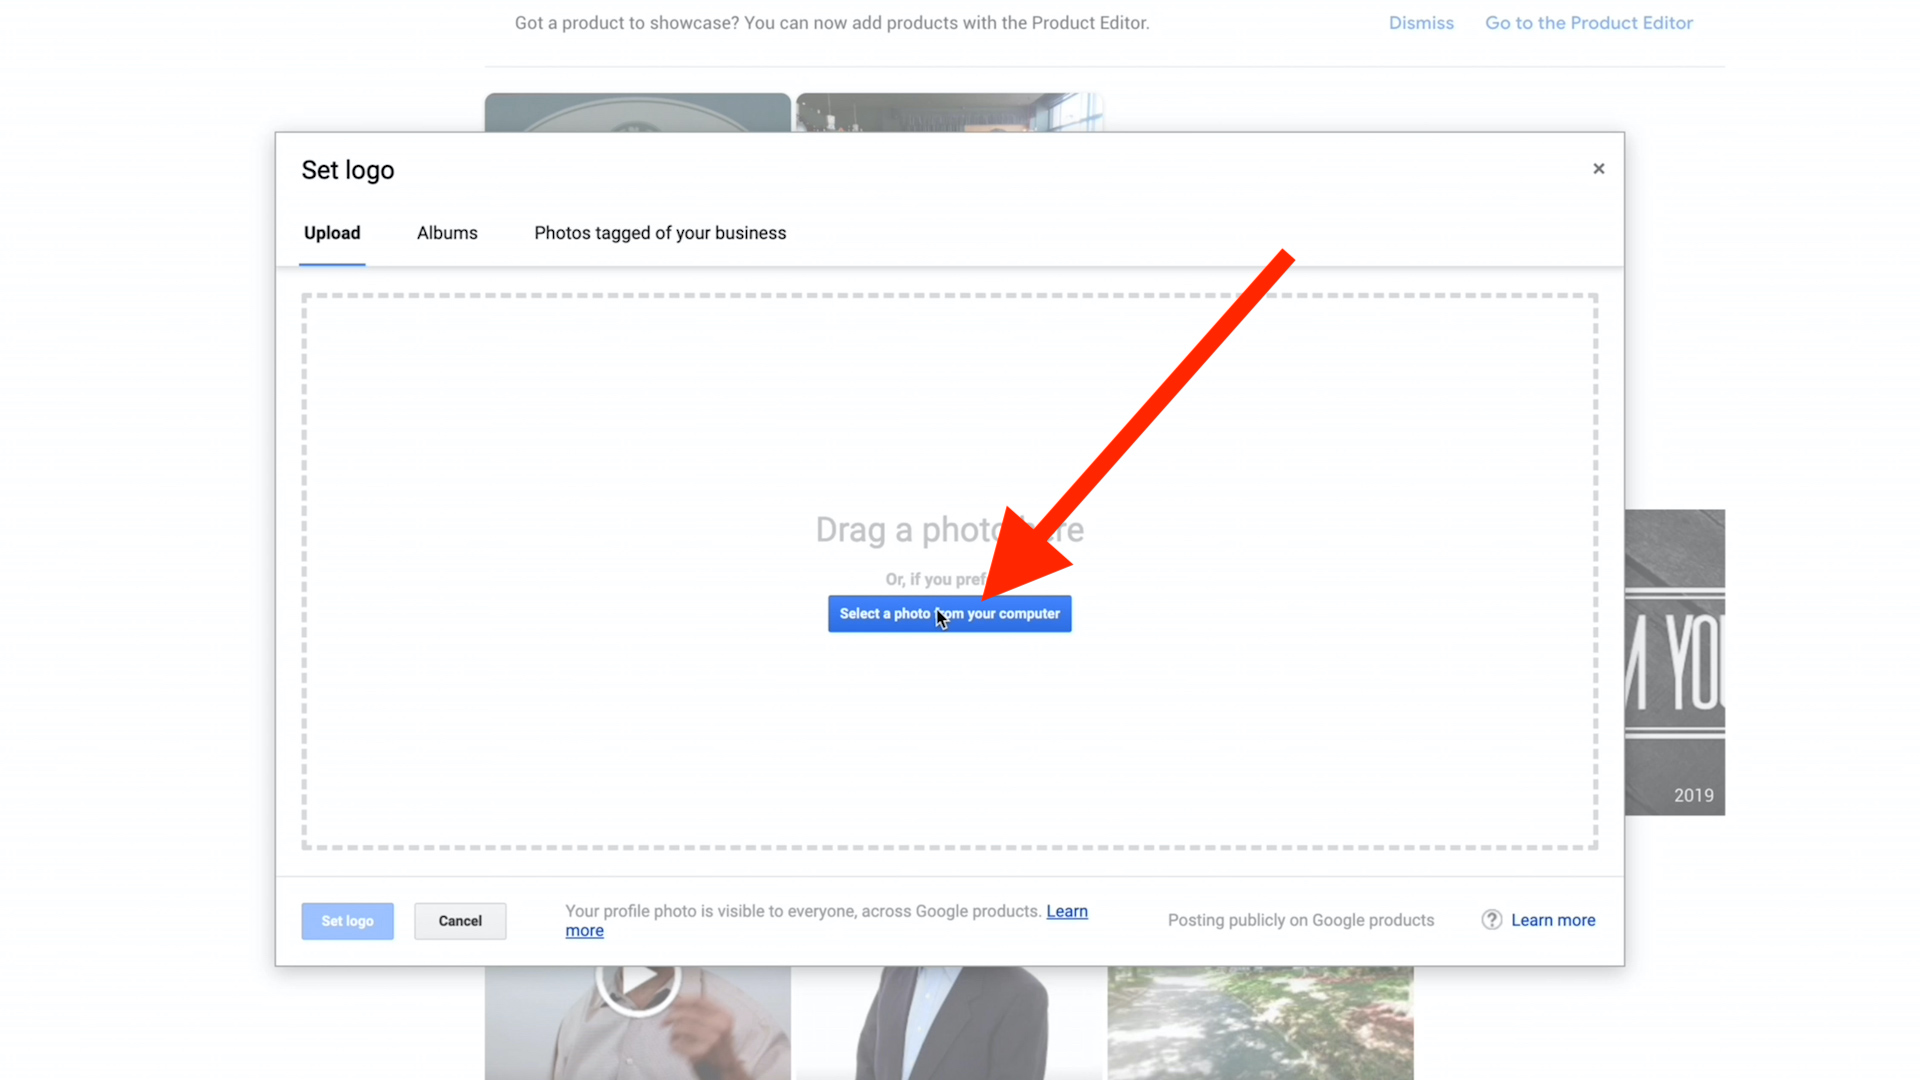
  • Next, click “Select Image From Computer.” Locate the photo on your desktop, select it, and click “Open.”
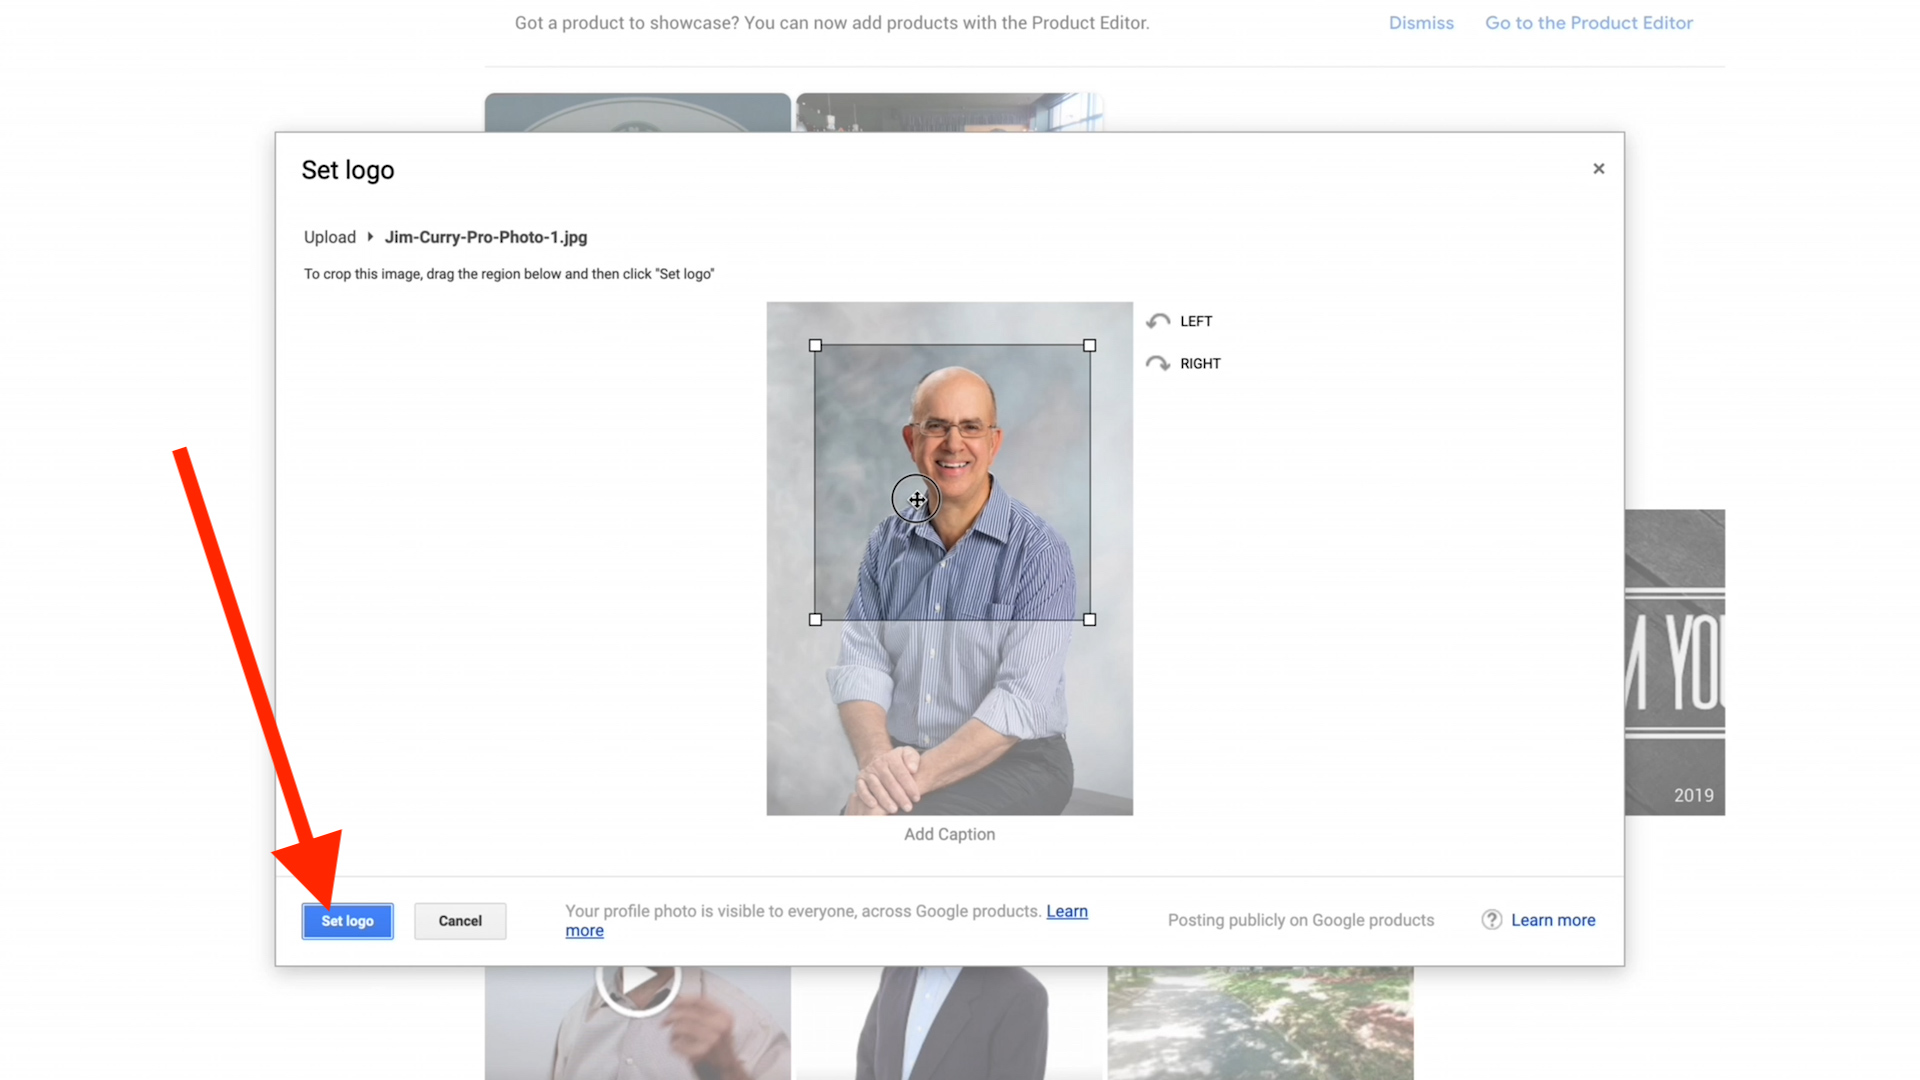
  • Once you’ve uploaded your photo, you can reposition the visible area to a proper placement. After you’ve finished setting your photo position, click the “Set Logo” button in the bottom left corner.

Reminder: Until you complete the verification process explained in Step One, none of these changes will become visible to the public.

Step 3: How To Add Products To Your Page

One of the most underutilized features of Google Business Profile is the ability to add products. As an agent, you can offer your books, as well as things like home valuations. Your products will be displayed in full view for anyone searching your page.

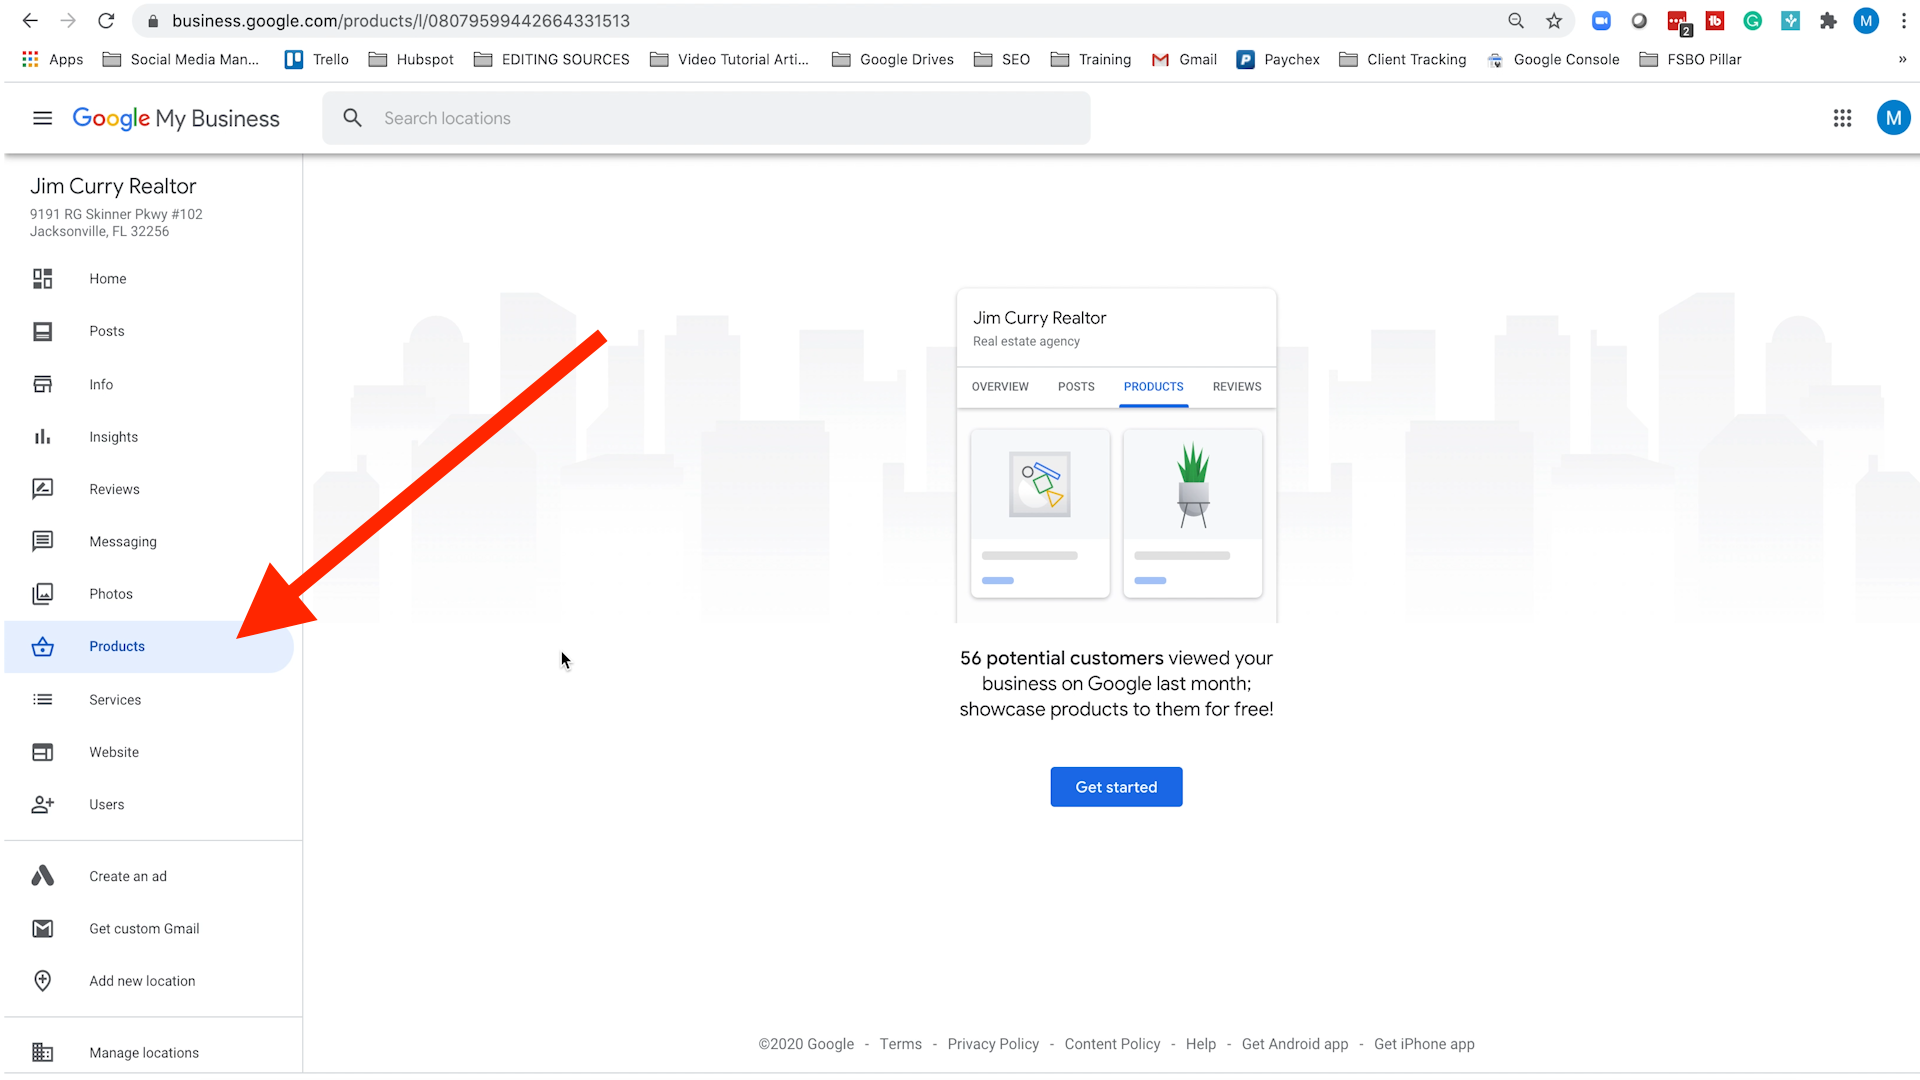
From your main Google Business Profile dashboard, find the Products page from the list along the left-hand side of the screen.

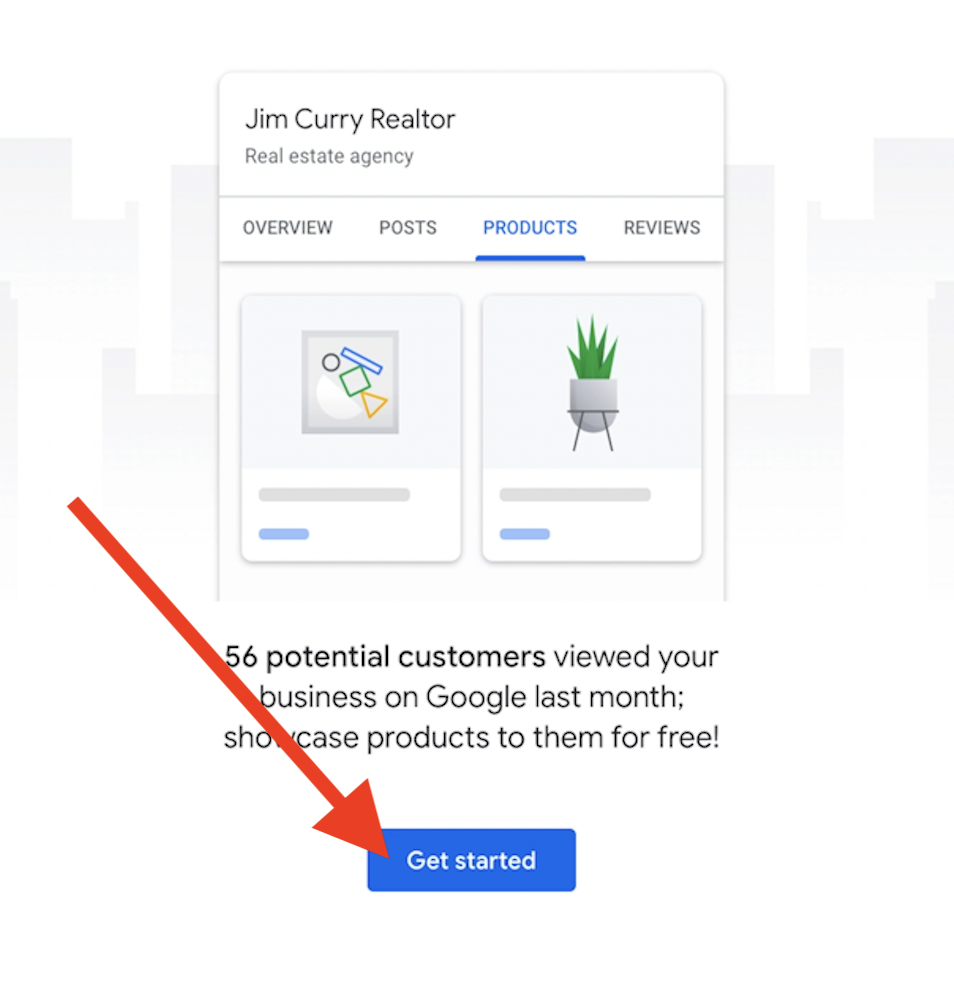
  • From the Products page, you will see the “Get Started” button.

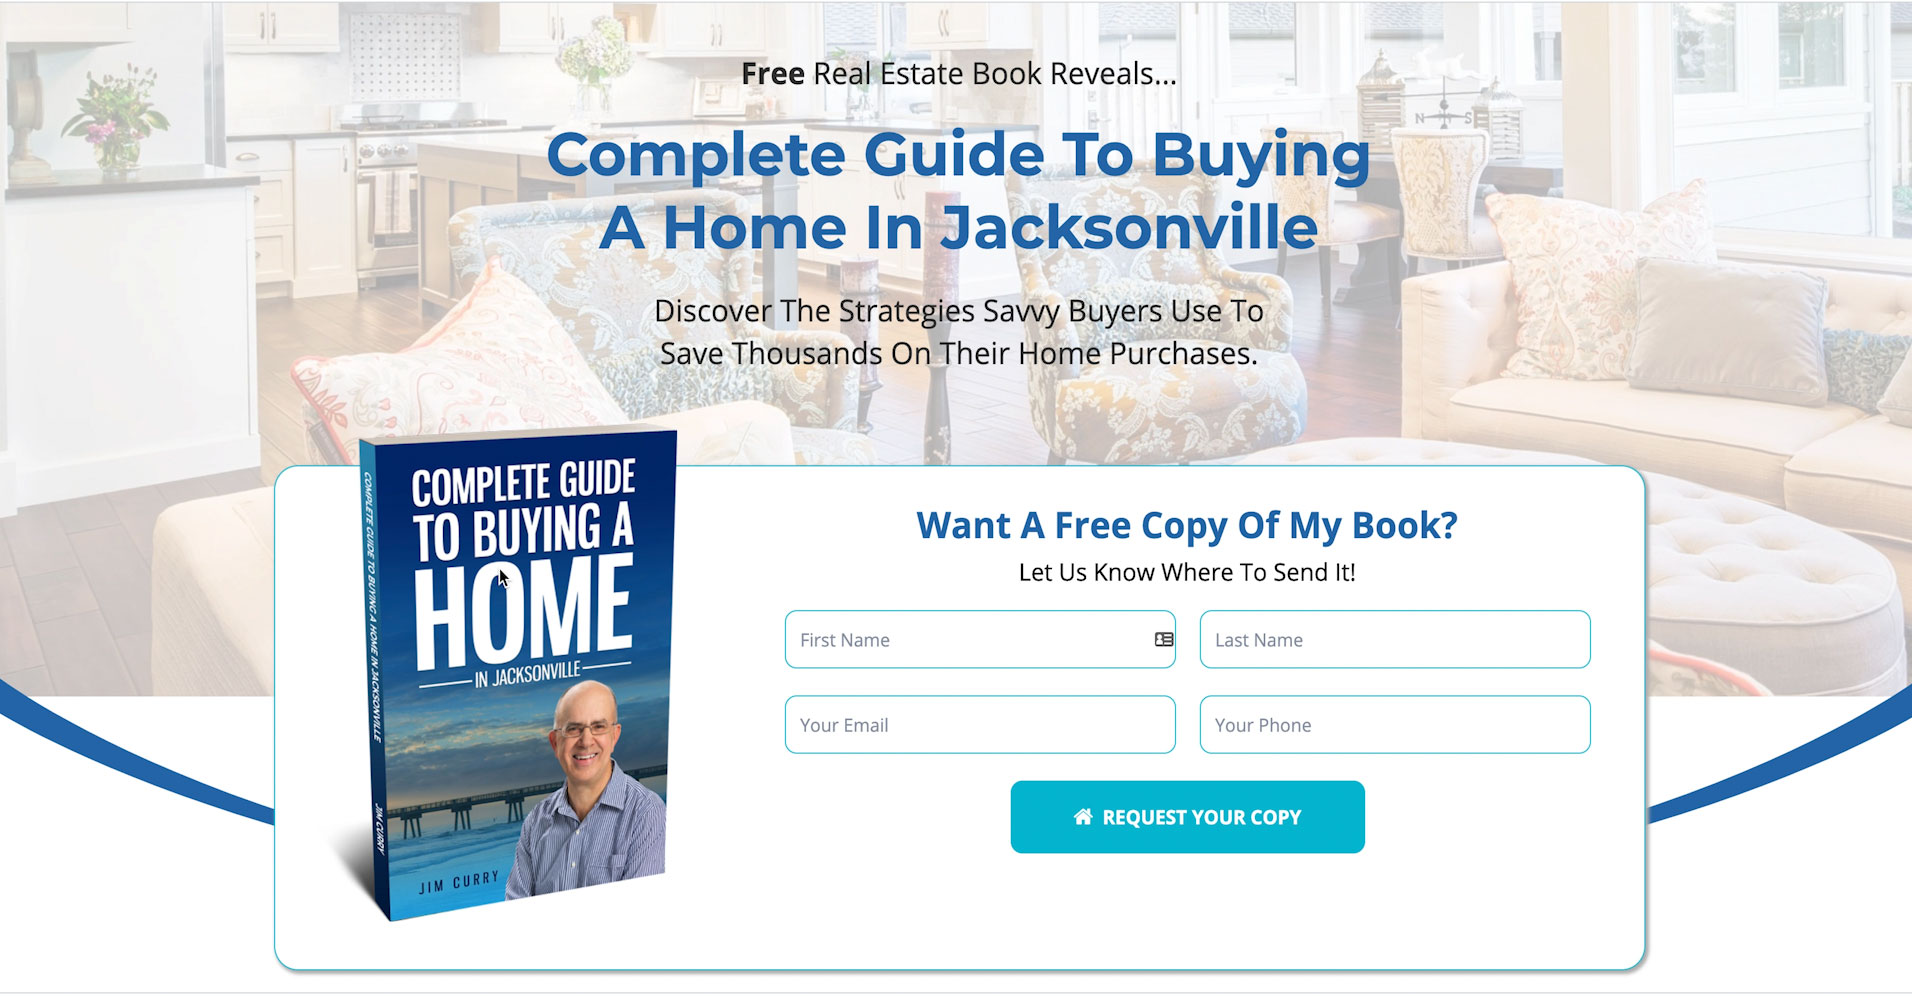
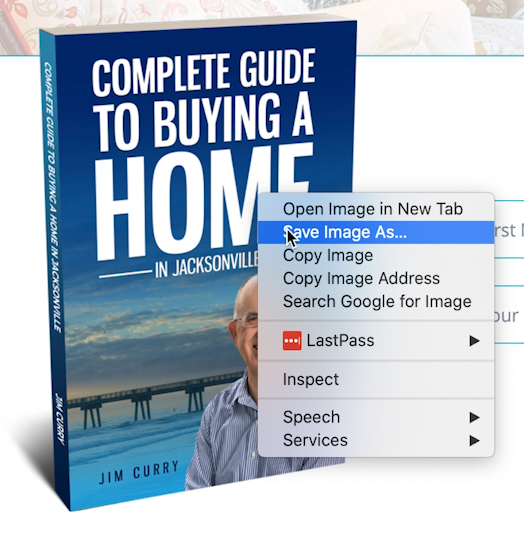
For this example, we will be creating an offer for potential clients to claim your book. Before we actually create the product listing, we need to grab an image of the book to display. Simply open your lead capture site for the book you are promoting, right-click on the book image and select “Save Image As.” Now, the image will be saved to your desktop for later use.

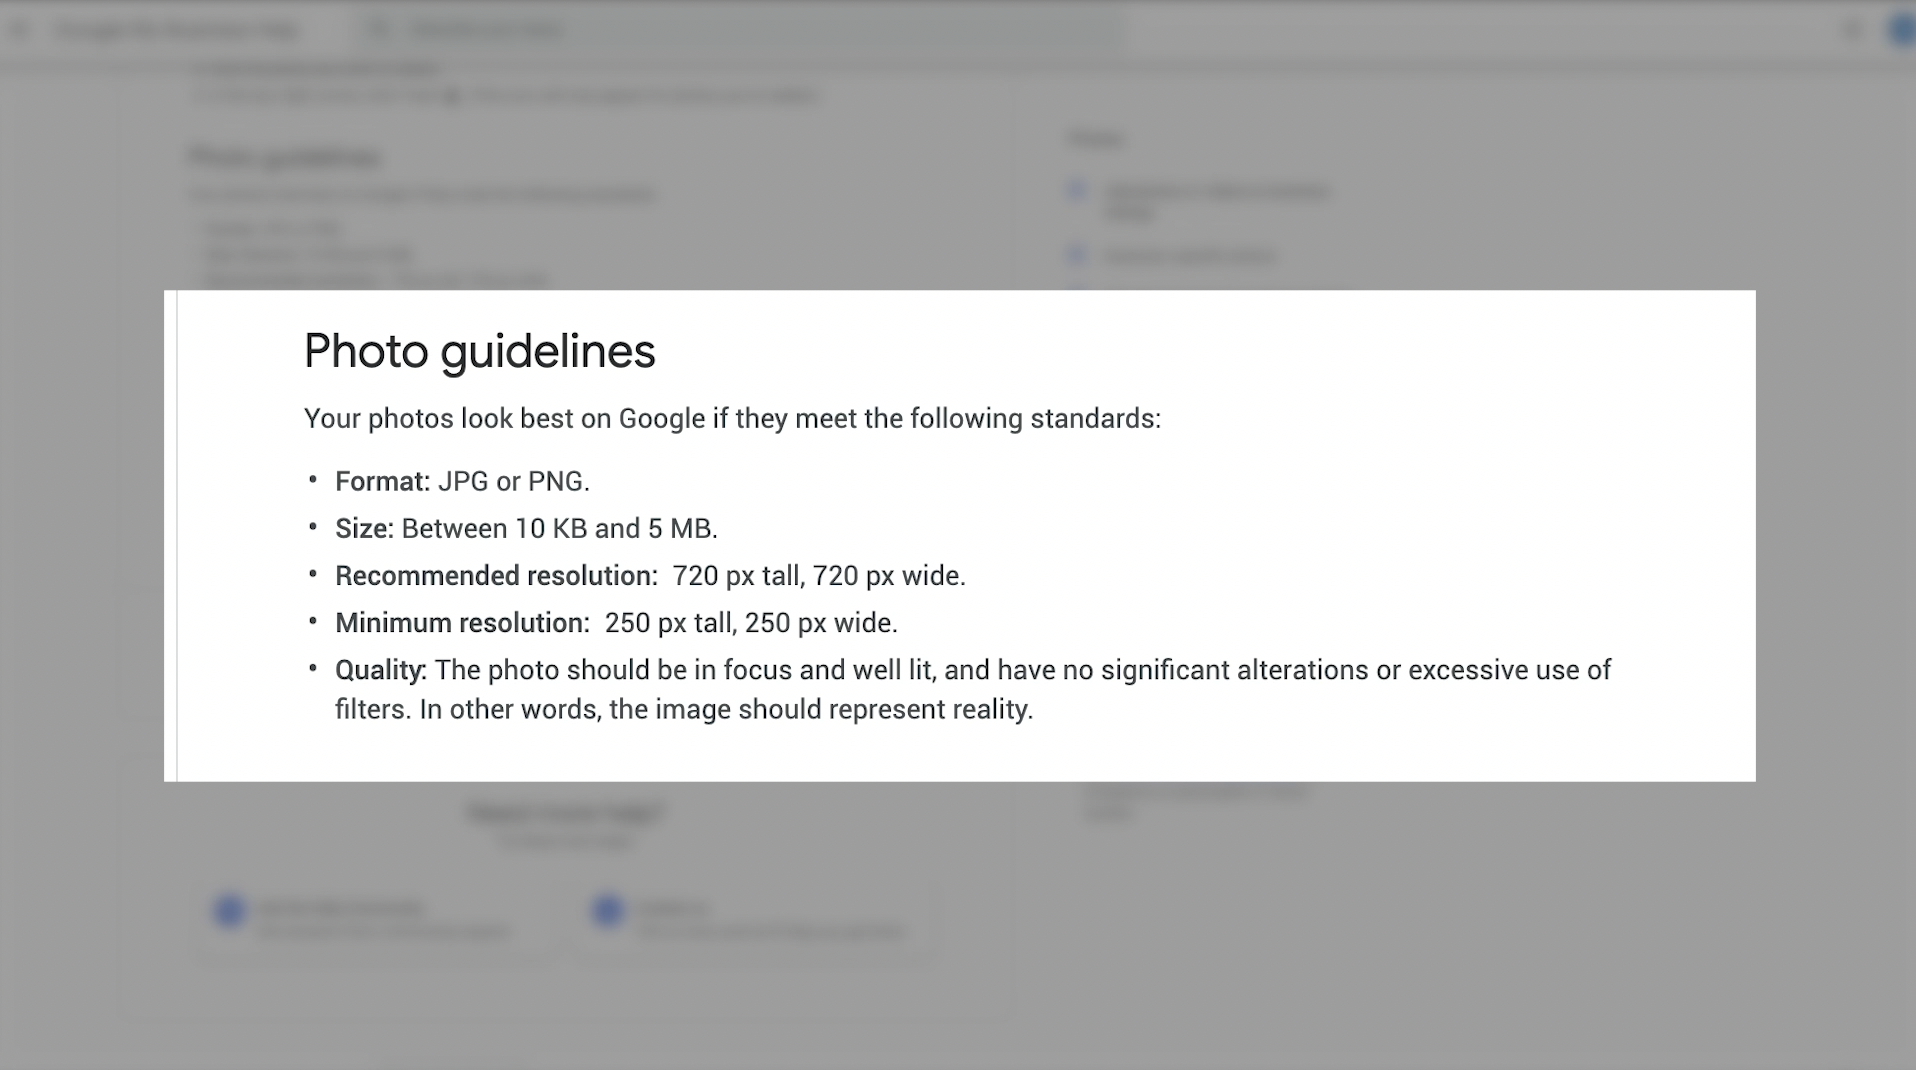
To ensure your photo is displayed in the best possible way, you want to follow the guidelines below.

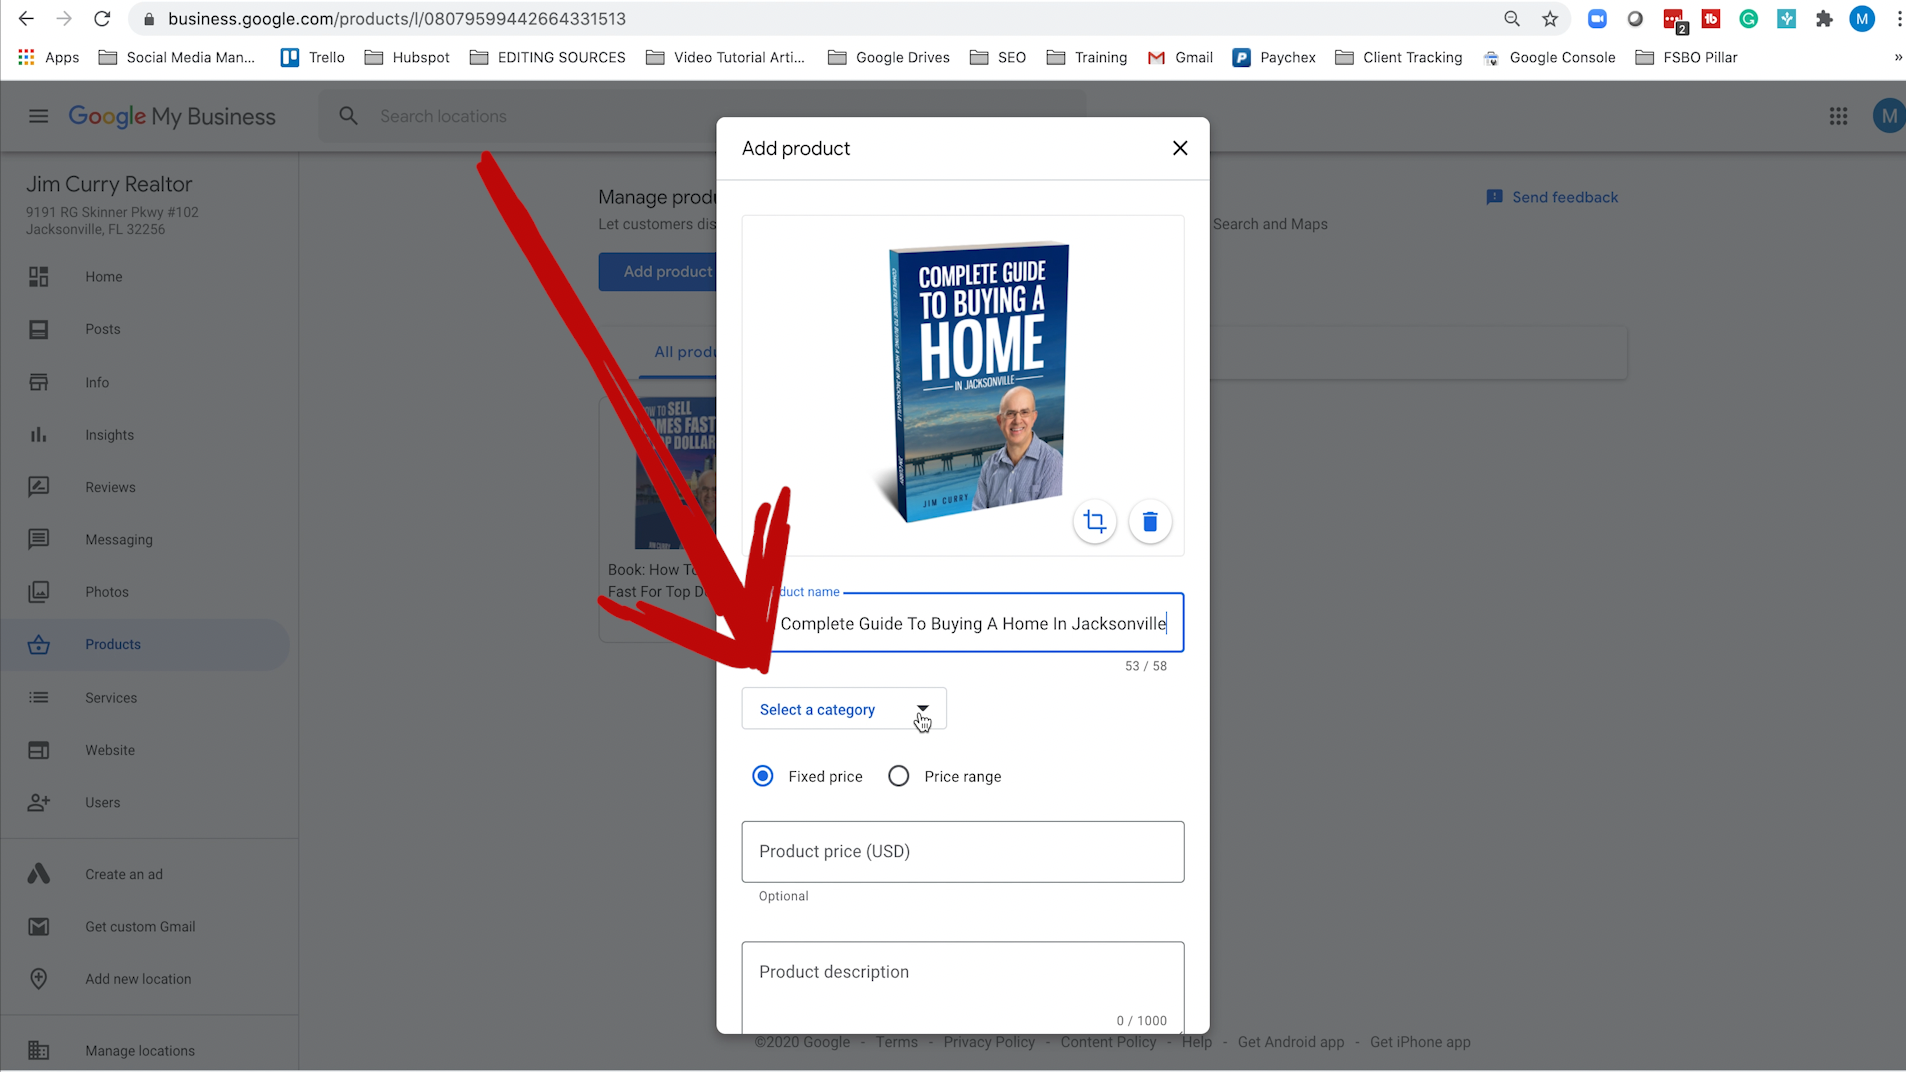
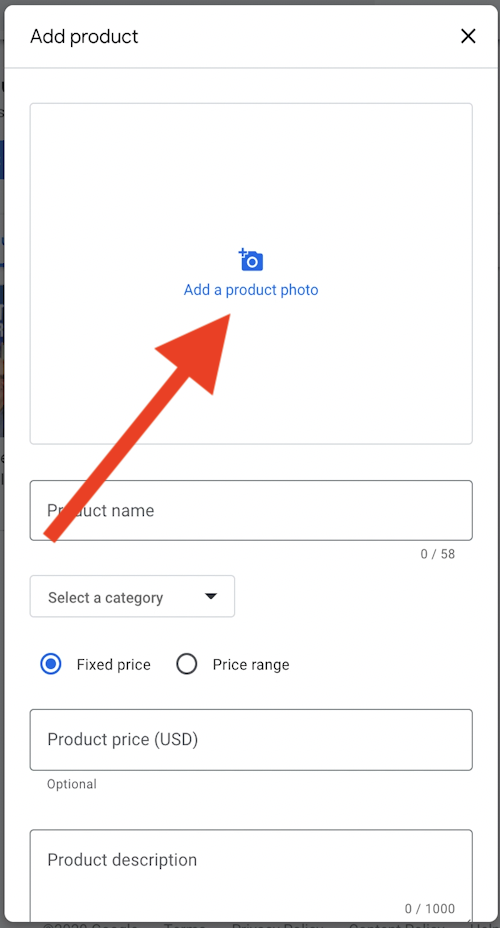
  • Once your photo is saved, you’re ready to create your product listing.First up, from the “Add Product” pane, you’ll be prompted to upload the photo you just saved.
  • Click “Add a product photo.”
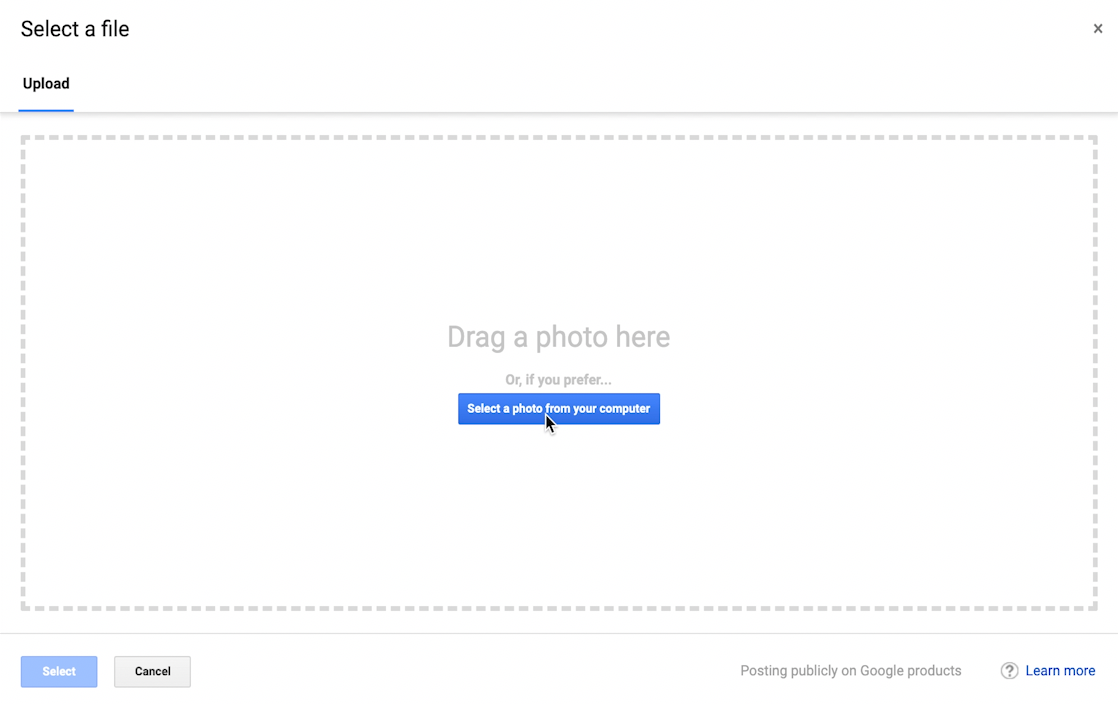
  • You’ll be taken to a window to select your photo. Click the “Select a photo from your computer” button.
  • Find the saved file on your desktop and click “Open.”
  • Your photo will then appear in the main product creator pane.
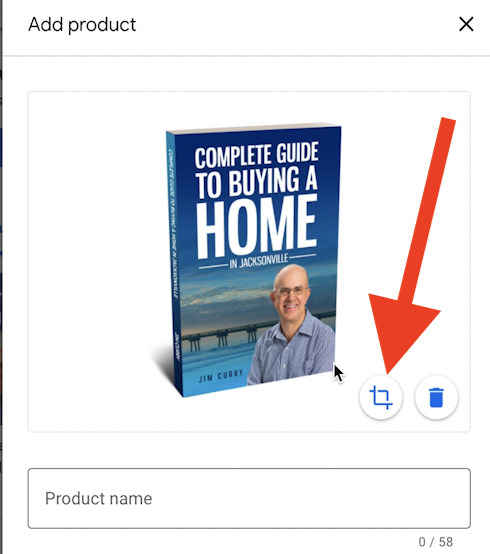
  • Click the small crop icon to the bottom left of your image.
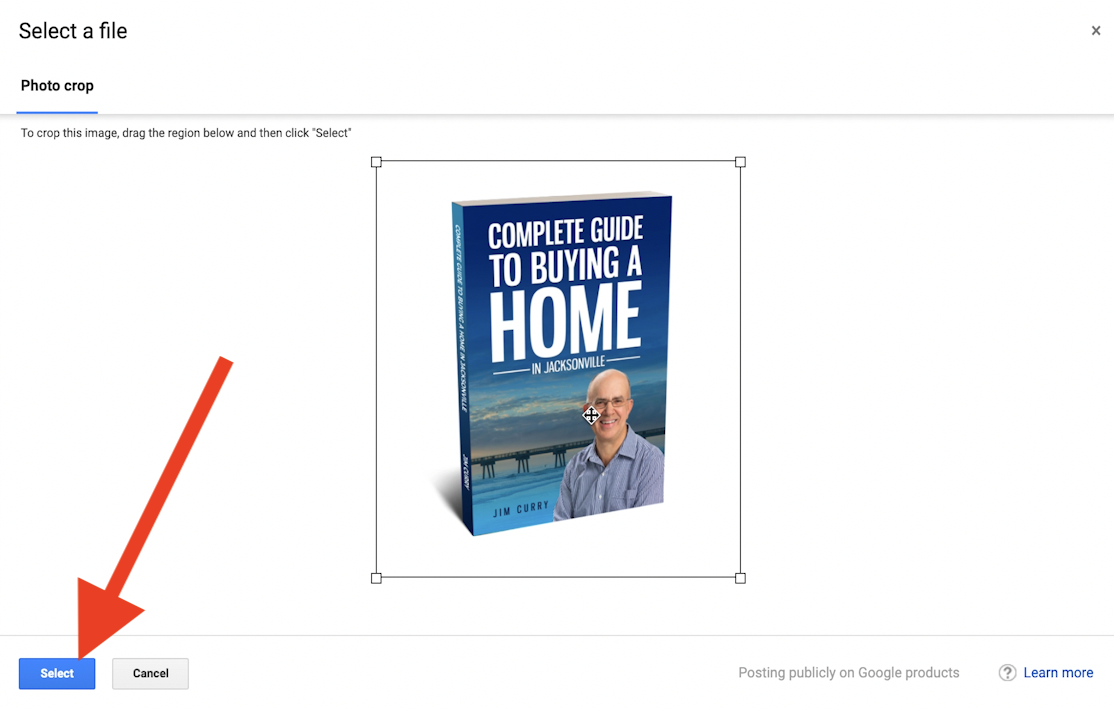
  • With the crop tool open, drag the corners of the tool out from your photo to make sure the entire image is now inside of the square.
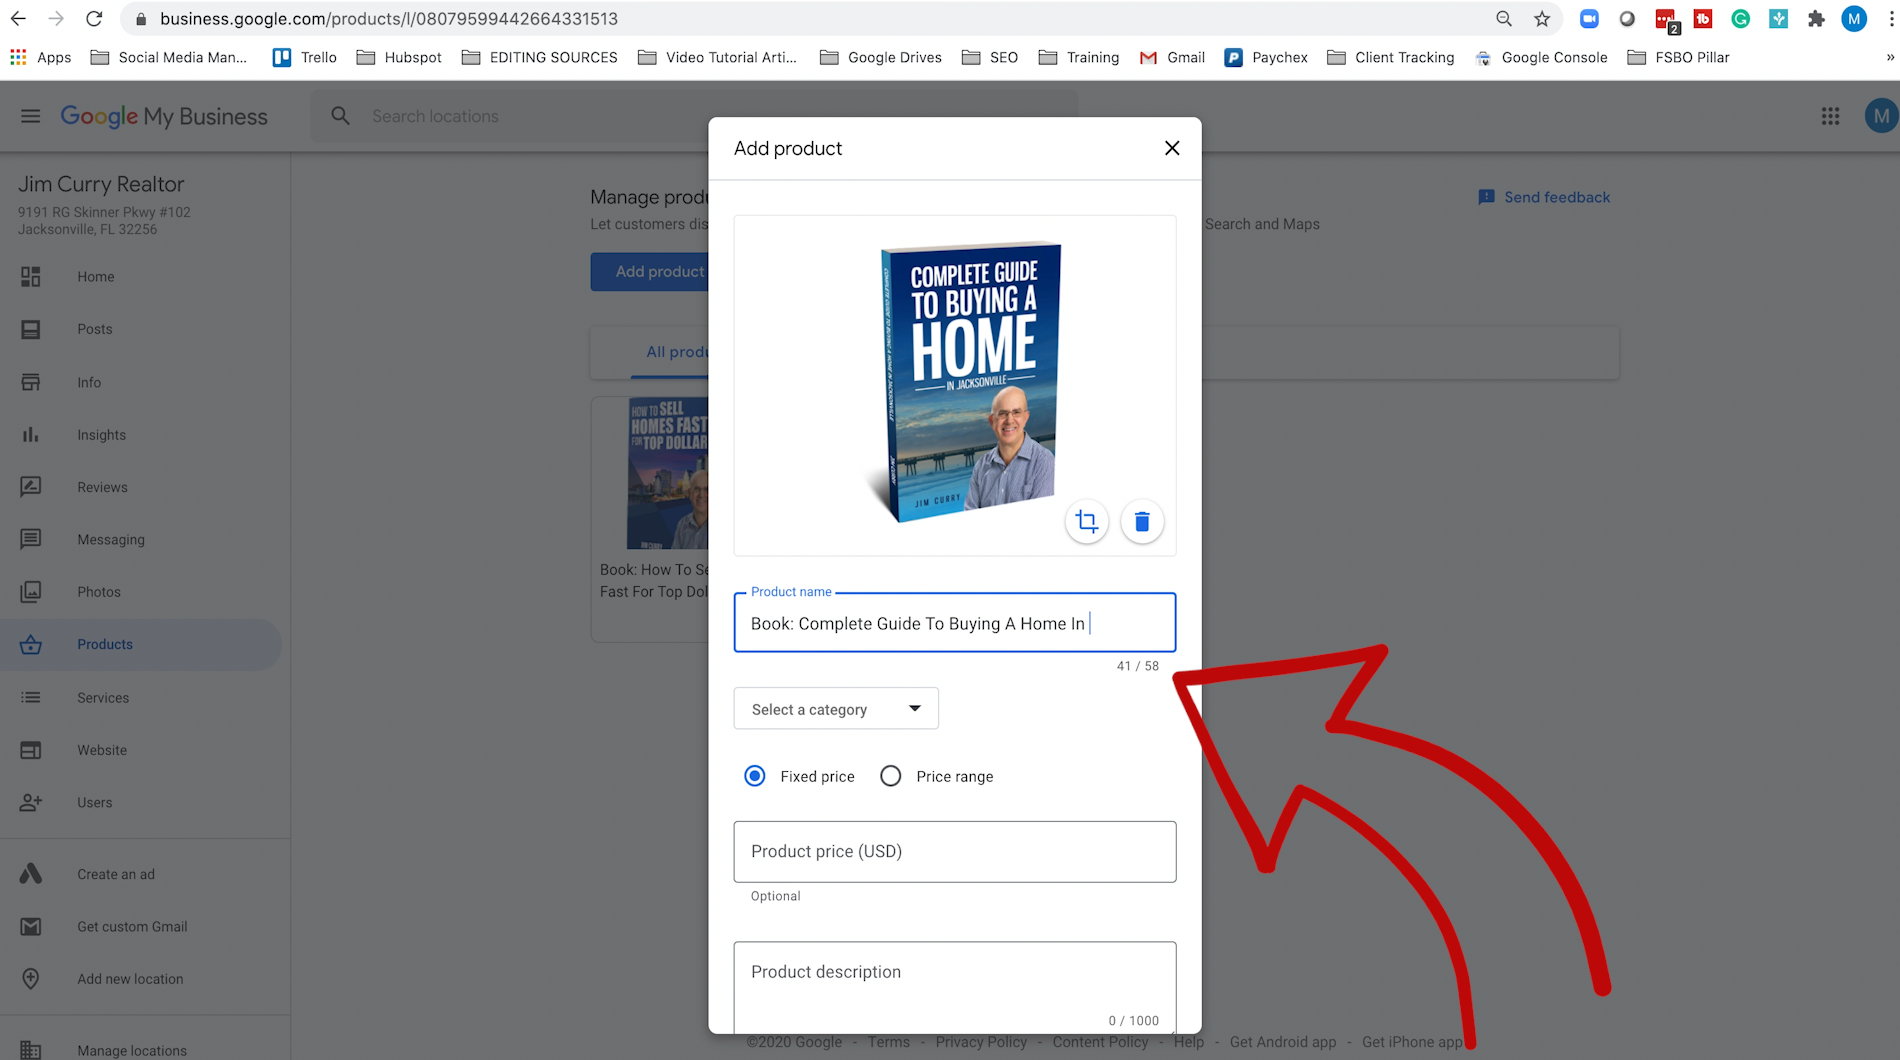
Next, you will enter the product name. There is a limit of 54 characters, but that should be plenty of space to include your entire book title.
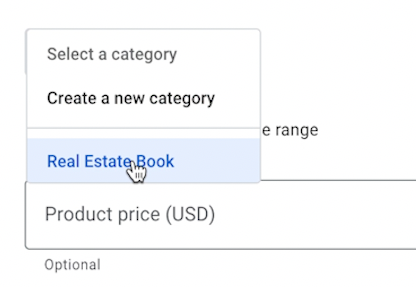
Next, you’ll select the product category. If this is your first product, select “Create A New Category” and enter an applicable category. For all future products, you will see your previously created categories in the drop-down bar.

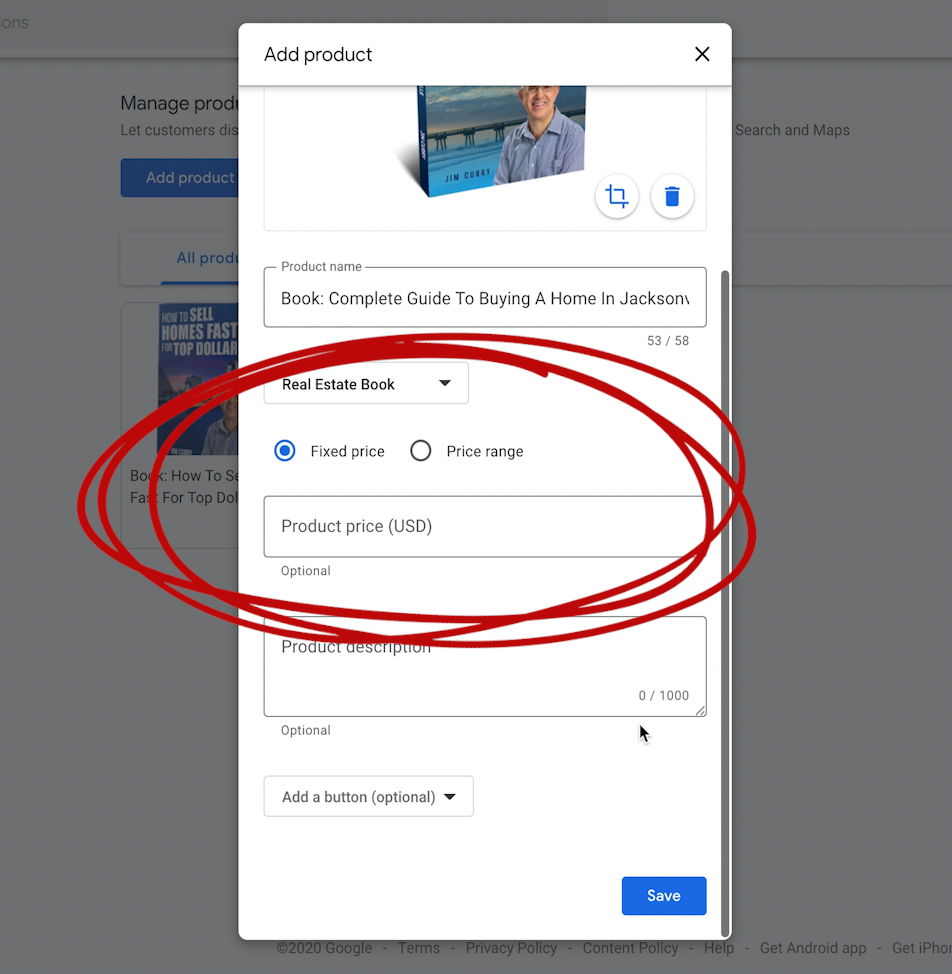
  • Next, you’ll be asked to set the price of the product. Since these are free offers, you will select “Fixed Price.”
  • Below that, you will see a box to enter the product price. This is optional, and you can leave it empty if your offer is for a free product.
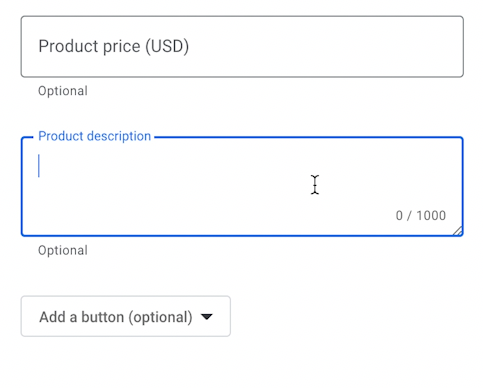
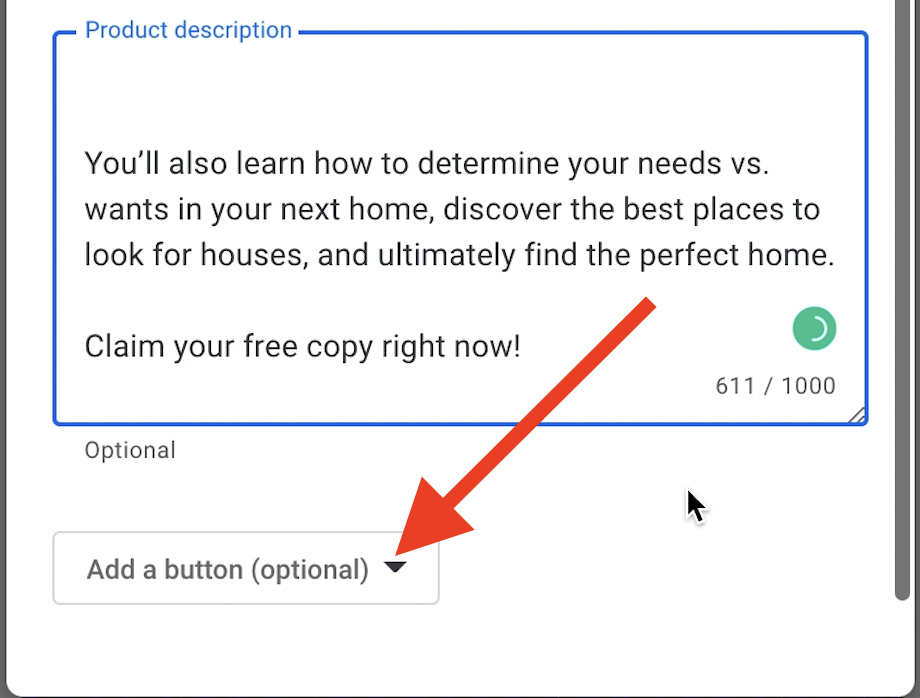
  • Next, you’ll enter your product description.
  • Notice you have a character limit of 1,000, so you will have no problem describing your product in as much detail as you’d like.
  • Once you have filled out your product description, you have the option to “Add A Button.”
  • While optional, we highly recommended you include one. The button will serve as a link to the product you are offering.
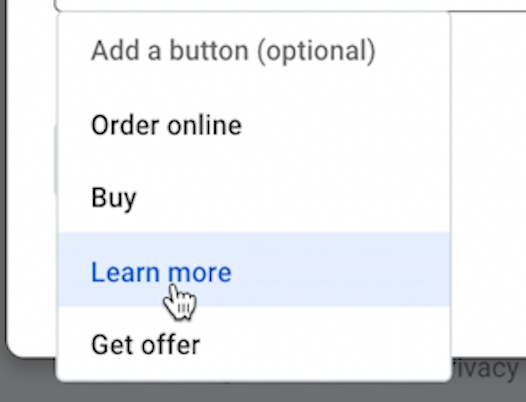
  • When you click the “Add A Button” drop-down menu, you will be able to make one of four choices.
  • If you are promoting your book, select “Learn More.”
  • If you’re offering something like a home valuation, select “Get Offer.”

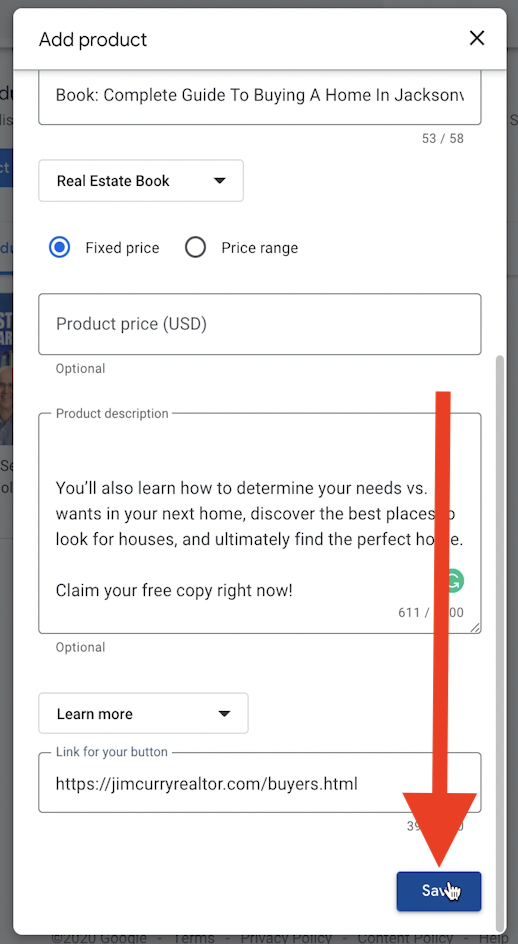
Once you select the type of button you want to display, a box will appear to insert the link. Simply copy and paste the web address for the page you are trying to promote.

  • Now that you have successfully added all of the product information, click “Save.”There is no limit to the number of products you can add to your page. Just note that only three will be displayed on the page at a time, and the most recently added products are shown. So keep that in mind when you’re adding products to maximize your page exposure.
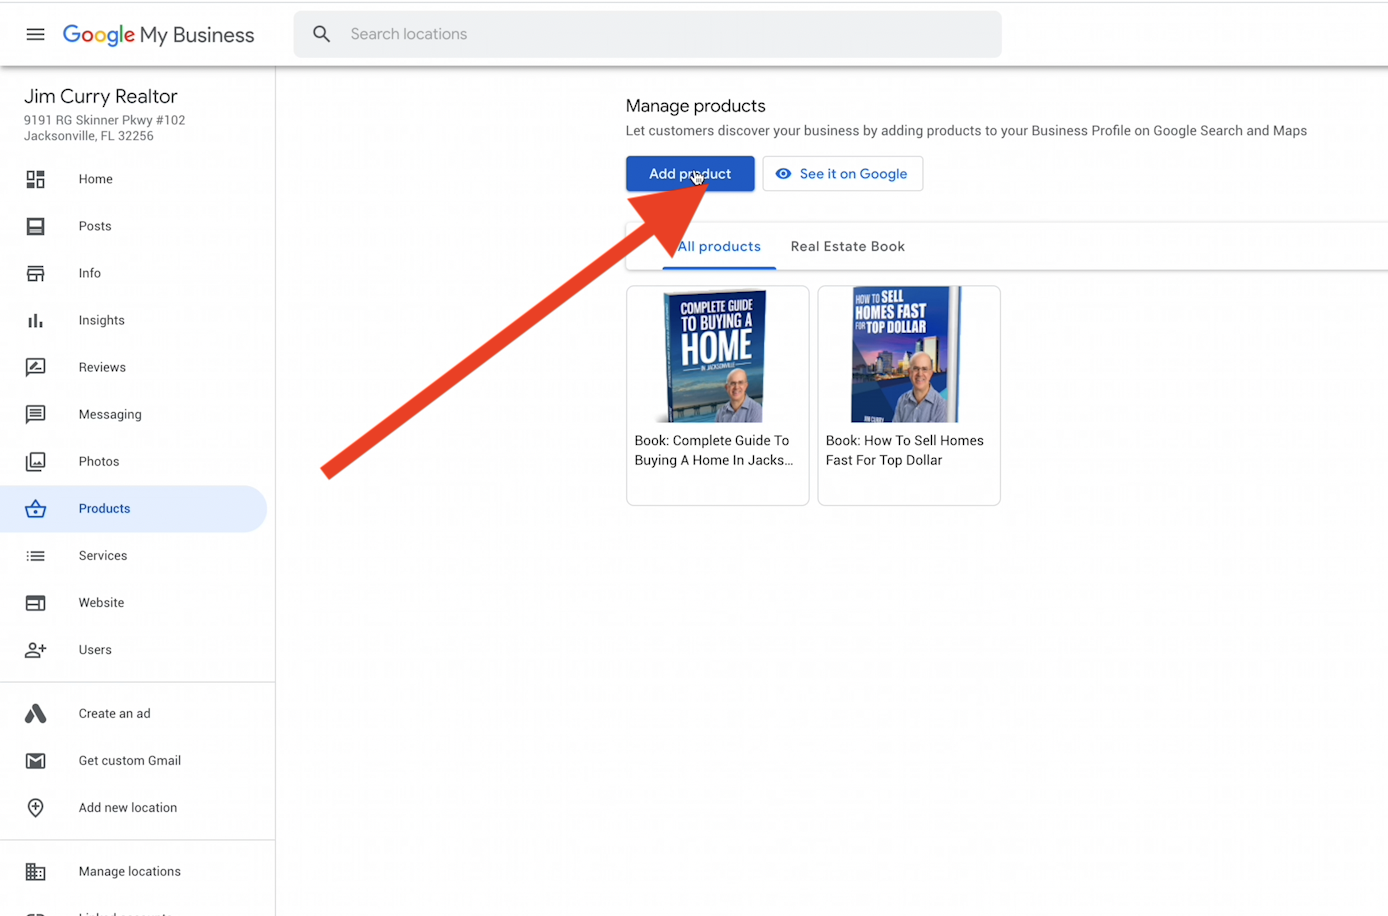
  • Anytime you decide to add a new product, simply navigate to the “Products” window of your Google Business Profile dashboard and click the “Add Product” button.

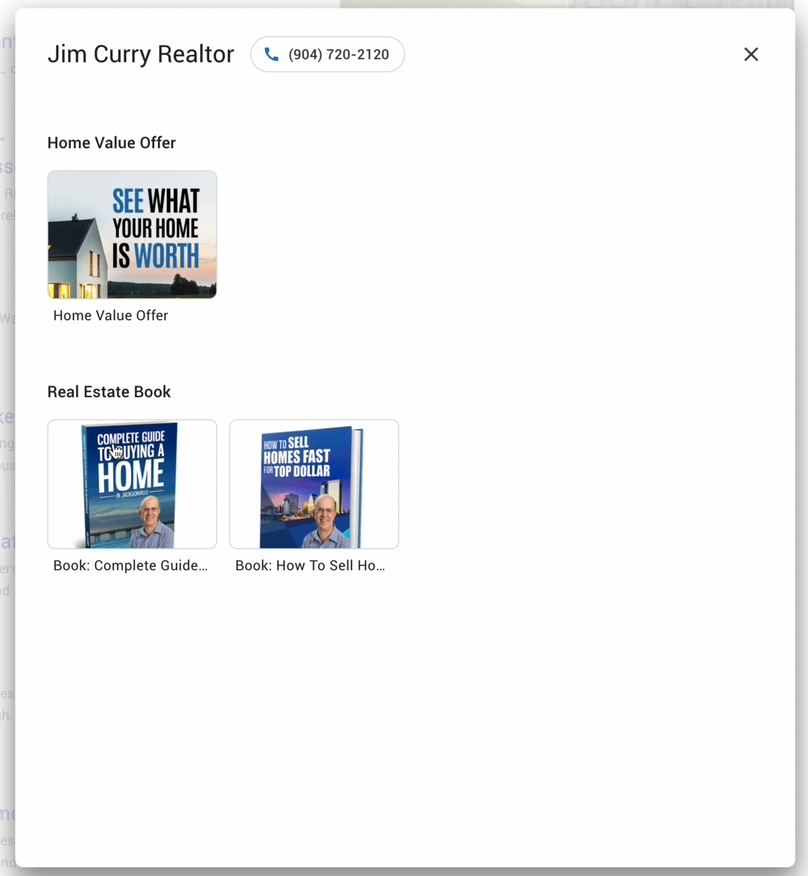
When a potential client views your page, they will see your products displayed underneath your primary information. They can either click on the products right from this page or click “View More” to see all of your offers broken down into the previously determined categories.

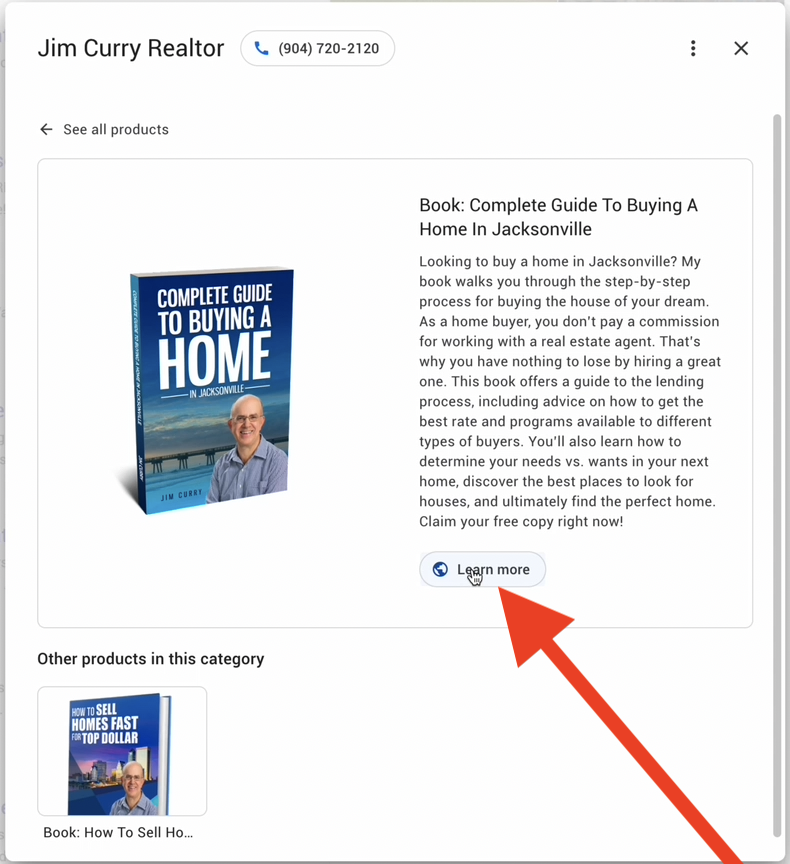
When your product is clicked, the person viewing it will be presented with the product description and the button linking to that product. This is a fantastic way to gain traffic to lead capture sites and start gathering new leads.

Step 4: How To Get Reviews From Past Clients On Your Google Business Profile

In a business where word-of-mouth is king, gathering reviews from past clients is crucial. The great thing about Google Business Profile pages is those star ratings and reviews from past clients are displayed right on the front page for everyone to see.

Now that you’ve successfully created and verified your Google Business Profile, it’s time to start gathering reviews. One thing to note: You want to spread this process out over a period of several months. While you may be excited to get as many reviews on this page as possible, you want to make sure all of them do not come in at one time.

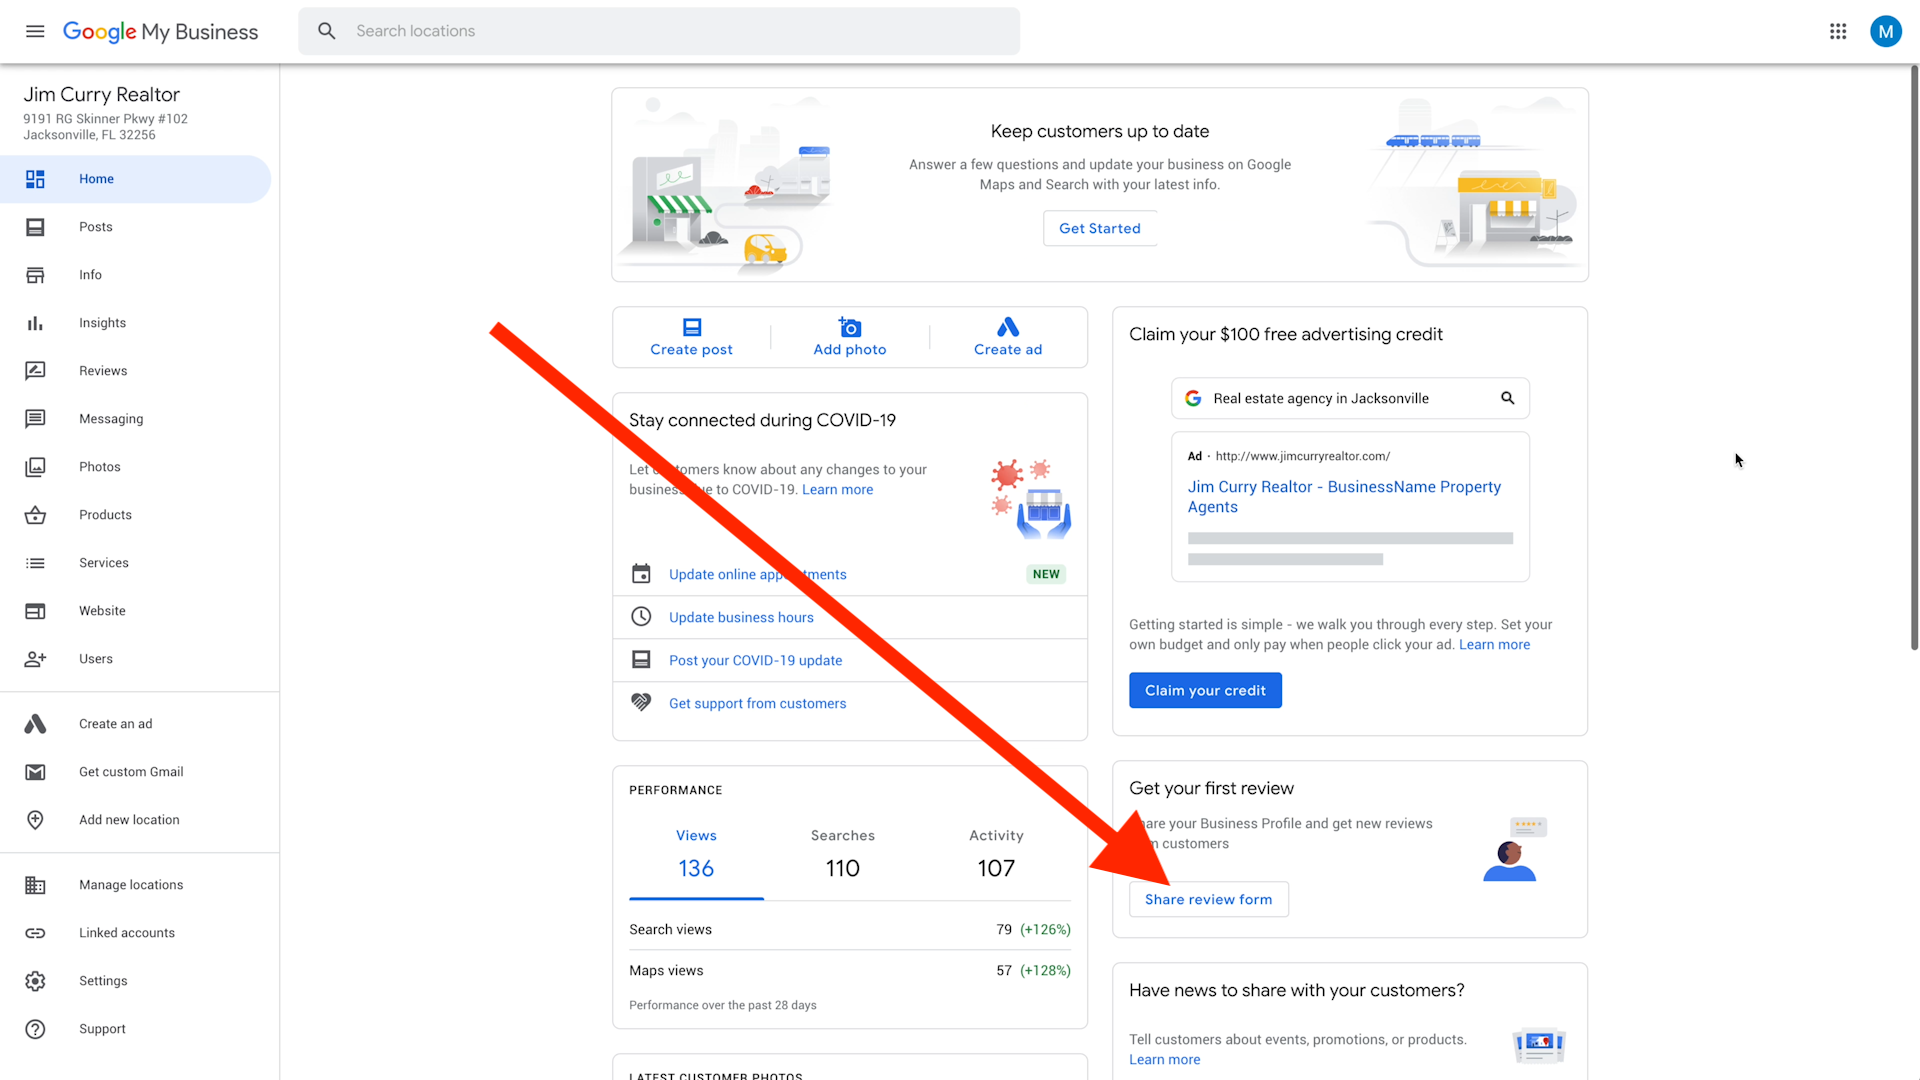
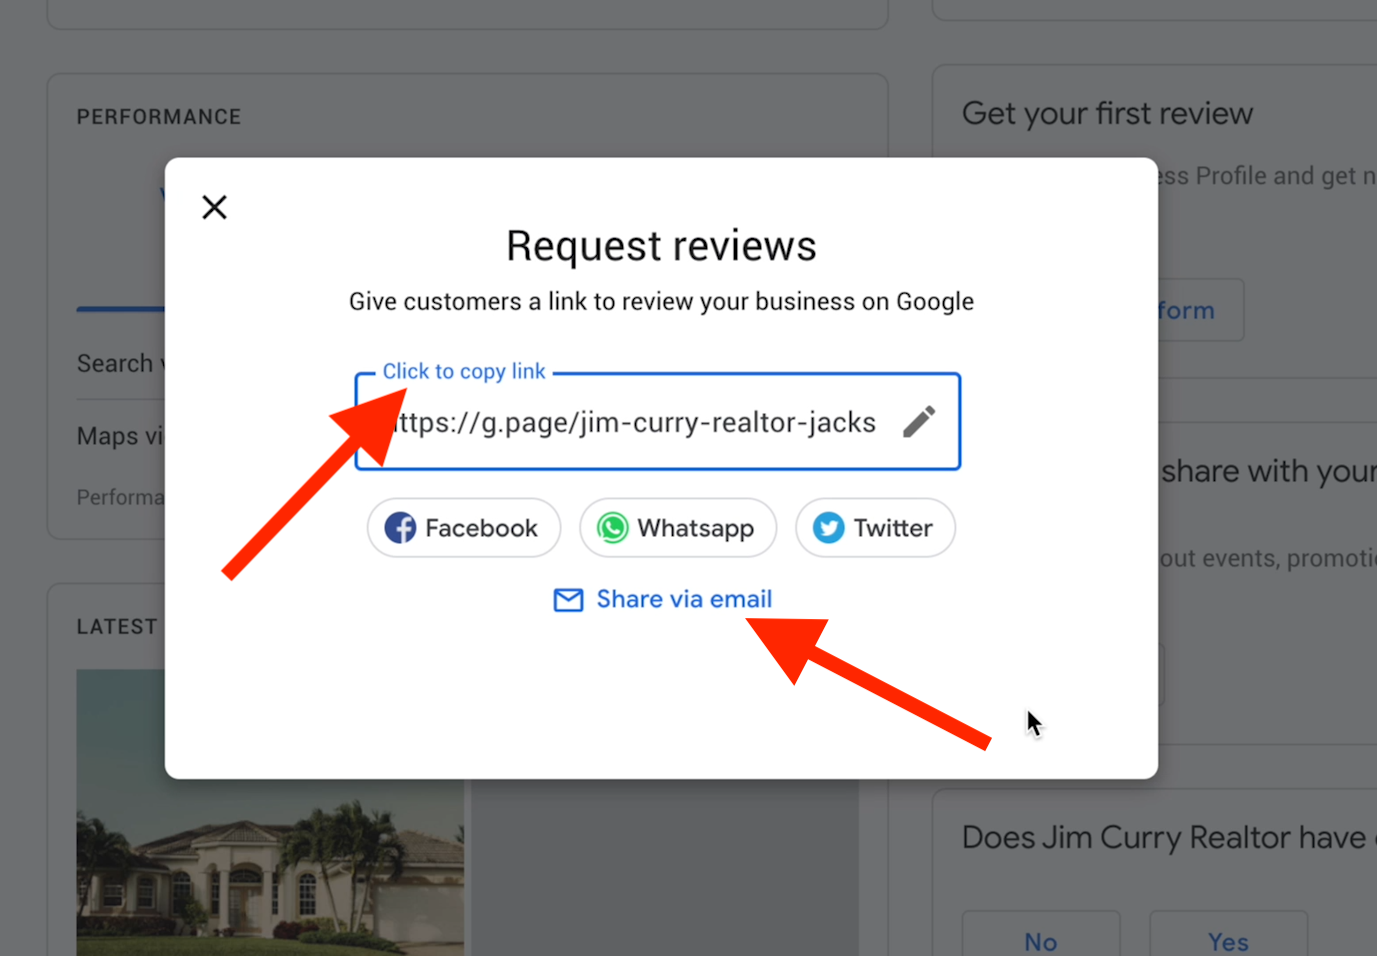
  • Google makes it very easy to get reviews directly on your business page. From your main dashboard page, you will see a section titled “Get Your First Review.”
  • Click on the button that says “Share Review Form.”

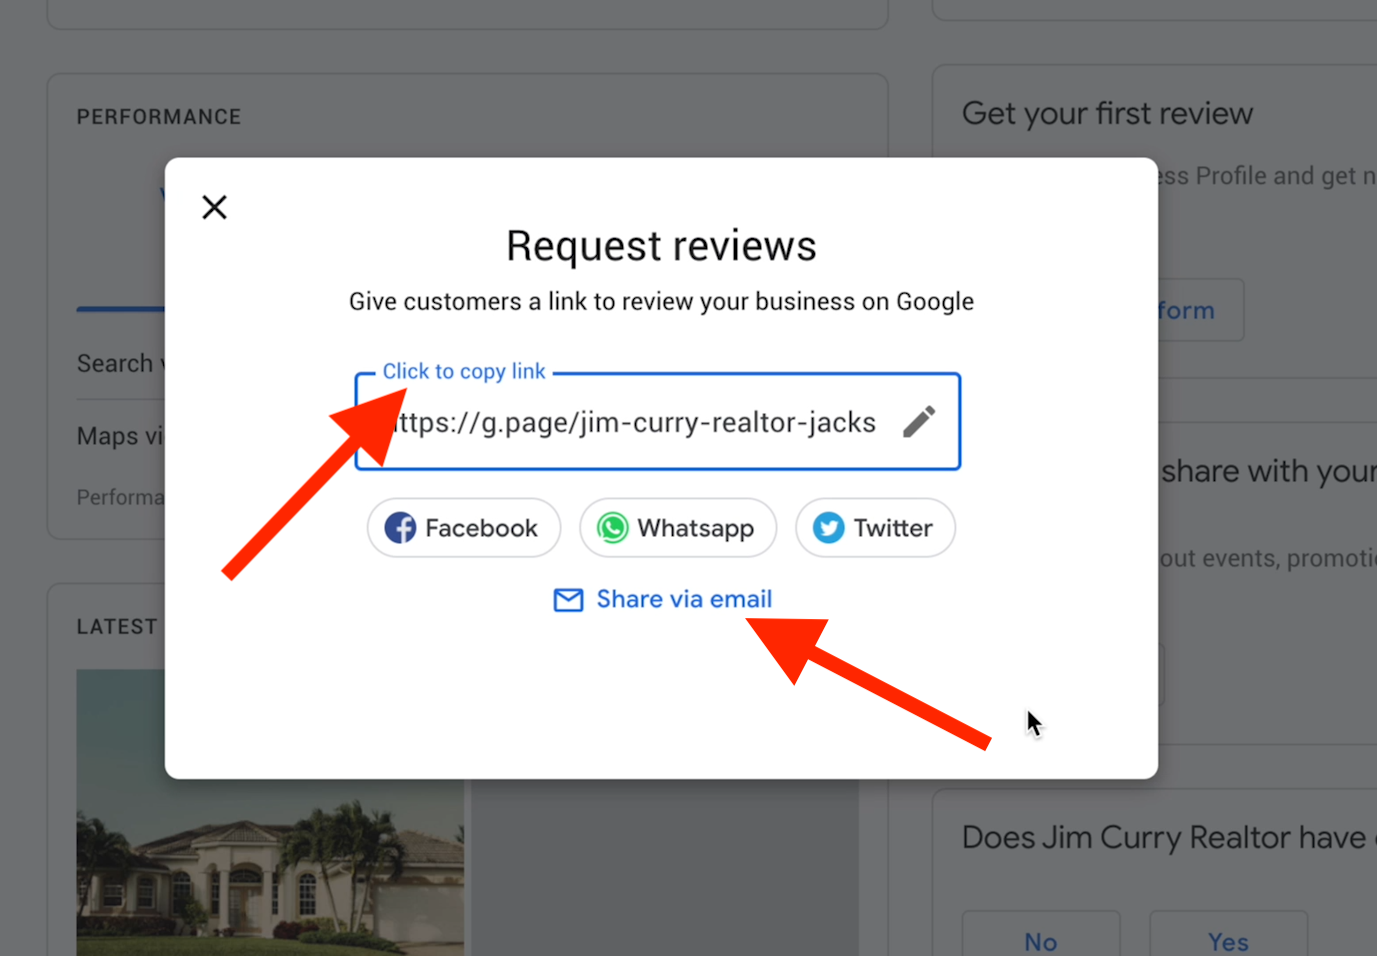
The window below will then pop up. As you see, there are several options for sharing your link for reviews. While you can certainly add it to Facebook, we recommend sending the link via personalized text or email.

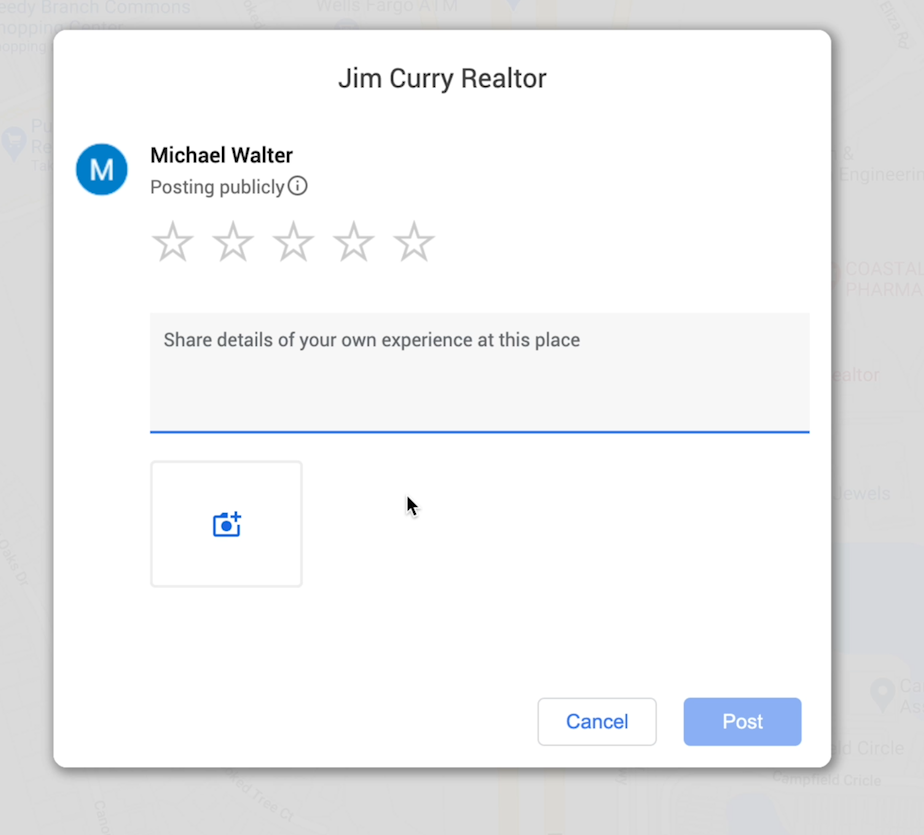
  • Once your past client clicks on the provided link, they will be brought to your Google Business Profile with this pop-up box present. They can add up to a 5-star rating and share details of their experience working with you.Another great option is to add photos. Any photo posted here will be visible on your page and really helps add credibility.

Asking For Reviews

In order to populate all of your business profiles with reviews, you have to first ask for them. By incorporating a review collection process into your routine, you are more likely to be successful.

Upon the closing of a deal, you can send a congratulatory text using one of these templates:

For Buyers:

Congratulations on your new home, [customer name]! Did I do a good job of helping you navigate the buying process? Please let me know here: [Review link].

[Customer name], now that the closing is over, are you happy with my services? Did I do a good job negotiating on your behalf? If so, please consider leaving a review! [Review link].

For Sellers:

Congratulations on selling your home, [customer name]! Would you list with me again in the future? Your feedback is vital. Would you leave some here? [Review Link].

[Customer name], I just wanted to again congratulate you on the closing. Will you do me a favor? Your feedback is vital to my success, and I would really appreciate it if you took a few moments to leave a review here [Review Link]. Thanks!

If email is more your style, you can use a template like this:

“[Customer Name], thank you so much for choosing me as your real estate agent! I hope you are as happy with how your transaction went as I am. May I ask you the favor of writing a review about your experience with me? I use this feedback as a way to continually improve. Here is the link to leave your comments: [Review Link] “Thank you again, [Customer Name]. I appreciate you taking the time to give me feedback, and I look forward to reading your remarks.”

Don’t be afraid to include a little gift like an electronic gift card to a nearby coffee shop as a token of appreciation.

Ideally, you will be collecting all of your reviews right after closing, but things happen, and in some cases, you will need to reach out to clients you worked with months or even years ago.

The key to reaching out to these clients is to have a reason for your communication.

And there is no better reason than an anniversary.

Email is best for reaching out to past clients, and you can use a template like one of the following:

For Buyers:

“[Customer Name], thank you again for choosing me as your real estate agent! I wanted to wish you a happy [###] anniversary in your home! I hope the home has been everything you dreamed. May I ask you the favor of writing a review about your experience with me? These reviews go a long way with prospective clients, and I would them like to hear about the experiences of my previous clients. You can leave your comments here [Review Link].

“Thank you again, [Customer Name]. I appreciate your feedback and look forward to reading it.”

For Sellers:

“[Customer Name], thank you again for choosing me as your real estate agent! I wanted to wish you a happy [###] anniversary on the sale of your home! I hope things have settled down a bit and that you’re as delighted with the end results as I am.  May I ask you the favor of writing a review about your experience with me? These reviews go a long way with prospective clients, and I would like them to hear about the experiences of my previous clients. You can leave your comments here [Review Link].

“Thank you again, [Customer Name]. I appreciate your feedback and look forward to reading it.”

How To Get The Right Reviews

The best reviews include personal stories that reflect your effectiveness, personality, work ethic and qualifications. These specific stories will provide potential clients something to relate to when they’re making a decision on who to hire.

So, how do you get these types of reviews?

It all starts with asking the right questions.

There is no reason to shy away from asking a past client specifically if they would recommend or use your services again in the future. Just don’t forget to follow up with the most important question — Why?

Here is a list of questions to help elicit the type of reviews you are looking for:

  • What made you choose me as your agent?
  • How did I help you (explain specific problem)?
  • What was the best thing I did to help you sell/buy your home?
  • How did we overcome (add a specific issue that arose)?
  • What stood out most to you about my service?
  • Would you recommend my services to a friend? What would you say?

By asking these questions, you’ll have a handful of short stories to add to a review page on your website, your social media and even the testimonials section of your book.


Pro Tip: Hire a Virtual Assistant to handle this for you! From lead generation and appointment setting to social media management and data collection, the Boost Assist team can help you delegate routine tasks and free up your schedule to focus on the bigger picture!

Find out more about Boost Assist here!

Other Marketing

Let's go in-depth to make sure you are building processes that will continue to bring in listings.

How To Get The Perfect Headshot For Your Marketing Materials

Read More

How To Get Online Reviews And Position Yourself As The Trusted Expert

Read More

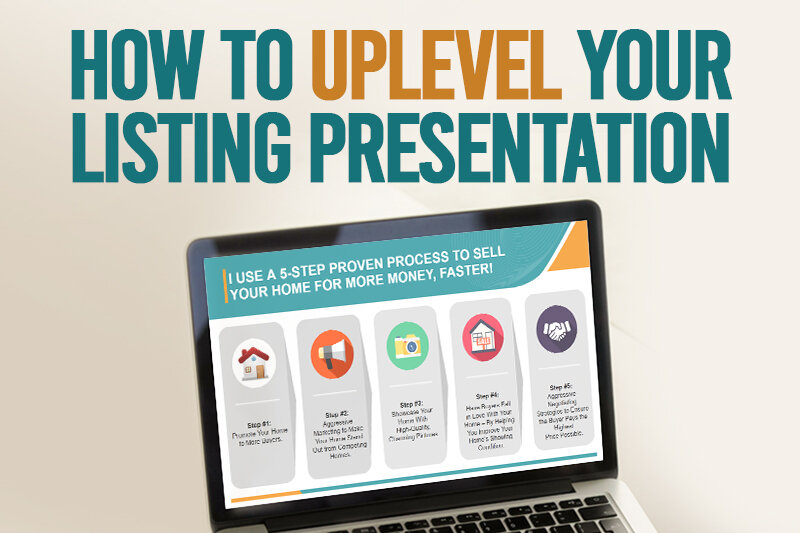
Uplevel Your Listing Presentation

Uplevel Your Listing Presentation

Your listing presentation is crucial! It takes a lot of time, energy, and effort to secure a listing appointment. So, it pays off big to make sure your presentation is solid, so you win the listing!

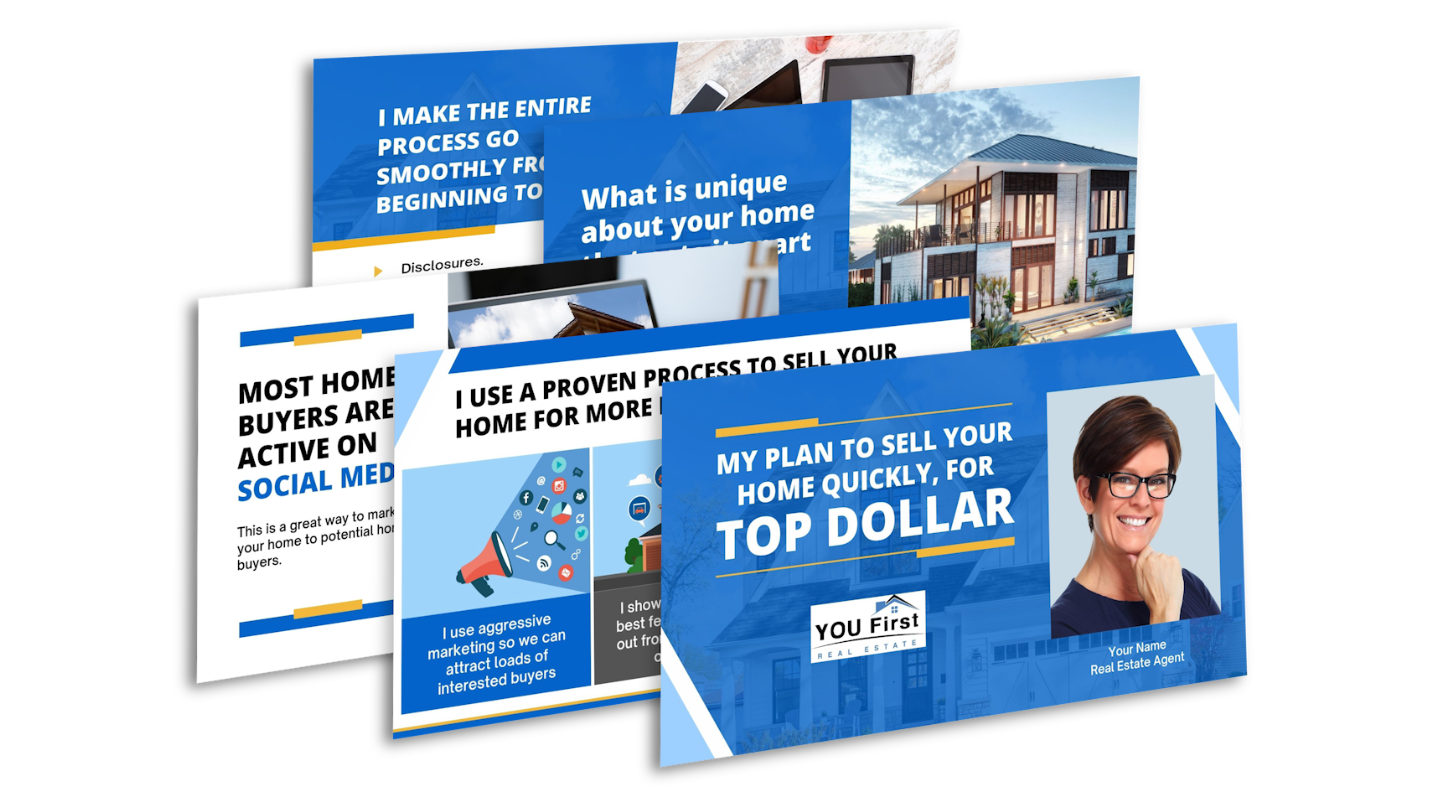
This is our best listing presentation based on hundreds of different listing presentations. We’ve tested out lots of different presentations and strategies. And this one worked the best. We’ve tested it on dozens of different presentations and made little tweaks to perfect it.

Step 1: Download the Easy Close Listings Presentation

Using a Free Canva.com account, you can quickly and easily customize our 46-page Easy Close Listing Presentation to fit your needs.

Linked below are six templates in total. You will see one fully customizable template that will allow you to add your brand colors and five templates with locked background colors. Be sure to check out the video tutorials below for Canva editing tips and a full roll-play of the presentation.

Not interested in using Canva? Download one of these options instead.

Step 2: Familiarize yourself with the presentation

Before you start modifying your presentation, we recommend that you go through the entire presentation to familiarize yourself with it.

Sample Listing Presentation. In this Video, Charles walks you through the presentation as though you were a seller. Other members have found it helpful. 

Step 3: Modify the presentation to fit you

The Easy-Close Listing Presentation template has been designed to require minimal modifications. Simply add your headshot and logo to the first slide. Beyond that, the only other required modification comes on slides 44 and 45. Replace the placeholder testimonials with your own and you are all set.

With that being said, the templates are completely customizable, so you can add your own listing photos and case studies throughout.

Check on the video below for a quick editing tutorial.

Step 4: Uplevel your listing presentation with supporting materials

As you go through your presentation, you will find it helpful to refer to your book or other printed marketing materials.

We recommend bringing the Marketing Materials we provide in the Instant Trust Package. This applies even if you mailed this seller your Instant Trust Package. They may have forgotten the materials inside the package. So, if you reference one of those documents again, it’s helpful.

So, review our Instant Trust Package and use any of the Marketing Materials you think would be helpful. (We recommend using all of them. But, whether or not you do that is your choice!)

Step 5: Practice your presentation to become more comfortable with it

Open your presentation on your computer, start at the beginning and do a practice presentation as if you are meeting with a seller.

Imagine that you are sitting at the kitchen table in a seller's home and you are going to go through the whole presentation with them now.

Go through each slide one-by-one and explain the slides. Speak outloud as if you were talking to a real person. If you get stuck on a spot, then go back to the training video and watch it again to learn how to present that slide. Then go to the previous slide (one before the slide you got stuck on) and start again. 

Keep doing this until you get through the entire presentation.

Step 6:  Overcome Objections So You Can Get The Listings

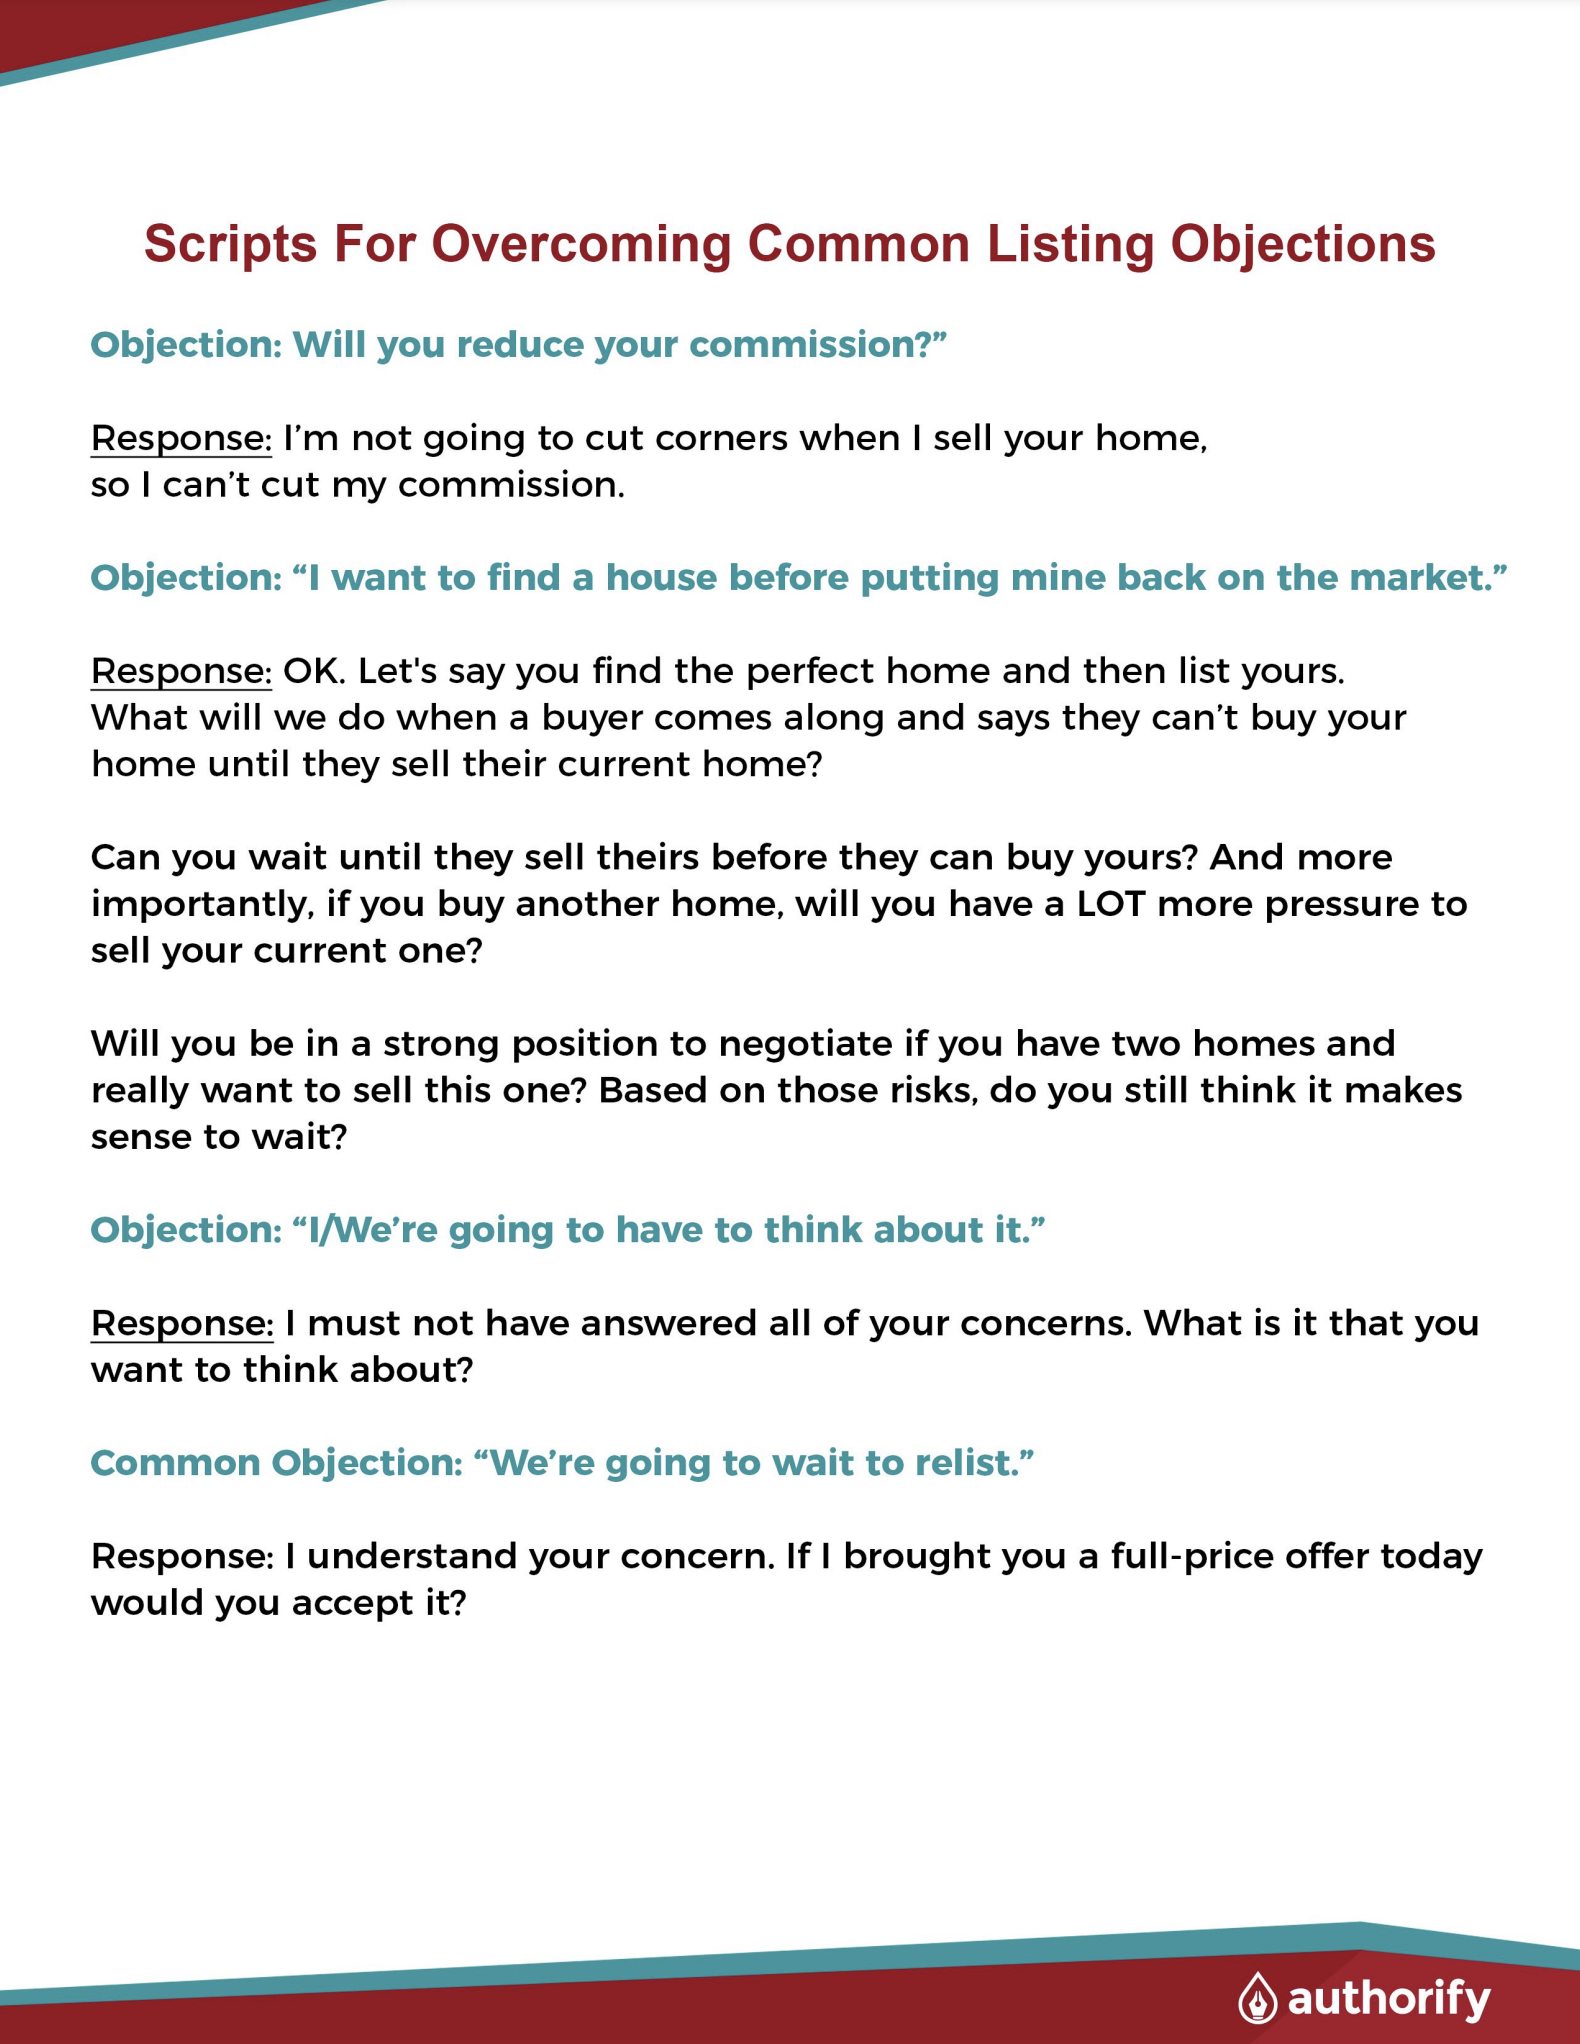
Objections are an inevitable part of a listing appointment, so we have resources to help you address some of the most common listing objections.

Review the How to Overcome Common Listing Objections and Win the Listing training. This will give you some simple responses to overcome most common listing objections.

Print out the Scripts for Overcoming Objections and keep them in your car.

Other Marketing

Let's go in-depth to make sure you are building processes that will continue to bring in listings.

Boosting Your Social Media Book Promotion To A Wider Audience

Read More

Generate More Sales With Your Email Signature

Promoting Your Book With Your Email Signature

On average you probably send out dozens of emails every day. And most prospects probably receive dozens more. So, how do you differentiate yourself from every other agent or salesperson trying to get them to buy something?

You let your books do the talking. 

In any email you send to your list of leads, include a link to your lead page in your signature or link it to an image of your book title.

How do you do that? We walk you through all of the steps below!

Create An Eye Catching Banner

Adding an image to your email signature is a sure-fire way to stand out and we’ve created all of the banner templates you need.Our team has created easy to use templates that you can customize using a free Canva.com account.

To access a template just click on the desired template from the sets below. Be sure to watch the video above for best practices.

*Inside each banner set you will find versions for our Real Estate Members and Mortgage Members

Email Banner Set 1

Real Estate Versions


Mortgage Officer Versions

Email Banner Set 2

Real Estate Versions


Mortgage Officer Versions

Email Banner Set 3

Real Estate Versions


Mortgage Officer Versions

Creating An Email Signature With Clickable Image

Now that you have created your one-of-a-kind banner, it’s time to add it to your email signature. In the video above, we walk you through the step-by-step process for creating a new email signature and adding a clickable image.

*Note* In our example, we are using a Gmail Account.

For adding images to email signature to additional providers view the instructions here:
Outlook
Yahoo
AOL

Email Signature Without An Image

Prefer not to have an image in your email signature? No worries, you can add a clear Call To Action promoting your book instead. We’ve even provided a copy and paste template for you to use.Follow the video above to step-by-step instructions for creating a new email signature in Gmail.

For instruction additional providers view the instructions here:
Outlook
Yahoo
AOL

Sample Real Estate Book Call-To-Action:

Have you read my real estate book yet? If not, you can get your very own copy by going here: (Insert Landing Page Link)

Inside my book, you’ll discover many ways to sell any home fast for top dollar. If you or anyone you know would like a free copy, please let me know.


Sample Mortgage Book Call-To-Action:

Have you read my real estate book yet? If not, you can get your very own copy by going here: (Insert Landing Page Link)

Inside my book, you’ll discover how to navigate the home financing process for your next home purchase. If you or anyone you know would like a free copy, please let me know.

Other Marketing

Let's go in-depth to make sure you are building processes that will continue to bring in listings.

Promoting Your Book On Social Media

Promoting Your Book On Social Media

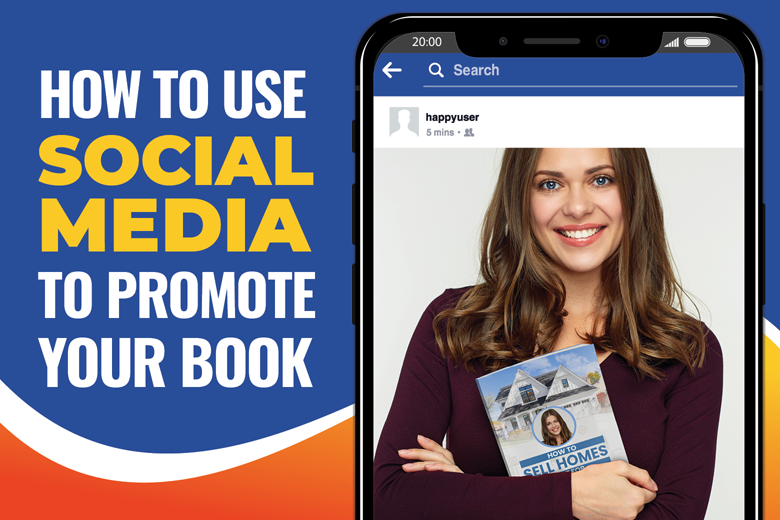
Social media is a powerful tool that you can use to generate sales with your book. Where else can you consistently stay in front of all the people you know? You can step up your reach by positioning yourself as an expert.

Obviously, the more engaged you are on social media and the more followers you have, the more successful you’ll be at securing sales and referrals with your book. If you're not active on social media, we recommend trying to increase your reach and engaging with your followers on a regular basis.

Note:

Before you begin promoting your book on social media you will need eye-catching images. We provide all the templates you need to create your very own social media images using the free graphic design software, Canva.

We also have step-by-step training on how you can download your book cover image to use in promotional material.

Pro Tip: Hire a Virtual Assistant to handle this for you! From lead generation and appointment setting to social media management and data collection, the Boost Assist team can help you delegate routine tasks and free up your schedule to focus on the bigger picture!

Find out more about Boost Assist here!

Here’s a quick overview of how you can share your digital book on Facebook and Instagram.

Facebook

There are a few ways you can promote your book through your Facebook page.

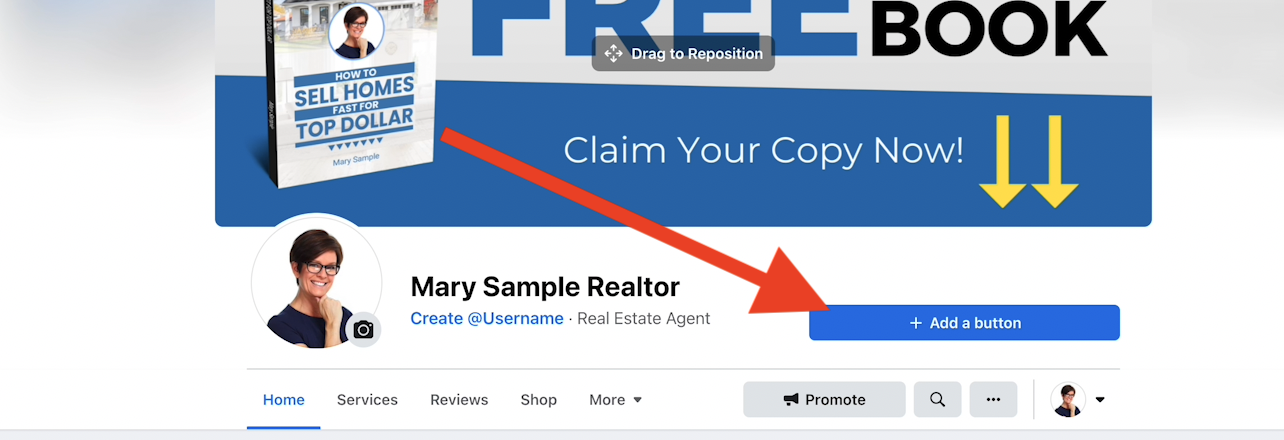
Cover Photo

Click on the button in the upper left corner of your cover photo that says Add a Cover then select the option that says Upload Photo/Video from the dropdown menu. When the upload box appears, find the image you want to use, click to select it and upload.

CTA Button

This will only work on an actual Facebook business page, not on your personal Facebook page.

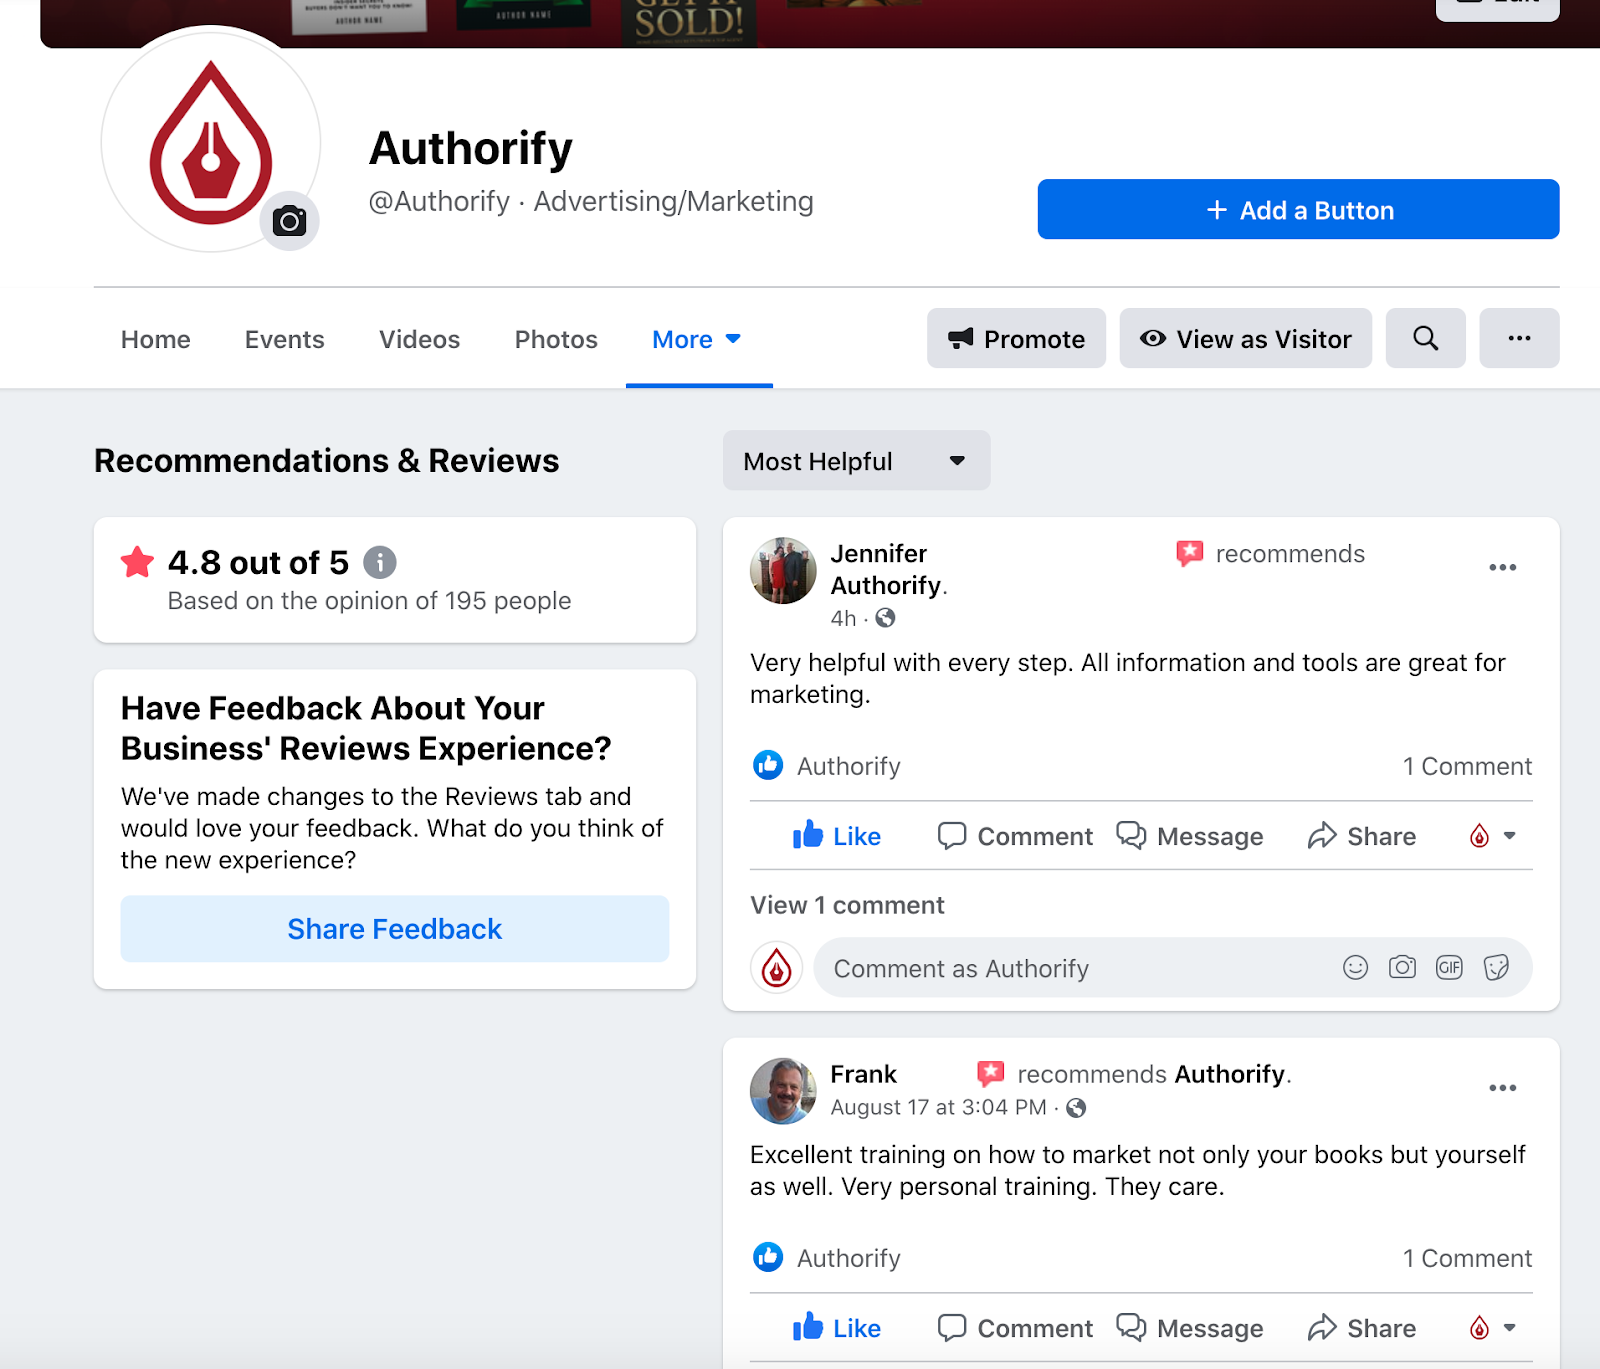
Just under your cover image to the right, you’ll see a blue button that says Add a Button. When the box pops up, choose the option that says Learn more about your business > Learn more,  then click Next.  

Click where it says Website Link, then paste in a link to your author site or digital book link into the box. Your digital book is actually available to read on your author site, so if you want to promote your whole site, link to it here.

Click Save, then Finish.

When you’re done, a button will appear that says Learn More. You can hover over this button to test it out or to change it in the future.

Facebook Posts

If you want to promote your book to all of your followers and make sure it appears on their timelines, create an actual post with your digital book link or landing page.

Copy and paste your link into a post from your page and upload a photo of your banner ad or another promotional image from our team. If you have physical books on hand, you can also take a picture of yourself holding up your book or a picture of a pile of books on your desk.

Not sure how to download the 3D image of your book? Click here for step-by-step instructions!

Post Text Template

“Thinking about selling your home? Check out my book that shows you how to get the most money in the least amount of time! Click here to read it for free!” {Insert Digital Book or Landing Page Link}

Click publish, and your post will be shared with all of your followers. You can also boost it for a small amount of money to people in your area who may be looking to buy or sell. Just click Boost under your published post and follow the steps to select your leads.

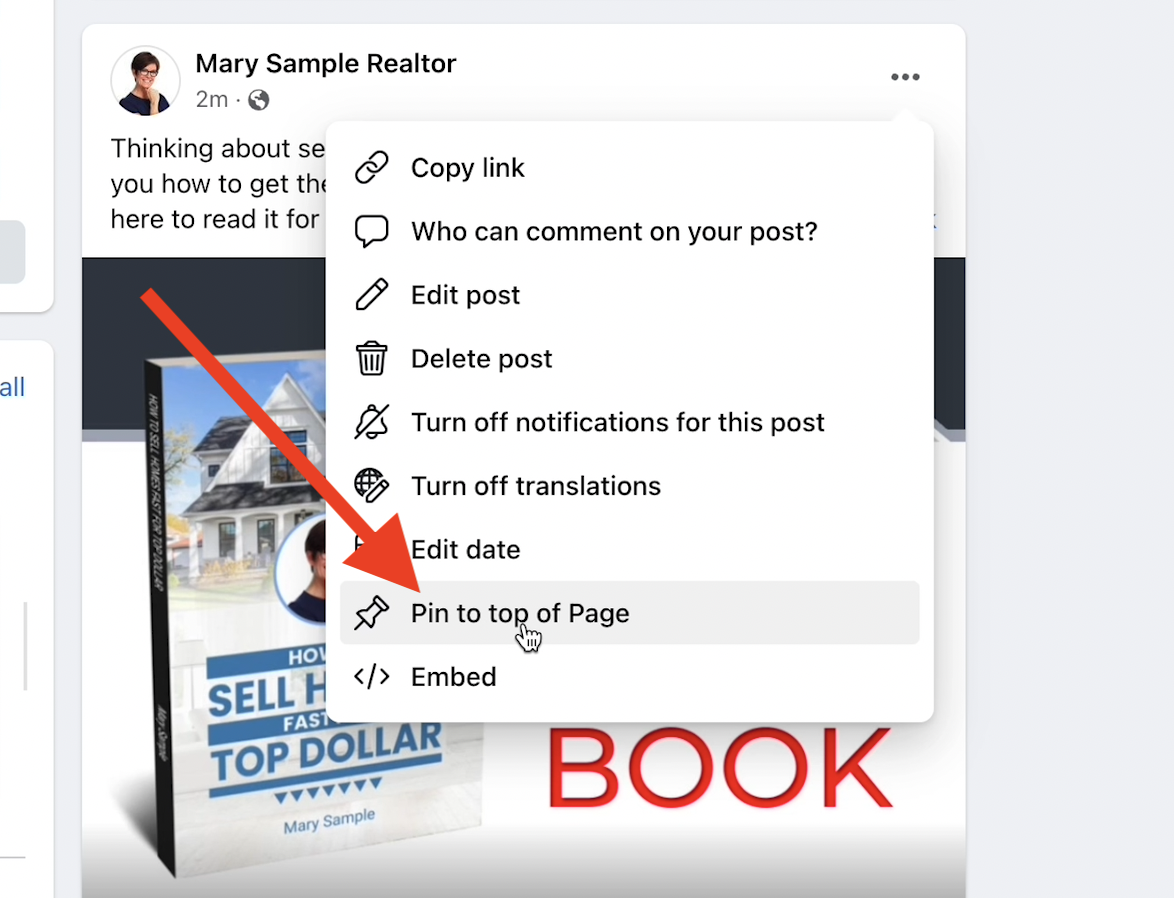
If you want this post to stay at the top of your page so it doesn’t get bumped down by other content in the future, click on the three buttons to the top right of your post. Click where it says Pin to Top of Page. 

You can also encourage shares of your post by holding a contest for people who share it. Enter them into a drawing once a month for a restaurant gift card, sports or event tickets, or a membership to a local zoo or museum.

About Section

You can also include the link in your “About” information on your personal or business page so anyone who visits your page can find it when they click to learn more about you.

Instagram

Included in your promotional images is an Instagram-ready ad for your book. You can post this or share a photo of yourself holding your book or your book cover on its own.

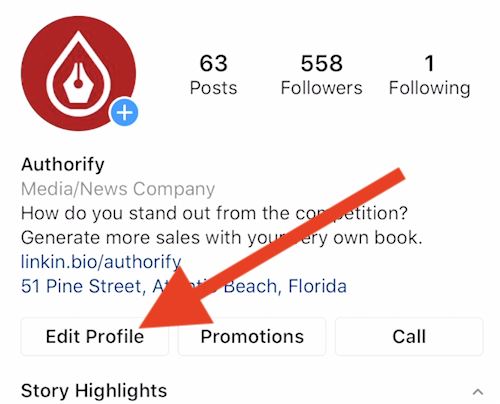
When you post on instagram, you can’t put your link in the actual post. You have to tell people to click the link in your bio. 

To add or change the link in your bio, visit your page from the app on your phone (or visit Instagram.com/profilename from your computer) and click Edit Profile. Copy and paste the link to your author site or digital book where it says Website.

Your site will remain on your profile until you decide to change it. When you create a post, direct people to click the link in your bio.

Again, with your Authorify membership, you have access to fully customizable social media graphic templates by clicking here.

Other Marketing

Let's go in-depth to make sure you are building processes that will continue to bring in listings.

How To Get Online Reviews And Position Yourself As The Trusted Expert

How To Get Online Reviews And Position Yourself As The Trusted Expert

There is no doubt about it, in real estate, word-of-mouth referrals are worth their weight in gold, and having a process for collecting client reviews is a must.

In today’s digital world, online reviews are just as or, in some cases, more important than personal referrals. A 2017 study found that a staggering 85% of consumers trust these online reviews with the same confidence that they would have an in-person recommendation.

How does this translate to real estate?

According to the 2019 National Association of REALTORS® Profile of Home Buyers and Sellers:

  • 90% of buyers said they would use their agent again or recommend their agent to others.
  • 48% of sellers stated they would definitely use the same agent in the future.

Based on those statistics, you can see there is a high likelihood you will be able to collect a review from past clients.

Securing multiple reviews is also key. According to this study, 25% of consumers will trust online reviews as much as in-person recommendations only if there are multiple reviews available.

Where To Display Your Reviews?

The answer to this question is truly anywhere and everywhere.

The more places you can show off your positive reviews, the better.

Obviously, you will be adding testimonials to your book, but you can not forget your online presence.

As an agent, you most likely have at least three different online profiles to keep up with. Whether it be Facebook, Zillow, Realtor.com or a Google My Business Page, potential clients are going to find you in a variety of ways. You need to make sure each of those profiles have up-to-date reviews.

Facebook

As an agent, you should absolutely be managing a Facebook Business Page.

Facebook’s reviews are displayed in the form of recommendations; however, a star rating is assigned based on these recommendations, as well.

To direct clients to leave a review on your Facebook page, you can include the following link to your request:

facebook.com/BUSINESSNAME/reviews

Zillow

Love it or hate it, Zillow is a household name by now, and you as an agent have to make sure you keep an updated profile on the platform.

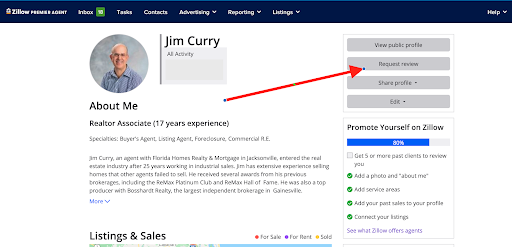
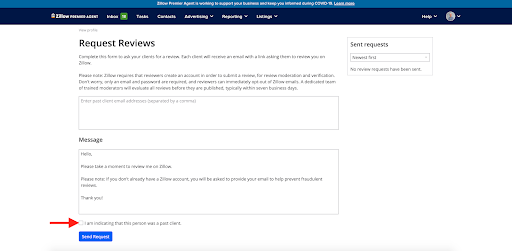
With your Premiere Agent Profile, Zillow makes it very easy to request reviews.

When logged in and on your profile page, you will see a button titled “Request Review.”

Clicking that button will bring up an email template that can be modified as you see fit.

Simply add the email addresses of the intended recipients.

Note, there is a button to “indicate this person is a past client.” Check the box if applicable.

Google My Business

Google My Business pages are a great way to increase your online presence. If you do not yet manage a Google My Business page, you can go check out our course where we walk you through every step, from claiming your business page to populating it with useful information.

Step 4 specifically goes through the entire process for requesting reviews on your Google My Business Page.


Asking For Reviews

In order to populate all of your different profiles with reviews, you have to first ask for them. By incorporating a review collection process into your routine, you are more likely to be successful.

Upon the closing of a deal, you can send a congratulatory text using one of these templates:

For Buyers:

Congratulations on your new home, [customer name]! Did I do a good job of helping you navigate the buying process? Please let me know here: [Review link].

[Customer name], now that the closing is over, are you happy with my services? Did I do a good job negotiating on your behalf? If so, please consider leaving a review! [Review link].

For Sellers:

Congratulations on selling your home, [customer name]! Would you list with me again in the future? Your feedback is vital. Would you leave some here? [Review Link].

[Customer name], I just wanted to again congratulate you on the closing. Will you do me a favor? Your feedback is vital to my success, and I would really appreciate it if you took a few moments to leave a review here [Review Link]. Thanks!

If email is more your style, you can use a template like this:

“[Customer Name], thank you so much for choosing me as your real estate agent! I hope you are as happy with how your transaction went as I am. May I ask you the favor of writing a review about your experience with me? I use this feedback as a way to continually improve. Here is the link to leave your comments: [Review Link] “Thank you again, [Customer Name]. I appreciate you taking the time to give me feedback, and I look forward to reading your remarks.”

Don’t be afraid to include a little gift like an electronic gift card to a nearby coffee shop as a token of appreciation.

Ideally, you will be collecting all of your reviews right after closing, but things happen, and in some cases, you will need to reach out to clients you worked with months or even years ago.

The key to reaching out to these clients is to have a reason for your communication.

And there is no better reason than an anniversary.

Email is best for reaching out to past clients, and you can use a template like one of the following:

For Buyers:

“[Customer Name], thank you again for choosing me as your real estate agent! I wanted to wish you a happy [###] anniversary in your home! I hope the home has been everything you dreamed. May I ask you the favor of writing a review about your experience with me? These reviews go a long way with prospective clients, and I would them like to hear about the experiences of my previous clients. You can leave your comments here [Review Link].

“Thank you again, [Customer Name]. I appreciate your feedback and look forward to reading it.”

For Sellers:

“[Customer Name], thank you again for choosing me as your real estate agent! I wanted to wish you a happy [###] anniversary on the sale of your home! I hope things have settled down a bit and that you’re as delighted with the end results as I am.  May I ask you the favor of writing a review about your experience with me? These reviews go a long way with prospective clients, and I would like them to hear about the experiences of my previous clients. You can leave your comments here [Review Link].

“Thank you again, [Customer Name]. I appreciate your feedback and look forward to reading it.”

How To Get The Right Reviews

The best reviews include personal stories that reflect your effectiveness, personality, work ethic and qualifications. These specific stories will provide potential clients something to relate to when they’re making a decision on who to hire.

So, how do you get these types of reviews?

It all starts with asking the right questions.

There is no reason to shy away from asking a past client specifically if they would recommend or use your services again in the future. Just don’t forget to follow up with the most important question — Why?

Here is a list of questions to help elicit the type of reviews you are looking for:

  • What made you choose me as your agent?
  • How did I help you (explain specific problem)?
  • What was the best thing I did to help you sell/buy your home?
  • How did we overcome (add a specific issue that arose)?
  • What stood out most to you about my service?
  • Would you recommend my services to a friend? What would you say?

By asking these questions, you’ll have a handful of short stories to add to a review page on your website, your social media and even the testimonials section of your book.

Other Marketing

Let's go in-depth to make sure you are building processes that will continue to bring in listings.

Dominate Your Neighborhood With Your Book

Dominate Your Neighborhood With Your Book

Dominate Listings in Your Neighborhood with Your Book

Have you ever seen an agent’s sign in your neighborhood and thought to yourself, “Why didn’t I get that listing?”

Whether you’ve been living or working in your area for a long time or you’re brand new in town, there’s no reason you can’t be the go-to real estate agent in your area. If that’s not currently the case, there are steps you can take to avoid losing out to another agent.

Laying the Groundwork

Before you can become the go-to agent in your area, you have to define that area. Are you trying to work with people in a specific city? School district? Township?

Aim to target an area of approximately 500 homes. Specifically focus on meeting people in your area you don’t know yet.

If it’s allowed in your area, knock on doors and introduce yourself. But don’t just show up and ask people to consider hiring you. Use the opportunity as a simple introduction and to offer them something of value — like your book. Encourage them to look through it and ask if they might know anyone looking to buy or sell their home.

The books are a tangible item that has value — something homeowners are likely to keep, not throw away. If no one is home, either come back another time or leave one of your books in a door hanger with a Post-it note explaining why you wanted them to have a copy.

An agent from Texas, Francesca, was new in the business when she went door to door around her neighborhood. “I started doing door hangers with these ‘pop-bys,’” she said, “I’d go around and pick a few different streets that were close to me, and I knocked on their doors and talked to everybody that would answer, and everybody else just got a door hanger. I got a couple of leads from doing that … I’ll be helping them list their home as well as find a new home.”

Show You’re a Local Expert

Once you let an owner know the benefits of working with someone who specializes in their area, they’ll be much more likely to list with you. Here’s what you need to bring to the table to differentiate yourself from other agents in your market:

  • Complete knowledge of the surrounding area (shops, schools, etc.)
  • Understand pricing in that market and buyer’s demands.
  • Reviews from clients in the area (if you have any).
  • Be somewhat familiar with the size of the properties.
  • Know where people work and if it’s a family-oriented neighborhood.

Try a version of this script:

“Hi, I’m _____. I’m one of your neighbors. I live on _____ Street. I also work as a Realtor, and I wanted to give you a free copy of my real estate book. Do you know anyone who is thinking about buying or selling a home in the neighborhood?”

The key to making this work is to reach out your hand and give them the book — while you are introducing yourself. When you’ve finished, wait for them to answer, and then see how the conversation progresses. It might surprise you how many people are friendly and more than happy to talk to you.

Honing in on Your Community

Before you start prospecting, first identify the low-hanging fruit — i.e. the people in your neighborhood most likely to be in the market to sell: FSBOs, expireds, vacant homes and those properties that were rented about 10 months ago (where leases may expire soon).

These are the people you should approach and reach out to first. You can start by mailing out your book or dropping it off in person using the aforementioned script.

Then, follow up by phone call a few days later to ask if the person had a chance to look over your book and see if they have any questions. This way, you’re not just calling them blindly or without reason.

Get People to Come to You

Hosting a barbecue at one of your open houses or sponsoring a local event is a great way to grow your brand awareness. Make fliers and distribute them in your area. Create a Facebook event page and share it like crazy in local groups.

Put copies of your books out in a highly visible area and other information/signs around the event that make it clear you’re the one sponsoring it.

If you host an open house in a neighborhood, invite everyone who lives close by. They will come for free food, but they’ll take home something valuable they’ll keep around the house and come back to when they’re in the market to buy or sell.

Results in Action

Frank Causey is a real estate agent with 13 years of experience. However, he recently moved from the south to Pennsylvania, which means he had to learn a lot about the area. “I even have the Southern accent still,” he said. Using Authorify books with his real estate prospects “helps me lay down the fact that I am experienced, I know what I’m talking about, and it makes me look like I have the authority and the know-how and the knowledge to sell their house.”

By using books, he found an effective and profitable way to market himself as a real estate authority — and to boost his own confidence in the process. Clients sense hesitation, and it can undermine their own confidence in the agent.

Here’s how Frank gets listings.

  1. 1
    He gets leads through Z Buyer, as well as Realtor.com, Homes.com, and other similar sites. He also looks for FSBOs.
  2. 2
    He meets face-to-face with potential clients and goes through a generic script.
  3. 3
    After the sales pitch, he leaves them a packet of information that includes a book. It’s a way to close the deal, and it’s different from all the other agents out there who just share fliers, so he stands out in the crowd.

When Frank reaches the end of his listing presentation, he likes to pull out his book and say, “Oh. I’m going to leave this with you to review it.” He tells his prospective client, “Instead of a business card, this is what I’m leaving with you. It’s got my telephone number, my contact information on it. But it’s also a book that I compiled. You’re not going to find it on Amazon.com, but here is a book that can help you.”

He informs the client that the book will explain the steps needed to get the best price for the home. “They smile and go, ‘Wow, that’s really different.’ And I say, ‘Yeah. I just want you to remember me. Even if you don’t list with me, you’re going to remember me because I gave you a book instead of a flimsy business card that you’re going to probably throw away as soon as I leave.’ Then, everybody gets a chuckle out of it.”

Of the 15–20 books Frank has given away, he’s gotten three listings. One listing was for $300,000, which he ended up selling himself, making even more money in the process. He said the biggest benefit of the books is that they set him apart from other real estate agents in the area. “It makes [clients] feel like they’re getting something tangible, that you care about them, and that you’re working for them.”

The books help Frank show he’s a real estate expert, which in turn makes him feel more self-assured, especially since he’s still learning his new market. Of course, Frank backs up his new-found status with a commitment to provide 24/7 help for whatever his clients need. But the books are his most apparent differentiator.

“You’ve got to spend money to make money,” he said. “Even just $100–$200 can be a huge help. Also, be confident, believe in what you’re saying and don’t hesitate.

Frank prefers to give a book to people when he has an opportunity to provide them with some context. He uses them primarily to close the deal after he gets his foot in the door. “If I can get face-to-face with them, my odds of getting a listing triple.”

Pennsylvania is more populous than the part of South Carolina where he started his career. It’s harder to stand out in a crowded market. The books have aided his conversion rate on listing appointments by making him seem authoritative, “especially in the area where I’m kind of the rookie, I’m kind of the fish out of water.”

“Anyone that’s starting out in real estate … I would encourage them to buy the books and buy the program with y’all. Because it does give them a little boost of confidence that they do need. And it makes them look like, even if they’ve been selling real estate for six months, it makes them look like they’ve been selling it for six years.”

Frank said his biggest failure was probably during his first year. He believes that if he had committed to paying a small amount for tools, like his books, he would have benefited tremendously: “You’ve got to have tools. It’s just like, a carpenter doesn’t go to a job without his tool belt.”

To Summarize:

  • There’s no reason you can’t become the go-to agent in your neighborhood.
  • Make it your mission to familiarize yourself to as many people as you can.
  • Your books can be a powerful tool in your neighborhood prospecting — they give you a reason to reach out to people and help you establish trust and credibility. 

Take Action:

Now it’s up to you to do a little research and get in front of potential clients in your neighborhood. If you can establish trust and credibility with your books, you’ll be head and shoulders above the majority of agents who aren’t willing or don’t have the proper tools to get out on the street and win listings.

Other Marketing

Let's go in-depth to make sure you are building processes that will continue to bring in listings.

How To Import Leads Into The Digital Marketing Platform

Read More

How To Create A Linktr.ee Account

How To Create A Linktr.ee Account

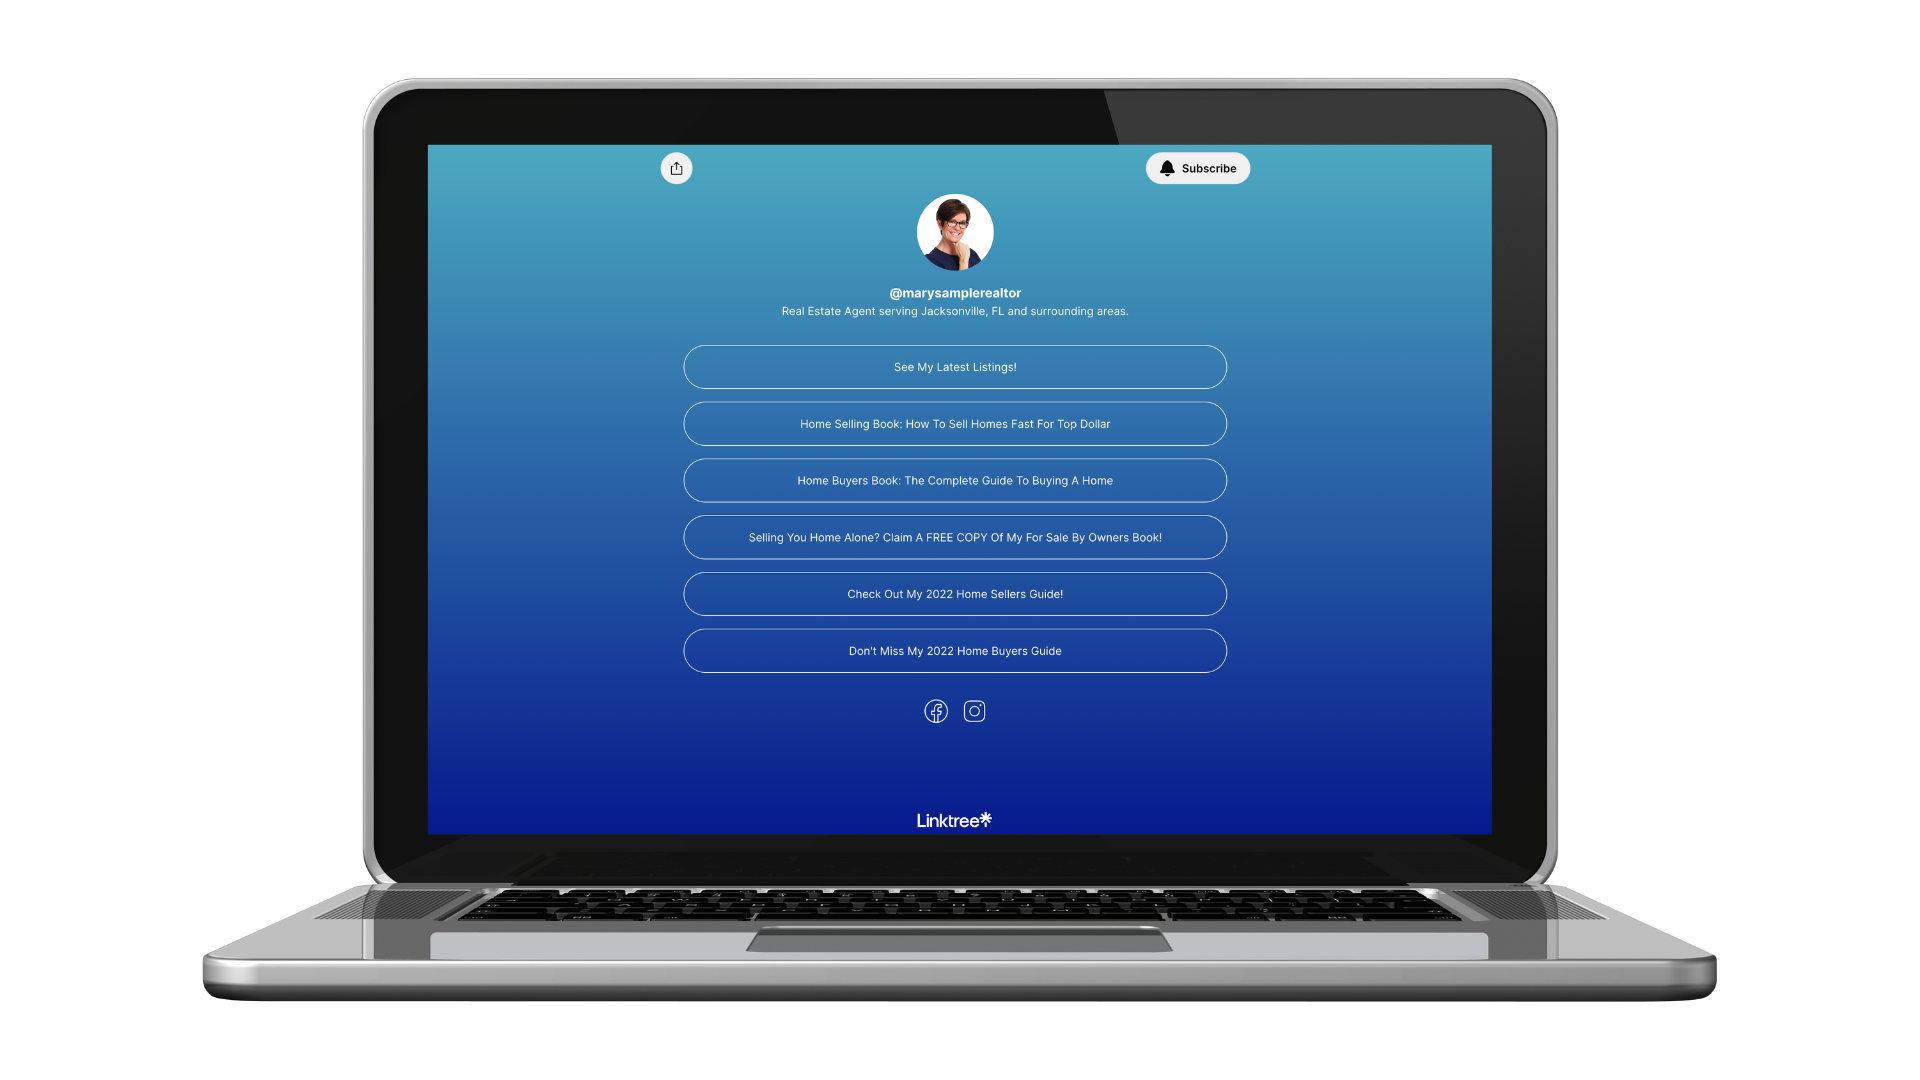
As an Authorify Member, you will surely have a wide variety of marketing materials to offer potential clients via social media posts. Whether you are promoting your Home Sellers Book, Buyer Book or maybe even your latest listings, having one central hub for all of these offer links is key.

Luckily, there is a free solution via Linktr.ee

In the steps below, we walk you through creating your Linktr.ee account, connecting your offers to your Linktr.ee page and adding your Linktr.ee to your social media account.

Creating Your Linktr.ee Account

Follow along with the video above for step-by-step instructions for building your own Linktr.ee page.

While there are several plan levels with various additional features, the Free Plan includes everything you will need.

Adding Your Linktr.ee Link To Social Media Profiles

Adding your Linktr.ee page to social media profiles is a great way enhance your ability to make multiple offers. In the video above, we walk you through adding your Linktr.ee link to both Facebook Business Pages and Instagram Profiles.

Facebook


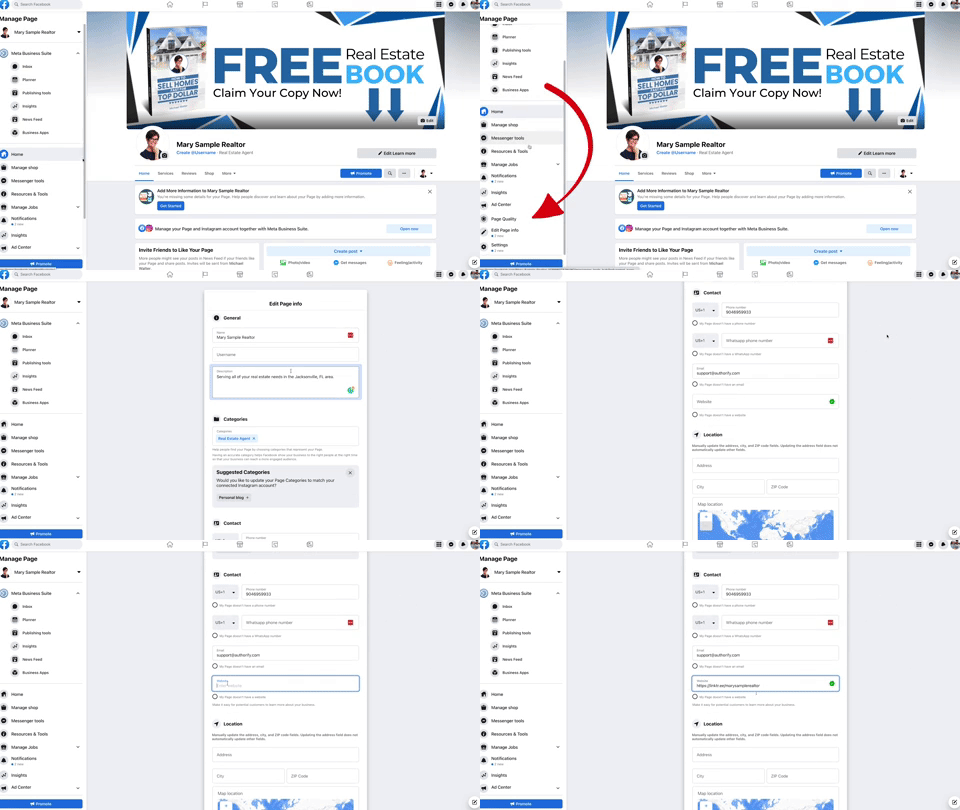
From your Facebook Business Page, click on the Edit Profile Info tab.

Scroll to the Website box and enter your personal Linktr.ee web address.

Instagram


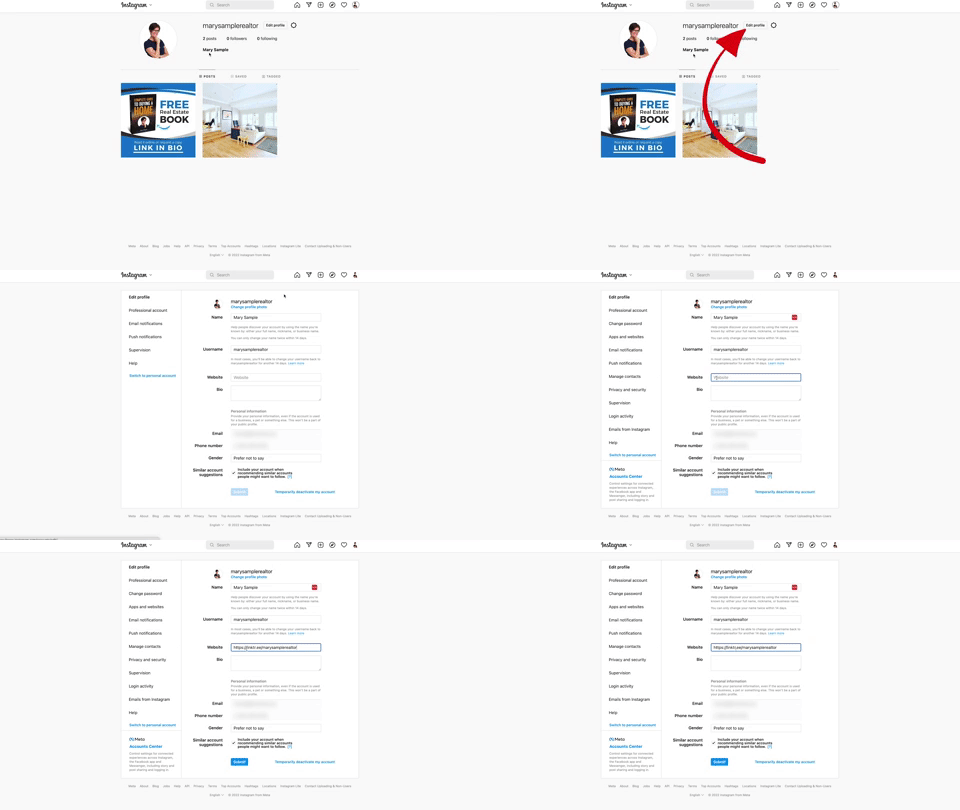
From your Instagram Profile, click on the Edit Profile button.

Scroll to the Website box and enter your personal Linktr.ee web address.

here...

Other Marketing

Let's go in-depth to make sure you are building processes that will continue to bring in listings.

How To Get Listings From Facebook

How To Get Listings From Facebook

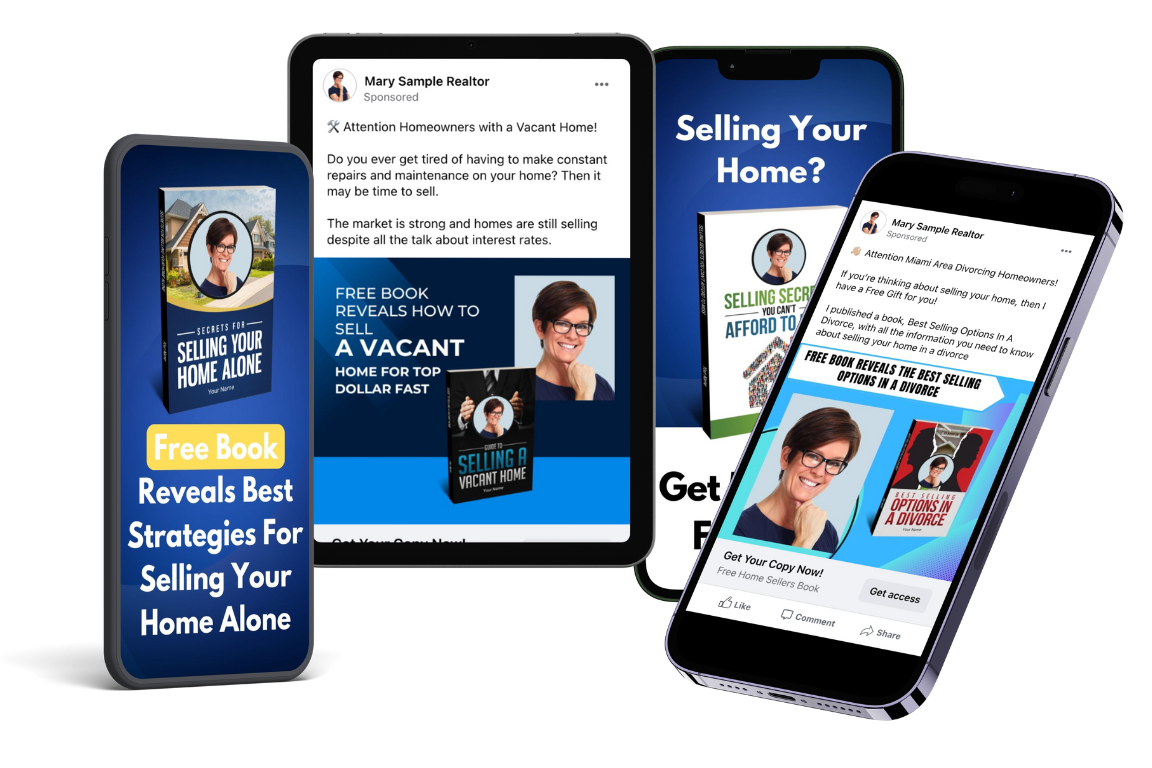
Facebook Marketing is a great way to get more leads and listings. In this training, I’ll show you how to publish your ads, create custom audiences, and track your results.

Step 1: Set Up Your Facebook Page

If you already have a Facebook page for your business, you can skip to Step 2. If not, complete the steps below.

  1. 1
    Login into Facebook. Then, open the Create a Page builder.
  2. 2
    Enter your page name. Most people name it “John Doe Realtor” or something like that. That’s what I recommend. Other people name it something like “City Real Estate”, “Great City Homes”, etc.
  3. 3
    Select the Category as “Real Estate Agent”, “Real Estate”, or “Real Estate Company.
  4. 4
    Enter your description. Here is an example: “John Doe is a Real Estate Agent in Anytown US. He works at ABC Realty and specializes in helping buyers and sellers navigate the process to reach their goals.”
  5. 5
    Upload your profile picture (this should be the headshot image you use professionally).
  6. 6
    Add a cover photo. This can be a picture of you in front of a house, a picture of a home you’ve listed, a local landmark, or a map of your area.
  7. 7
    Hit submit to create your page.
  8. 8
    Go to the “About” Section and update your information. You’ll want to add your phone number, website (if applicable), Business Hours, etc.

Your page is set up! Let’s continue to the next step.

Step 2: Set Up Your Ads Manager

First log in to your Facebook account.

Then, click on the link below to visit the Facebook Ads Manager

Facebook Ads

If you’ve already set up an Ads Manager, you’ll be brought to your Ads Manager Dashboard and you can move to the next step.

If you haven’t set it up yet, simply follow the steps to set up your Facebook Ads Manager, then go to the next step.

Step 3: Build Your Facebook Ad Campaign

At this point, your Facebook Page and Ads Manager should be completely set up.

Important Note: All Real Estate-related ads MUST be placed into the Special Housing Category. However, if your Facebook Ads Manager is new, you will not likely see the option to place your ad into the Housing category.

You will need to follow the steps in the video below, build your ad and submit it to Facebook for review as a regular ad. 

Facebook will then reject your ad because it’s real estate related (this usually takes 15 minutes or less), and then you will be given the option to place it in the Special Housing Category. At that point, your ad will be approved. 

Simply follow the instructions in the videos below with the step-by-step process and you’re good to go.

Facebook Ad Copy

Primary Text Option 1:

If you or someone you know is selling their home soon, then you’ll want a copy of my book!

Secrets Every Home Seller Needs to Know

Discover the Formula that Wealthy Home Sellers Use to Sell Homes Fast for More Money!

Click Here to Claim Your Copy Now ➜ [Your Author Website URL]. 

Provided by ABC Realty.

Primary Text Option 2: 

If you or someone you know is selling their home soon, then you’ll want a copy of my book!

I’ll show you the exact strategies you can use to Win Big in your home sale.

Request your Free Copy now ➜ [Your Author Website URL]

Provided by ABC Realty.

Headline Options:

  1. 1
    Want a free copy of my book?
  2. 2
    Selling your home? Discover the Secrets Wealthy Homeowners Use to Sell Homes Fast for More Money!
  3. 3
    FREE BOOK: Secrets of Wealthy Home Sellers

Website URL: [Your Author Website URL]

Note: On the final publish screen, Facebook will likely tell you that your ad has an error. Go ahead and ignore the error and publish the ad as is.

Step 4: Set Up Retargeting For People That Visit Your Website.

A. Set up your Facebook Visitor Tracker. Follow the instructions in the video below to set that up.

B. Set up your Facebook Custom Audience. Follow the instructions in the video below to do that.

Step 5: Set Up Ads to Follow Up on Your Past Clients and Sphere of Influence. 

A. Create your Contact List File. See the instructions in the video below.

B. Upload your contacts to Facebook. See the instructions in the video below.

C. Create Facebook Ads Targeting that Audience. See the instructions in the video below.

Text Template:

Hey, I’m Your Name and I sell homes in the #### area. If you’re planning to buy or sell then give me a call and I’ll be happy to help you access the information you need.

Your Phone Number

You’re done! Now you’re targeting your Past Clients and Sphere of Influence on Facebook.

Bonus: Live Workshop Recording

Other Marketing

Let's go in-depth to make sure you are building processes that will continue to bring in listings.

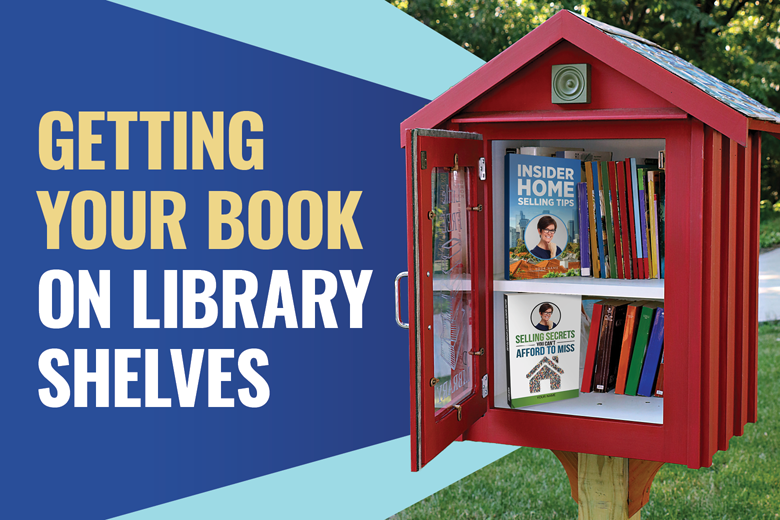
How To Get Your Book On Community Library Shelves

Read More

Uplevel Your Pre-Listing Package

Uplevel Your Pre-Listing Package

The books can be a great tool to warm up new leads. But some of our most successful members have also used them to stand out heading into listing presentations.

If you currently drop off or mail a pre-listing package, adding your books to your package can make all the difference. And if you aren’t currently delivering a pre-listing package, now is the perfect time to start.

What is a pre-listing package? It’s a collection of materials you send to a lead before you make the actual listing appointment. The purpose of these materials is to show the lead you are capable of selling their home in a timely fashion and are dedicated to making it happen.

A pre-listing package often includes the following materials. Many of them will appear in the listing presentation, as well.

  • A cover letter introducing yourself, your brokerage, your area of expertise, how you learned about their desire to sell their home and why/how you can help
  • Examples of homes you’ve recently sold (including photos)
  • Local market data
  • An explanation of your marketing strategy, including professional photo examples
  • A brief explanation of the process to sell a home

Here’s an example of a generic cover letter for a pre-listing package:

Dear Name,

I just wanted to drop off this package because I am very familiar with this area and know of buyers currently looking to purchase homes here. Ever wonder why two identical houses sell for entirely different prices?

Why does one house sell for $188,000, while another house, identical in every way, brings in $202,000? It just doesn’t make sense.

The truth is, similar homes sell for varying prices all the time. It happens all across the country. It happens in markets large and small.

Surely, there must be a reason!

These houses do not sell for more money by accident. No magic trick helped one seller get a better deal than the other. On the contrary, higher sales prices are the direct result of careful and strategic marketing. 

In my book, which I’ve included in this package for you to peruse, you’ll find helpful strategies to help you get the most money for your home in the least amount of time. 

If you’re willing to meet with me, I’ll walk you through my specific marketing plan to get homeowners like you the most coin in their pockets. 

In the process of selling, you’ll spend an incredible amount of time holding shows for potential buyers. Unfortunately, many are not interested in buying your home. The average home-showing process takes 3-4 hours. 

I can break down how to make these showings really count. That’s just one of the many things we’ll discuss. If you have any questions, feel free to give me a call at xxx-xxx-xxxx.

Best Regards,

Your Name

Your Real Estate Company

Phone: (333) 555-1212

Email: Name@Email.com

Don’t worry if you’ve never put together a pre-listing package on your own. Our membership site includes a variety of templates and marketing materials you can customize for your own business and include in your package.

The most important component of your pre-listing package — the one thing that will make you stand out more than anything else — is your book.

If your leads receive your book before the actual appointment, you’ve already done the hard work of establishing your credibility. When you arrive, you’ll already have their respect, and chances are, they’ll be ready to list with you without a lot of convincing.

You can reference your book throughout the appointment and even flag or mark off pages in the book that apply to the homeowner’s unique selling situation.

Results in Action

One of our members, April, has had great success delivering a pre-listing packet before she goes on listing appointments.

“Before I even get there, depending on when the appointment is, I'm going to get someone to drop that package off with the book in there. And then we're going to call and make sure they got the package. And then they're very excited. So once I get there and they see what I have, and they see that I sent them the book, then pretty much the listing is already done.”

When she meets with the sellers, she asks them to review her book while she tours the house.

“When I get there, I have a really good listing package. I put a ribbon around it and everything to make it look as if it is a gift. As soon as I come in, I give it to them and I start taking a look around the house by myself. I let them sit down at the table, and I tell them, ‘Go ahead and fill out your seller’s homework sheet and you can take a look at my book.’”

Once she’s done touring the house, she sits down, asks if the homeowners have any questions, and lands the listings. 

To Summarize:

  • Your books can make a great addition to your pre-listing package.
  • If you aren’t currently sending one out, it’s a great way to warm up your potential clients before you arrive for the listing presentation.
  • Including your book in the package can pre-sell clients on working with you, so by the time you arrive, you have to do less legwork to convert them.

Take Action:

If you aren’t already sending or dropping off a pre-listing package, you’re missing out on a major opportunity to make a great impression. Including your book in that package can put you over the edge, especially if you’re competing against multiple agents.

Other Marketing

Let's go in-depth to make sure you are building processes that will continue to bring in listings.

How To Get Online Reviews And Position Yourself As The Trusted Expert

Read More

Get Business At Events

Get Business At Events

Get Business at Events with Your Book

Your real estate business relies on people — people who want to buy or sell houses and people who know people who want to buy or sell houses. It makes sense that the more people you meet, the more your potential customer base grows. To thrive, you need to convey your message to those people.

You want them to understand that you’re authoritative, experienced and skilled. You know the real estate industry, from the trends that affect home sales in your neighborhood to the intricacies of financing deals and writing contracts.

Your books can establish your credibility and status as a real estate expert, and events are the perfect way to get them into more peoples’ hands.

Every month, thousands of people gather at special events and mixers. These are opportunities for you to meet people and, with your books, establish yourself as someone with whom they want to do business. But to be effective, you need a strategy.

How to implement your strategy: 

  1. 1
    Make a list of events that will be held in your area. Farmers’ markets, art walks, home shows, senior expos, or even local fairs can be great places to get your books into a lot of hands.
  2. 2
    Contact whoever hosts the event and reserve a booth or location. Allow plenty of lead time. In many cases, this will be months for large-scale events such as conferences and conventions, and perhaps only weeks or days for smaller local gatherings.
  3. 3
    When you arrive, set up a table or booth. If possible, put up a banner that says, “Free Real Estate Books on Buying or Selling a Home.” Put all of your books on the table.
  4. 4
    Smile when people approach. Try to start a conversation and get their contact information. Don’t be timid about starting conversations with people who walk past. Most attendees at such events are browsers who allow themselves time for such encounters. Simply ask, “Hello! Would you like a free real estate book?” Agents who master this approach — people who really know how to work a trade show or similar event — learn not to be afraid to ask people if they want free stuff. As a result, they get a lot of leads.
  5. 5
    Don’t fool yourself into thinking you don’t belong. I recently went to a farmers’ market and saw some interesting people. A farmers’ market is usually a place where farmers sell their fresh produce and meat products, right? Wrong! At this farmers’ market, I saw a church representative, a roof/gutter replacement contractor, even a Cutco showman.
  6. 6
    Remember, events you host or sponsor are great opportunities, too! This strategy works equally well at mixers, such as those held by your local chamber of commerce and local or regional business clubs. These, too, are excellent places to give out your books, although the exhibit opportunities might be more casual and limited.

The key to succeeding at events is having enough confidence in your abilities to stand behind what you offer. When you give people a book, you pique their interest, and they’re more receptive to listening to you because they respect you.

Case Studies

A member named Sheri made a sale to someone she met at a chamber of commerce mixer. This person mentioned they were looking for a home, so Sheri gave him her buyer book. The buyer contacted her a few months later and bought a home with her.

Getting Established

Here’s another case study, about an agent named Christine. Not only does Christine hand out her books, she also hosts events to promote them to the public. As a relatively new agent, she’s only been using her Business Card book for a few months. So far, she has given out 50 copies. She’s focused on building her reputation in her community but has already used the books to get appointments with prospective clients.

“I’ve been calling them ‘Savvy Seminars for Homeowners,’” she said of the events she hosts.

Christine and her team invite members of the public to learn more about their business and home-selling strategies, then hand out the books. “Last time, which was just last Wednesday, we had 14 people come, and they all were interested in selling their homes. So, it’s really kind of been really successful for me."

Christine said she wrote a press release for the book. “I got some interest with that and also I give them out at open houses and offer them through social media.” She follows up with people by phone or email, “Then I put them on my weekly newsletter and I follow them on social media and try to keep in contact with them as much as I can.” She’s been gaining great exposure and plans to get the books into some local shops for giveaways.

2 Listings in Two Hours

Sharon has been a Realtor for 11 years. She said she was attracted to Authorify because she wanted to develop a competitive edge — some powerful way to differentiate herself from other real estate agents in her market.

She received a small number of free sample books with her name on the cover and was impressed. “The funny thing is, I see you guys marketing on Facebook a lot, but I’ve never seen the product actually in hand,” she said. She placed a few books on a coffee table in her office as an experiment, to see how her co-workers would react. The response was electric: “She’s got a book! She’s got a book! So awesome!”

She ordered more books, which arrived on a Friday. The following Sunday, she attended an event. She and another real estate agent met up with some clients, watched people milling around, and listened to the live music. “Then for an experiment, we sat at a table where I knew absolutely nobody. I threw two books on the table, and people started picking them up and looking at them,” Sharon said. “It was like fire: ‘This Realtor, she has a book!’”

“I got two listings on Sunday for people I never even knew because of the books,” Sharon said. “One is about $550,000; the other one’s probably going to be pitching in the [$800,000 range].”

Not surprisingly, Sharon decided she wants to order more books. “The way that people respond to you with the book … it just puts you at the top. You’re a professional in what you do. It’s not a business card.” She encouraged people to create books for themselves and to share books with their friends and family.

“I think it’s truly a great product,” Sharon said. “I’m really excited. I think that it’ll probably make me a lot of money this year, using it. It has something of value to it. It has something to hold onto. You’re not likely to throw your book in the trash; they’re always going to keep it somewhere in the house.”

To Summarize:

  • Events present a great opportunity to increase your brand awareness and build a name for yourself in your community.
  • Bringing your books to events — whether they’re trade-oriented or regular community gatherings — can help you establish an even greater impression.

Take Action:

With your book and this advice, you have everything you need to turn events into lucrative listing opportunities. Don’t miss out on your chance to get your name and brand out. Take 10 minutes and look up events in your area. Find the right opportunity, and get yourself involved. If you don’t take action, someone else will.

Other Marketing

Let's go in-depth to make sure you are building processes that will continue to bring in listings.